%20(1).png)
The new ServiceBoard
Efficient Project Organization and clear Clarity are crucial to the success of an IT systems provider. With our browser-based ServiceBoard We offer a powerful solution that simplifies complex processes and gives you a clear overview of the overall status of your projects and tickets at all times.
ServiceBoard is specifically designed to meet the needs of IT system integrators It is designed to provide comprehensive management of appointments, help desk tickets, and projects.
Thanks to the optimized User interface and the powerful full-text search you can find all the relevant information—from ticket numbers to internal notes—faster than ever before.
You can find installation instructions at ServiceBoard Installation (next).
Requirements
Before you can take full advantage of the new ServiceBoard’s features, certain requirements must be met. These relate to licenses, settings, and permissions.
1. Licenses
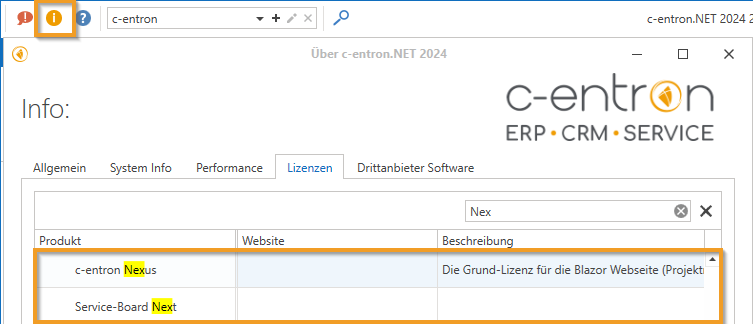
To use the new ServiceBoard, you must ServiceBord Next be available. This can be licensed separately, but is often already included in existing ServiceBoard packages. You will also need a valid license for the c-entron Nexus, which ensures access to the platform and its modules.
(If you don't have one, please feel free to contact our Sales.)
(NOTE: You can view which licenses you have in use in c-entron by clicking the orange (i) info icon in the upper-left corner under the "Licenses" tab, or by navigating to Global Settings – Administration – System – c-entron Licenses, or in the c-entron Connection Manager by clicking [Show Licenses], or in c-entron under Global Settings.)
2. Settings
To ensure that all features of the ServiceBoard can be used, the following key settings must be configured:
APIs and Integrations: To integrate external tools such as Microsoft Teams, TeamViewer, and Supremo, API keys or script tokens must be entered in each employee’s personal settings under “APIs.”

Calendar synchronization: Make sure that appointment synchronization with your Outlook calendar is configured correctly. You can do this in the general settings under "Calendar Sync."
3. Rights
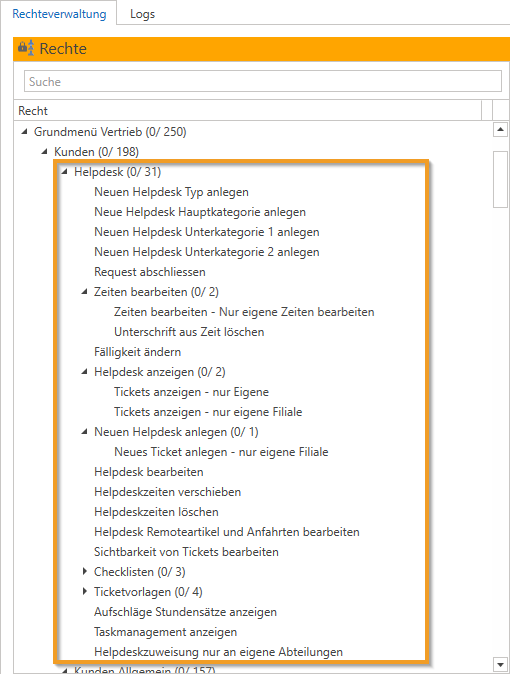
Access to the individual modules and features of the ServiceBoard depends on the assigned permissions:
Calendar rights: To access the calendar, the “Calendar” superuser right and the “View Calendar” right must be assigned. If you only want to view your own calendar, there is a restricted right called “View Only My Calendar.” This prevents the user from viewing other employees’ calendars.

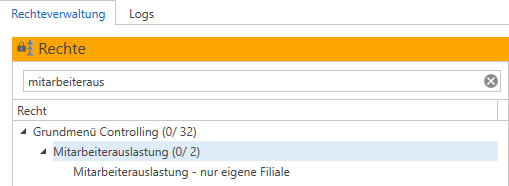
Employee utilization: This feature allows you to view other employees' workloads and schedule their appointments.
Ticket processing: You need permissions to create, edit, and forward tickets in order to use the ticket management system according to your needs.
Modules and Features in Detail
1. Ticket Management
The core function of the ServiceBoard is ticket management. Customer inquiries, orders, and internal tasks are managed here as tickets.
Create a ticket
You can create a ticket directly from the dashboard or via the ticket overview by clicking the "New" button.

Once you have located the customer (and the appropriate contact person), the following fields are important when creating a ticket:
Title: The ticket title should be clear and concise and should not exceed 100 characters. In the advanced settings, you can use text blocks to quickly create standard titles.
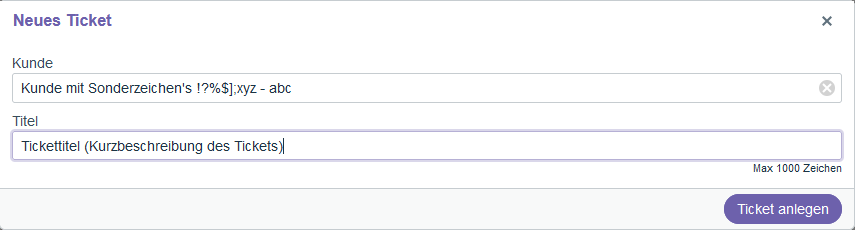
Description: The problem or task is described in detail here. We recommend providing as much information as possible so that the ticket can be processed quickly and efficiently.
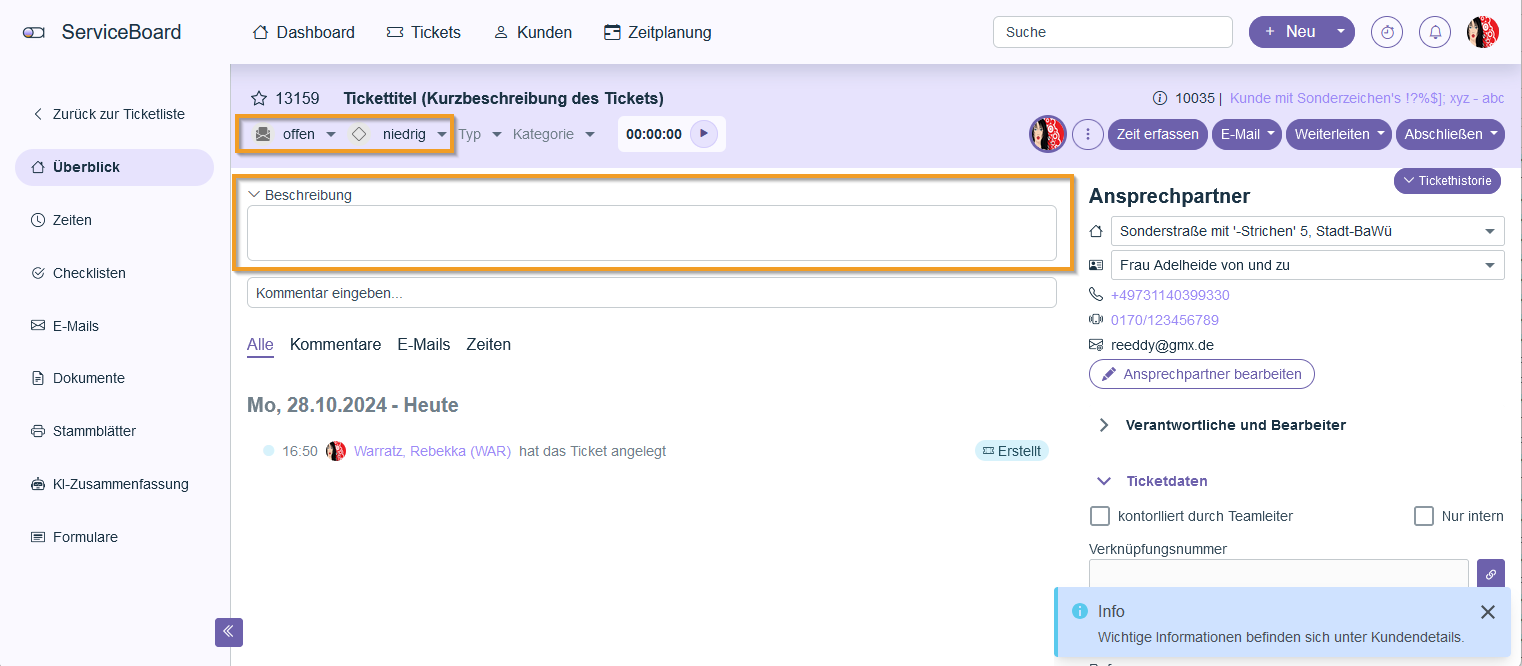
Priority and Status: Each ticket is assigned a priority (low, medium, high) and a status (open, in progress, closed). This information determines how the ticket is handled going forward.
Time tracking and stopwatches
While processing a ticket, time can be tracked using a built-in stopwatch.
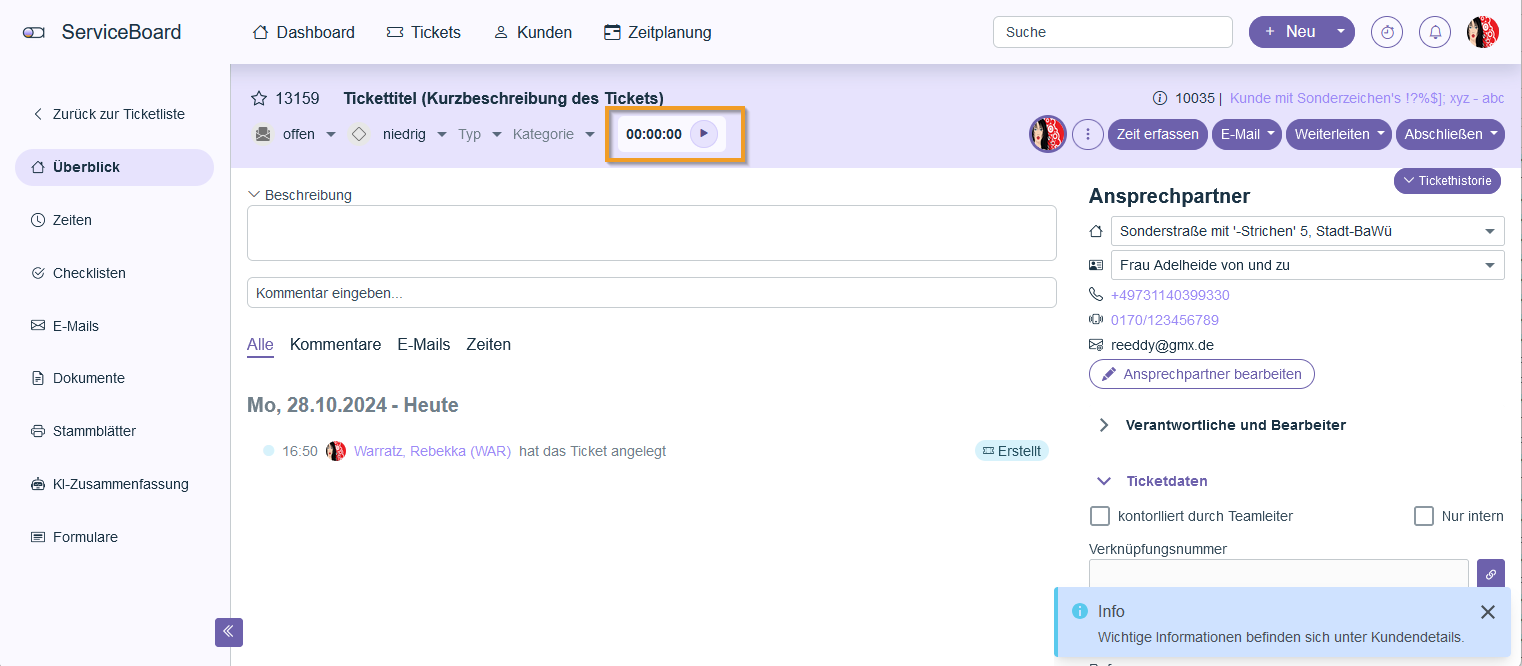
The recorded times can be edited manually or billed automatically at a later time. Using the scheduling feature, tickets can also be entered directly into the calendar and work hours can be assigned to them.
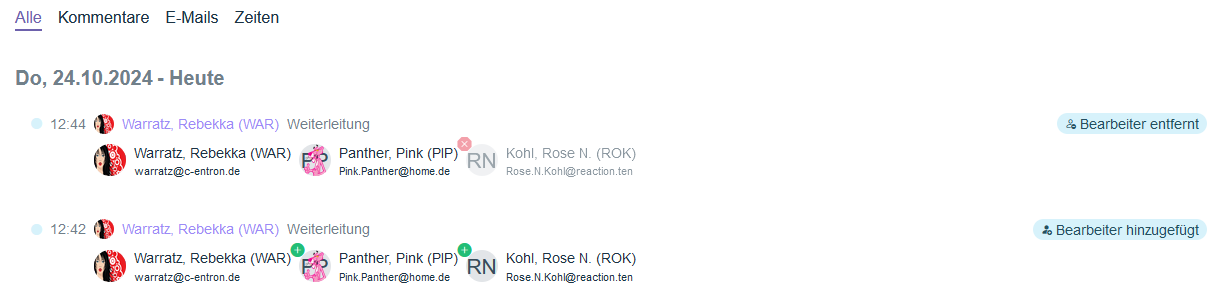
Forward tickets
Tickets can be assigned to other employees within the system. The ticket’s current status is carried over, so the assigned agent can continue to track the ticket’s history.
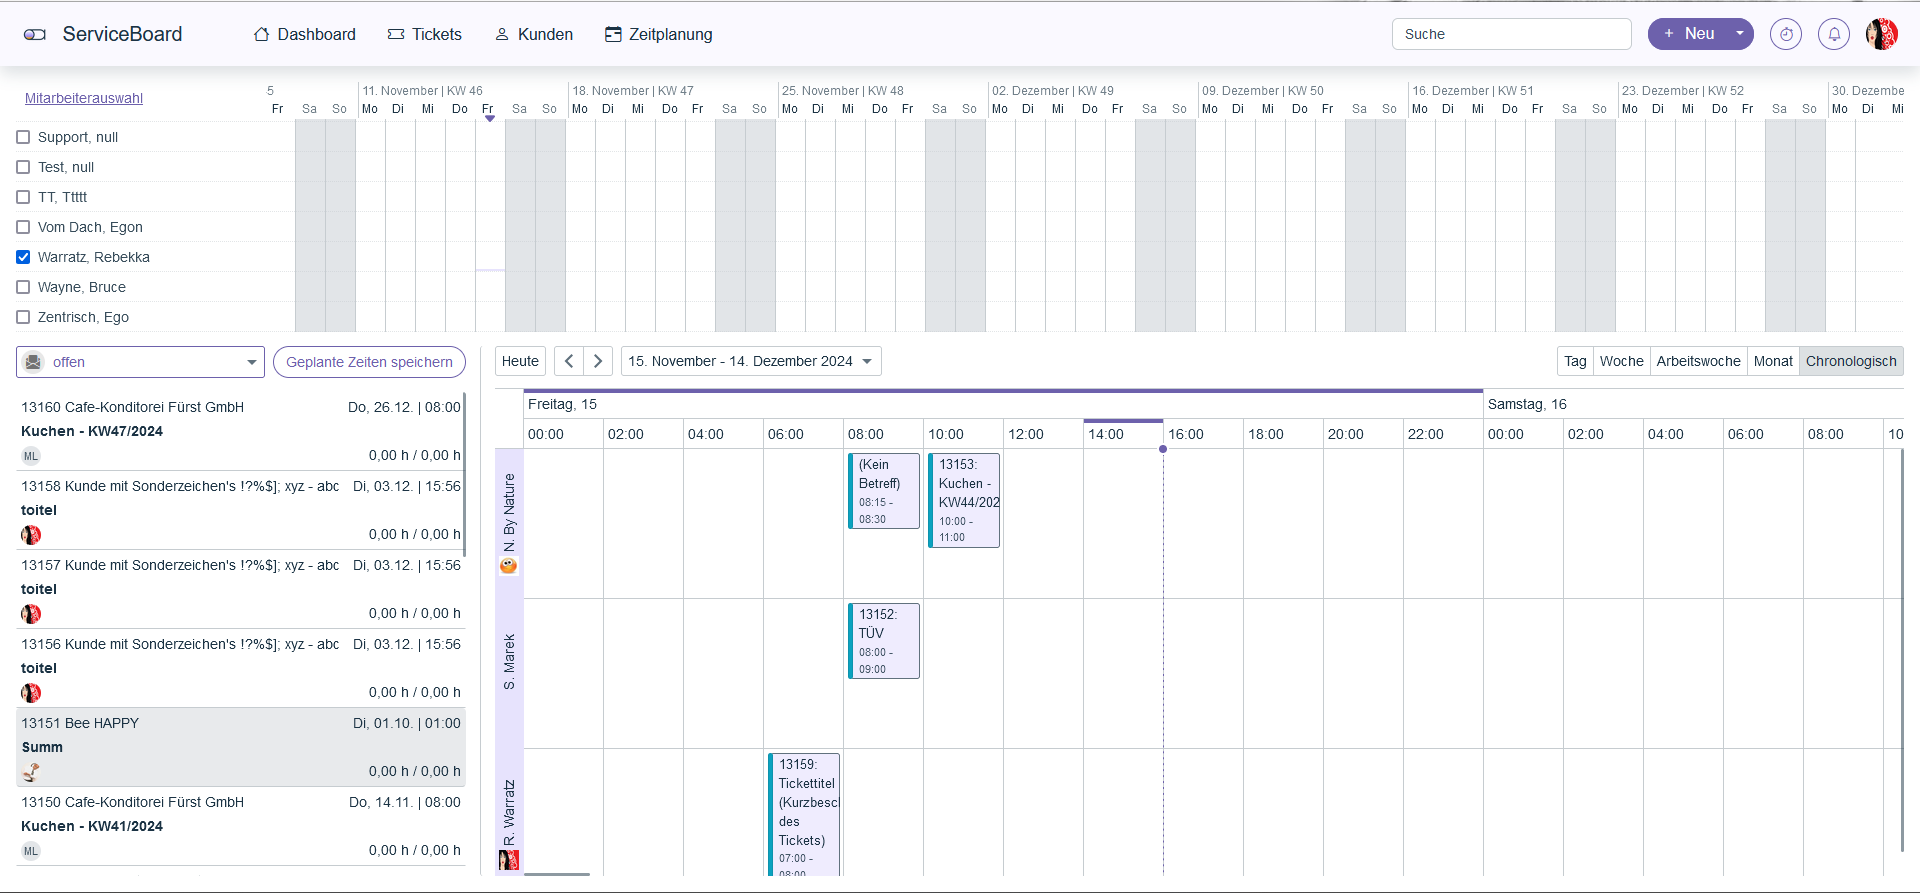
2. Scheduling
The scheduling feature in the new ServiceBoard makes it easy to schedule tickets with precision. The following functions are available:
Scheduling permissions
To take full advantage of the schedule, three rights are relevant:
Oberrecht Calendar
View calendar:
This permission allows access to the user's calendar. If you want to display only the user's own calendar, there is a restricted permission called "View Only Own Calendar." This prevents the user from viewing other employees' calendars.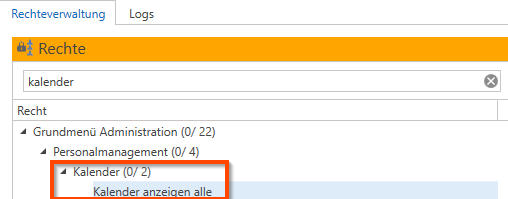
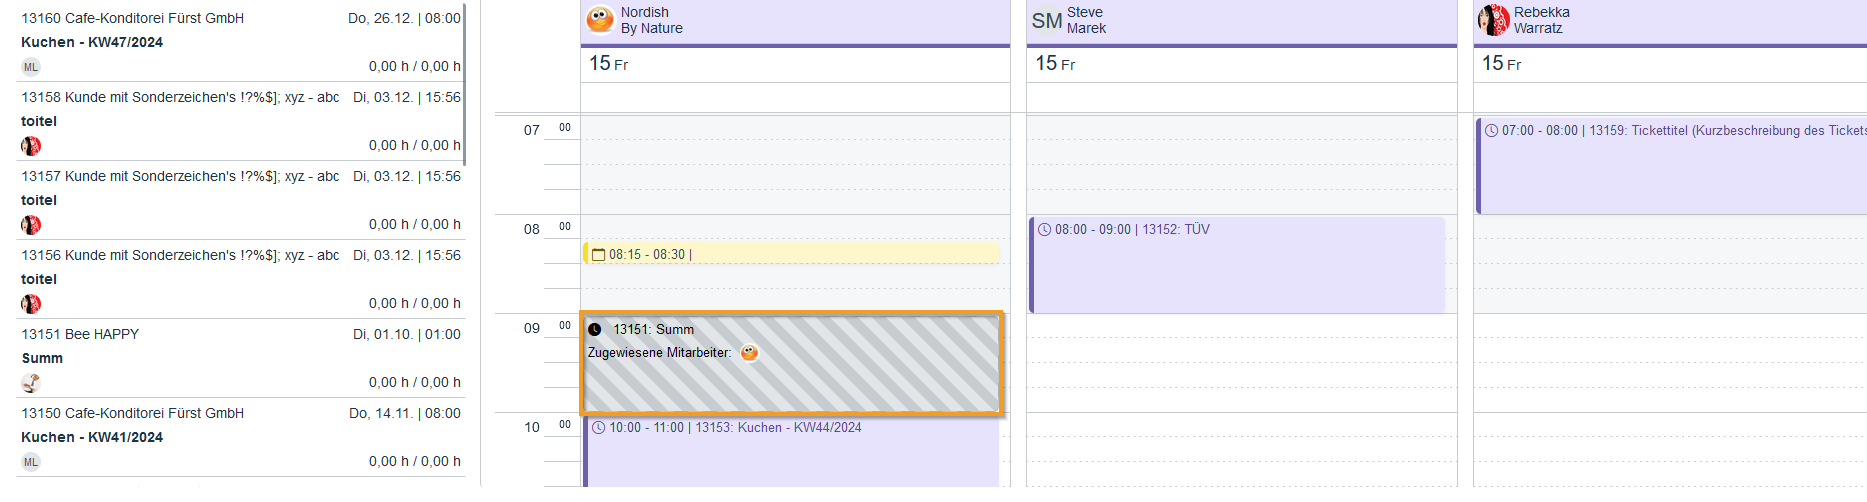
Employee utilization:
To view other employees' workload and their schedules in the calendar, the permission to view employee workload must be enabled.
Display of daily utilization
Once the appropriate permissions have been set, you can view both your own availability and that of your colleagues. The calendar displays availability using color-coded markers, allowing you to quickly see which employees are still available.
Plan when to buy a ticket
The scheduling feature allows you to set a scheduled time for each ticket. The following process is used:
Tickets with the corresponding status are displayed and can be dragged and dropped onto the calendar.

Dragging a ticket onto a calendar automatically creates a scheduled time slot.
Double-clicking on a time entry allows you to edit the time or assign additional employees.
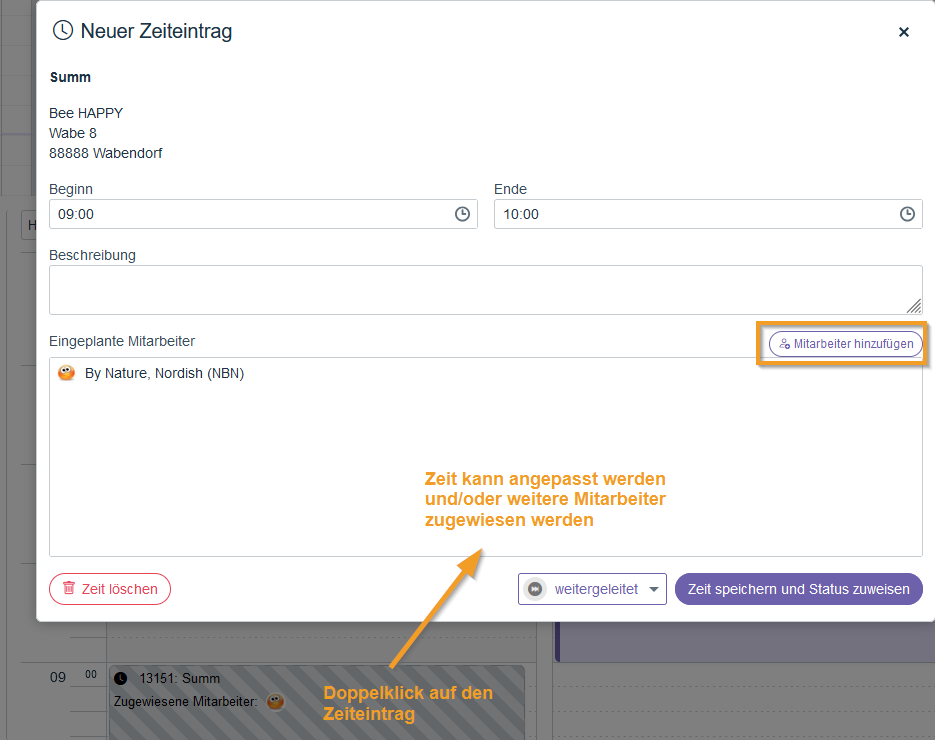
Editing time entries
You can open and edit any time entry by double-clicking it. This allows you to adjust times, change employees, or add details to the task at a later time.
3. Calendar Synchronization
![]() Available as a subscription: Pro · Ultimate
Available as a subscription: Pro · Ultimate
The new ServiceBoard offers comprehensive calendar integration, particularly with Microsoft Outlook. Thanks to calendar synchronization, appointments and tasks can be seamlessly synchronized between Outlook and the ServiceBoard.
Set up calendar sync
Synchronization is configured in the general settings under "Calendar Sync." There are two modes:
Synchronize all appointments: This process transfers all appointments from Outlook to ServiceBoard and vice versa.
Synchronize only scheduled appointments: In this mode, only scheduled appointments are synced, so tickets that have already been closed will not appear again in Outlook.
Link to time entries
Every calendar entry created in ServiceBoard is directly linked to a time entry. This means that changes made to the calendar automatically affect the time entries in the ticket. This link provides a comprehensive overview of scheduled and worked hours.
4. Using the c-entron ServiceBoard
Once successfully installed and configured, the Service Board offers a wide range of features to support your daily work.
Dashboard
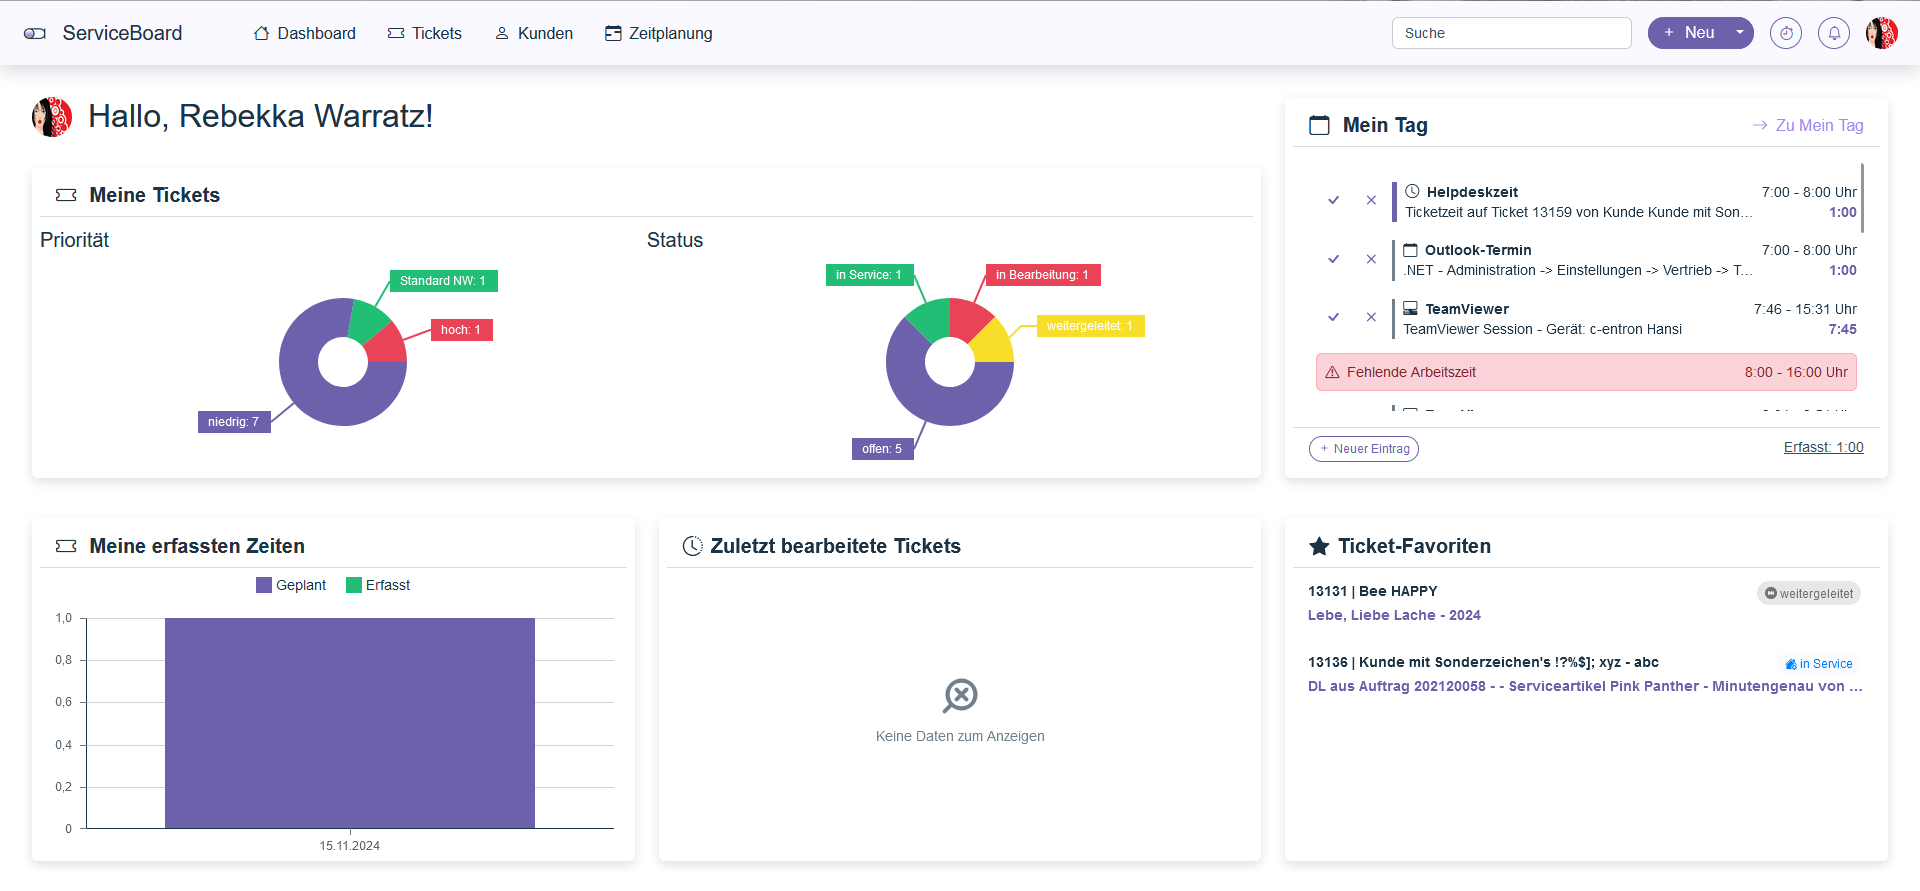
The dashboard is the central overview of ServiceBoard and provides quick access to relevant information and work data:
My tickets:
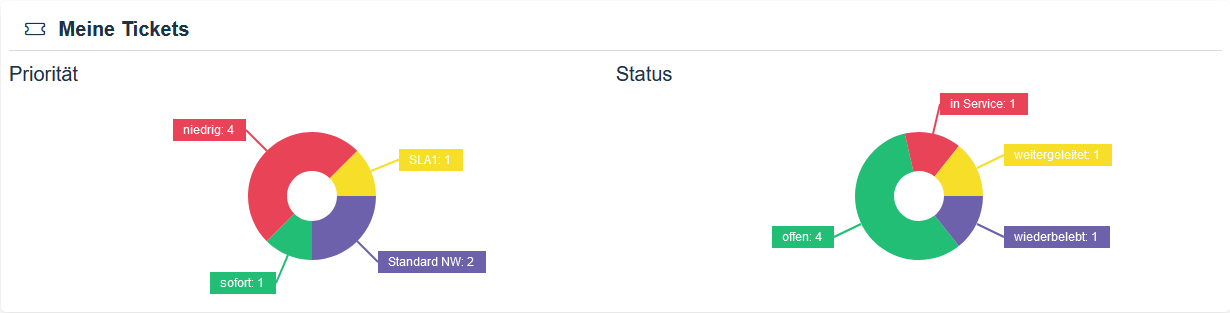
In this section, you will see All open tickets where you are listed as the owner or assignee. Tickets will be available at two charts shown – one shows the distribution by Priority, the other one after Status. This gives you a clear, at-a-glance overview of open, pending, or scheduled tickets, as well as their priority levels. This makes it easier for you to quickly assess your current workload.
My Day:
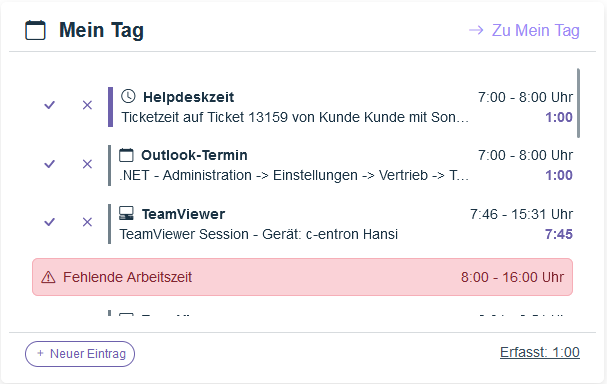
The "My Day" feature is fully integrated into the dashboard and replaces the previous menu function. It provides a centralized overview of your daily activities, such as TeamViewer sessions, phone calls, and Outlook appointments, which are automatically detected and can be added with a single click.
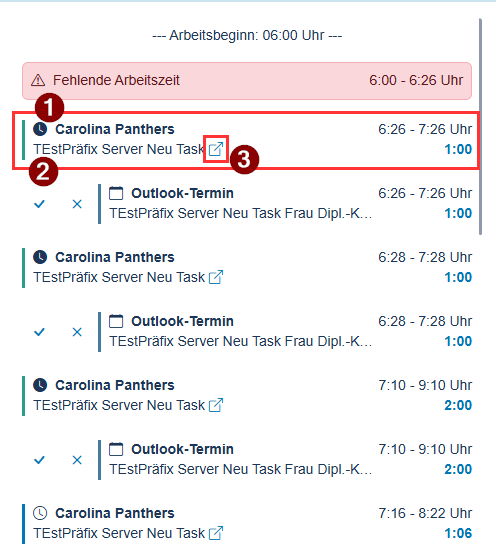
You can also manage and review the work hours you’ve logged. Both automatically recorded (ticket/help desk) times and manually added entries are clearly displayed. Missing work hours are clearly highlighted, so you can easily add or correct them. This integration provides a clear structure and makes it easier to organize your daily tasks and appointments.
My recorded times: 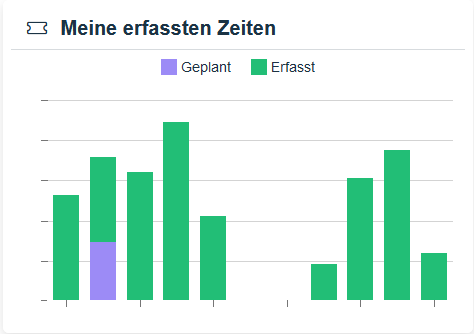
This feature provides an overview of your recorded and scheduled working hours for the current day. You can see at a glance whether you have already met your daily work requirement—for example, 8 hours. This provides valuable support for your daily planning and allows you to track your time efficiently.
🆕 New recurring entry (Available starting with release 2.0.2605.x)
In “My Day,” you can now also create “new recurring entries”—for example, for vacation, sick leave, training, or other absences. In addition to the standard options available for a “simple new entry,” this feature allows you to select the days using the “From” and “To” dates, as well as the number of days in the selected time period. (1) Using the “Weekend” checkbox below, you can control whether the entries in the selected time period should also be created for Saturdays and Sundays or only from Monday to Friday.
Using the “Entire Week” and “Entire Month” buttons (2), you can quickly set the “From” and “To” dates to the respective days of the week (Monday through Sunday) or from the 1st to the last day of the month (based on the “From” date).
The “Start” and “End” dates, as well as the break (3), are determined by the “My Day” settings of the logged-in user (c-entron → Global Settings → MyCentron → My Day → Working Hours) and can be adjusted as desired for the appointment.
The “Type” (4) and the “Description” (5) can be entered in the same way as for a “simple” appointment.

🆕 Automatic update (Available starting with release 2.0.2605.x)
When a new appointment is created in “My Day,” you no longer need to manually refresh the page to see it; instead, the page now automatically reloads after saving, so you can find the appointment right in the left sidebar.
🆕 Ticket identification (Available starting with release 2.0.2605.x)
To make it easier to identify, the ticket times have been changed in the display. Previously, they were shown as
Line 1: “Ticket processed” and Line 2: “Ticket 12345 processed”
This is now displayed more clearly: Line 1: “Customer Name” (1) and Line 2: “Ticket Title” (2), as well as a direct link (3) to open the ticket in a new tab.
Most recently edited tickets:
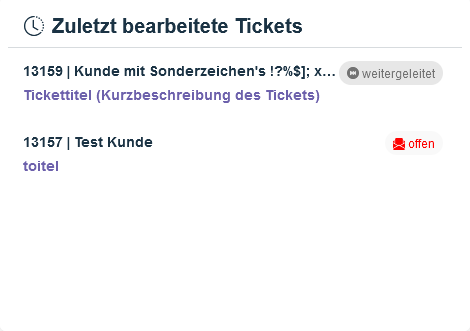
In this section, you will find a Overview of the tickets you've recently edited. With just one click, you can go directly to the relevant ticket. This gives you quick access to current tasks and makes it easier to get back to work without any detours
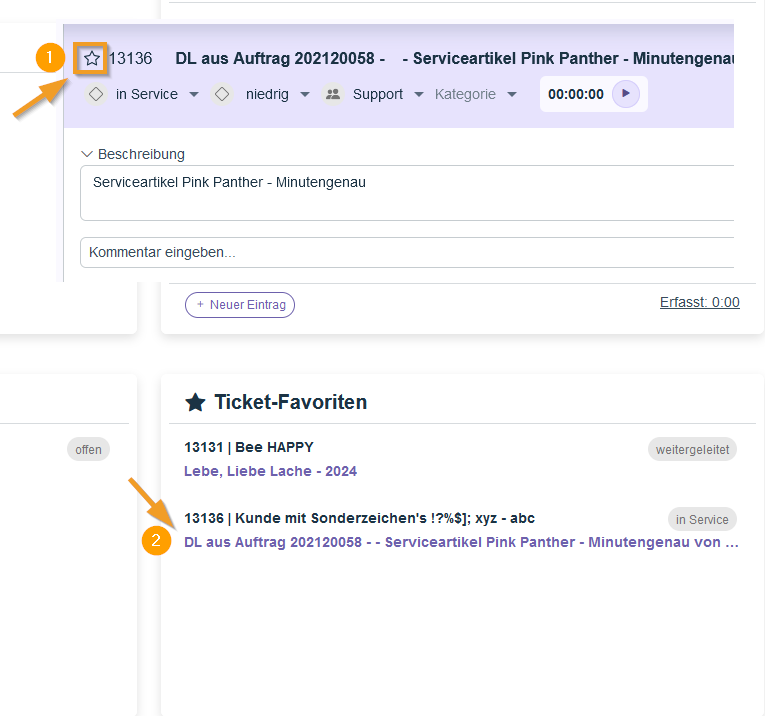
Ticket Favorites:

You can easily save tickets that you need frequently or that are high priority as Favorites Mark them by clicking the star icon in the open ticket. These marked tickets are accessible directly from the dashboard, allowing you to quickly access them and efficiently manage frequently processed cases.
Right-click to edit:
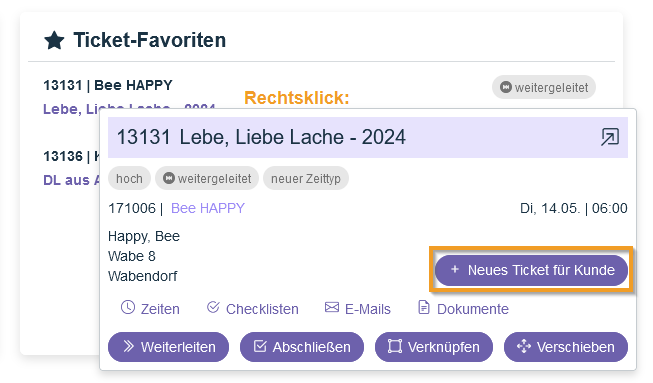
You can easily open and edit tickets by right-clicking on them. New tickets can be created directly from your favorites, which makes your workflow even faster.
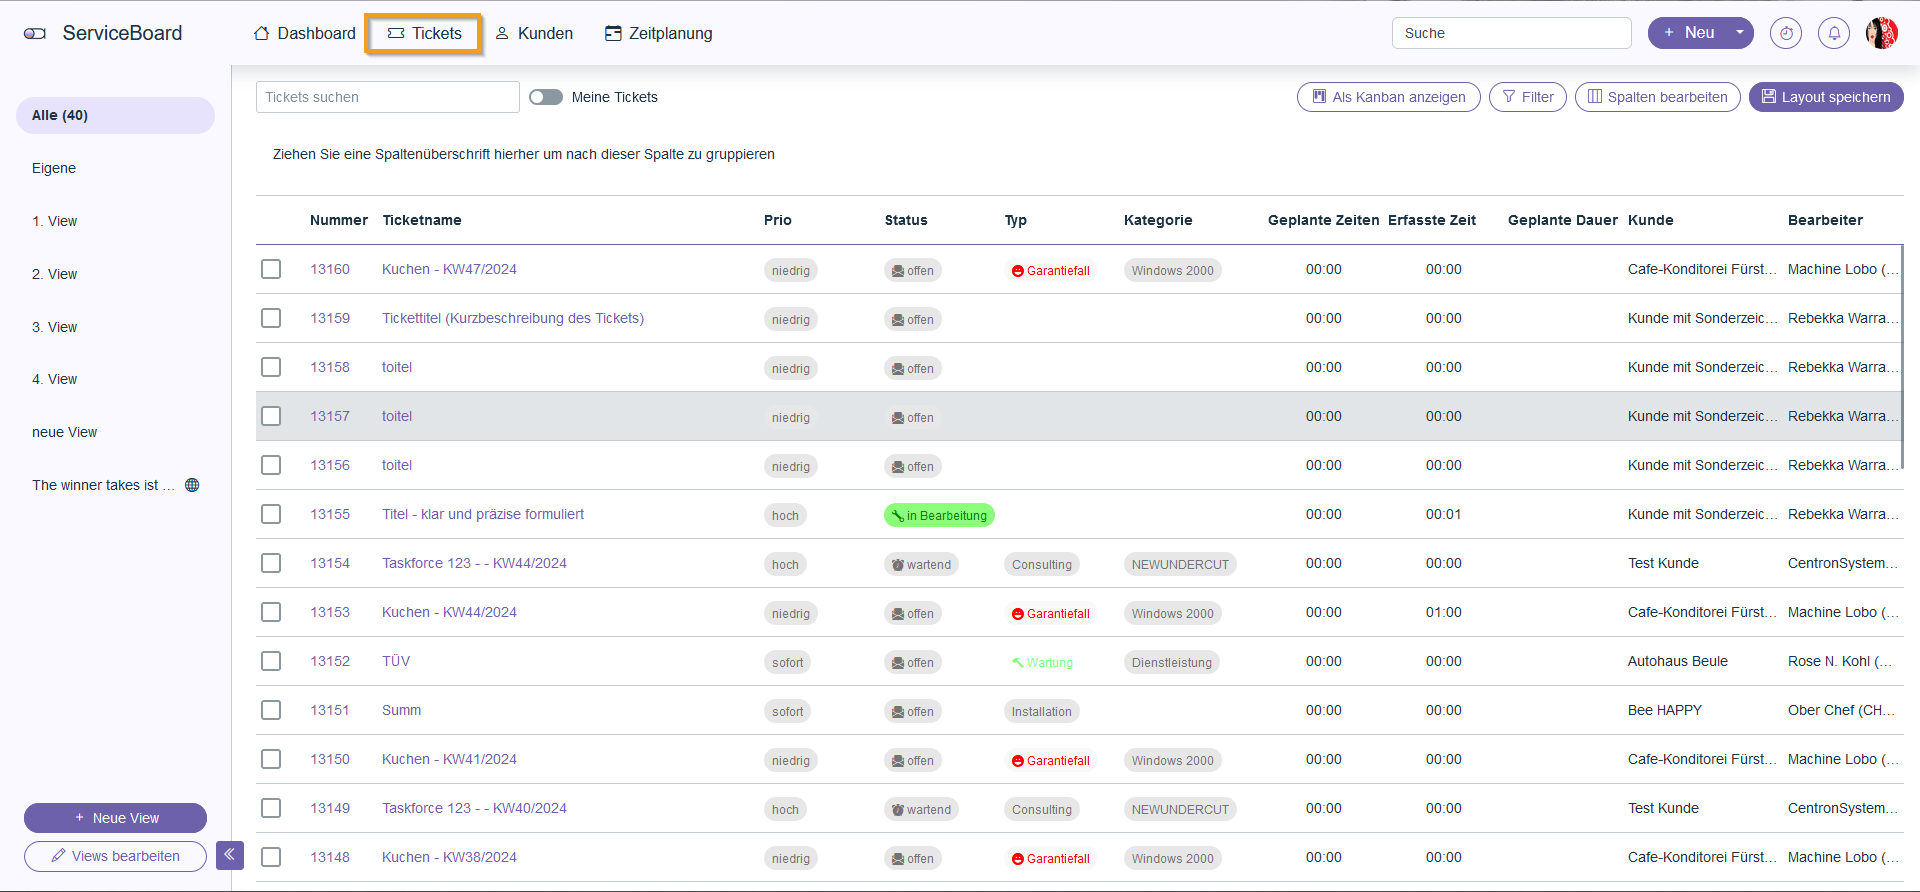
The Ticket List
The ticket list offers extensive customization options and has been enhanced with new viewing and sorting features:
Views - Custom and global views for tickets:
With the customizable views, formerly known as Dock Panels, allow you to Ticket List customize it to suit your needs. Adjust the size and order of the columns, add new ones, and display important information such as assignee icons or priorities. You can save your changes so that your preferred layout will be retained the next time you use it. You can global views create and save, which also apply to your available to the entire team This way, you can work more efficiently and always stay on top of things.
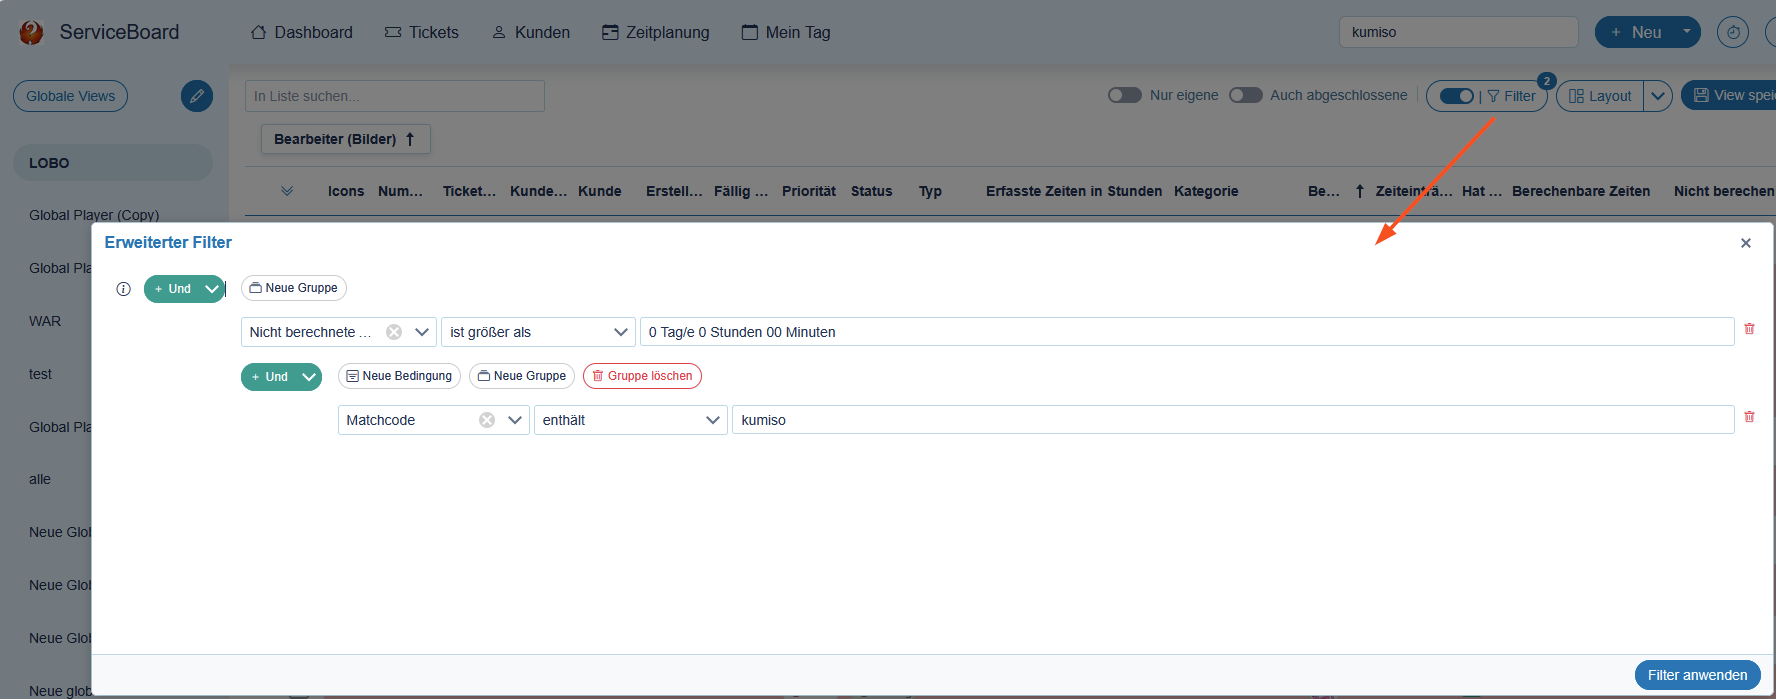
Filters - Efficient filtering options for your ticket list:
With the versatile filter options you can Ticket List narrow down results based on specific criteria, such as customers, priorities, or ticket status. Combine multiple filters to create precise views, and save them for easy reuse. Changes to the filters take effect immediately, so you always see the information that’s relevant to you at a glance.
Kanban view – enables flexible work:
Keep your tickets organized with the Kanban view, which can be sorted by status, priority, or type. With a intuitive drag-and-drop feature Tickets can be easily moved between columns (buckets), and their status is updated automatically. Customize the view to suit your needs—for example, by hiding columns (buckets) you don’t need—and make your workflow as efficient as possible.
Ticket Details
The ticket details provide a central location for all information and activities related to a ticket:
Live communication:

The Live communication enables by multiple users at the same time work on a ticket without any editing locks. Changes and comments are in Real-time synchronized, ensuring that collaboration remains efficient and seamless. Profile pictures of active contributors and time logs are immediately visible, so everyone involved can always see the current status. These real-time updates promote smooth teamwork, especially when multiple technicians are working on tickets simultaneously.
🆕 What's New (Available starting with release 2.0.2605.x)
🆕 Sums of times (Available starting with release 2.0.2605.x)
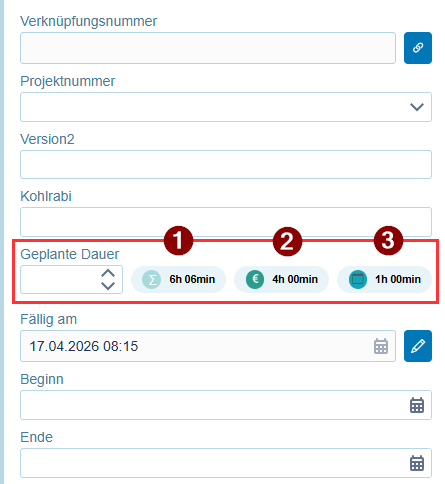
In the ticket "Overview," next to the "Planned Duration" field, you will now see the "Totals" for "Total Recorded Times," "Estimated Times," and "Planned Times."
🆕 Responsible Persons and Processors (Available starting with release 2.0.2605.x)
The field Responsible Persons and Processors is now one of the most requested features open by default is displayed and can, of course, be closed if necessary.
🆕 Internal memo (Available starting with release 2.0.2605.x)
The Internal memo is now included as a standard feature, having been one of the most requested features always displayed immediately, rather than only when it is shown or when data is already available.
New feature when modifying the contract or MSP service (Available starting with release 2.0.2605.x)
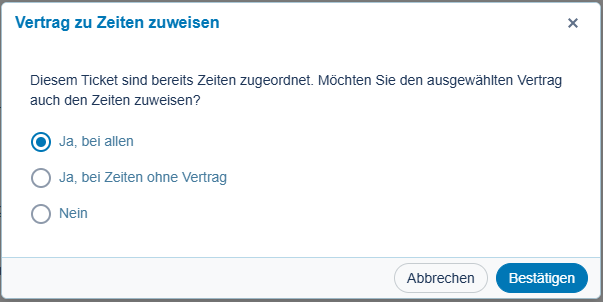
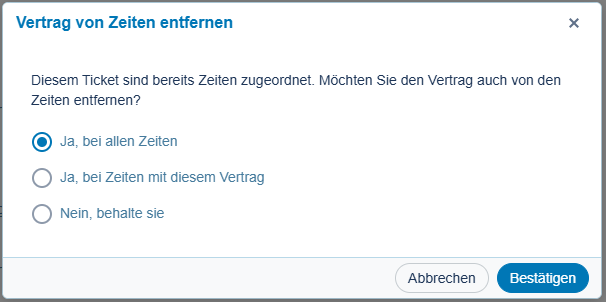
If you add, change, or remove an MSP service or contract in a ticket for which at least one time entry has already been recorded, a prompt will appear asking whether you want to keep the selected or deleted service or contract
of all time
all periods without service/contract” or
No -> no time
want to add or remove. This allows you to correct the situation “in one step” if, for example, the wrong contract or service was assigned to the ticket, or if you forgot to assign a service or contract to the ticket—resulting in the times not being assigned to the desired service or contract either. Depending on your selection, your choice (no service/contract or the selected service/contract) will then be assigned to all times or those “without a contract.”
Note: For periods with MSP services, only the service can be changed, since the contract is always automatically determined (and, if necessary, modified) based on the service selection.
Comment feature:
With the built-in comment feature Colleagues can communicate directly within the ticket. By using mentions (@Name), specific people are notified and immediately receive a Real-time notification. This feature supplements or partially replaces internal notes while remaining flexible and optional, designed to support individual work styles.
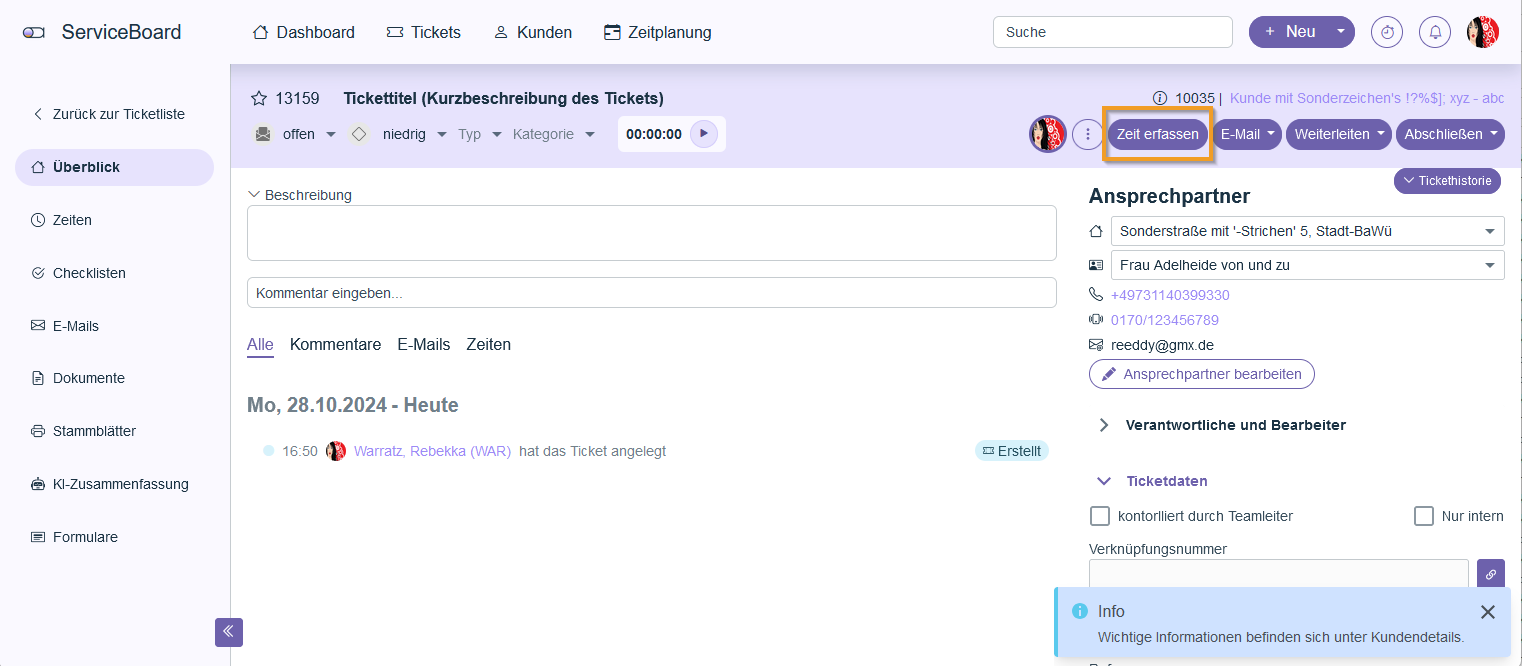
Track time:
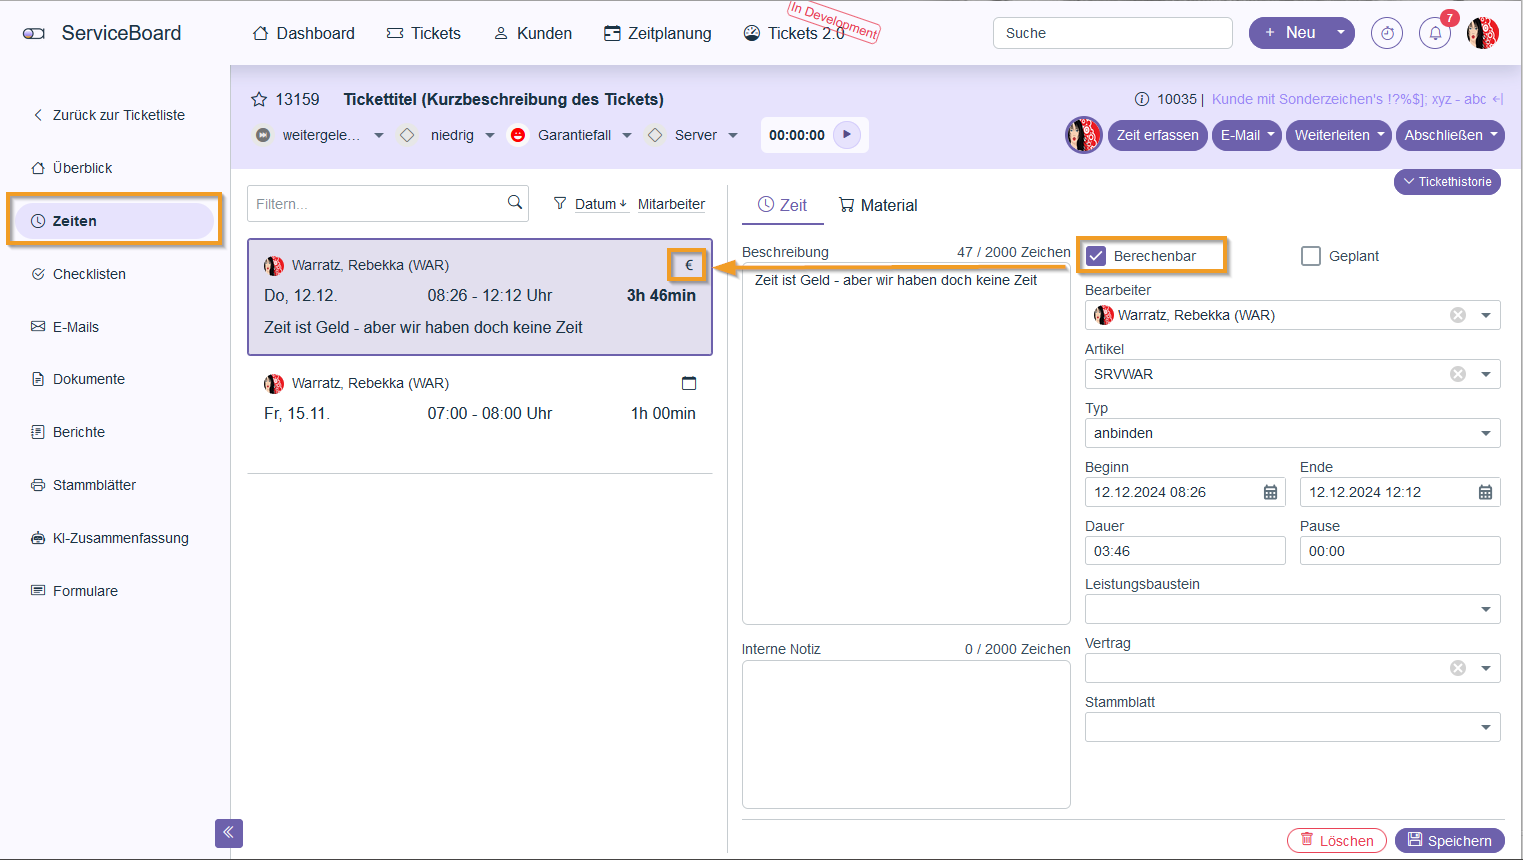
The Time entries are visible directly in the ticket and clearly indicate billable hours with a euro symbol. Hours can be easily added or edited directly on the ticket, making it efficient to track and bill for work performed.
🆕 What's New in the "Times" Section (Available starting with release 2.0.2605.x)
🆕 Total time (Available starting with release 2.0.2605.x)
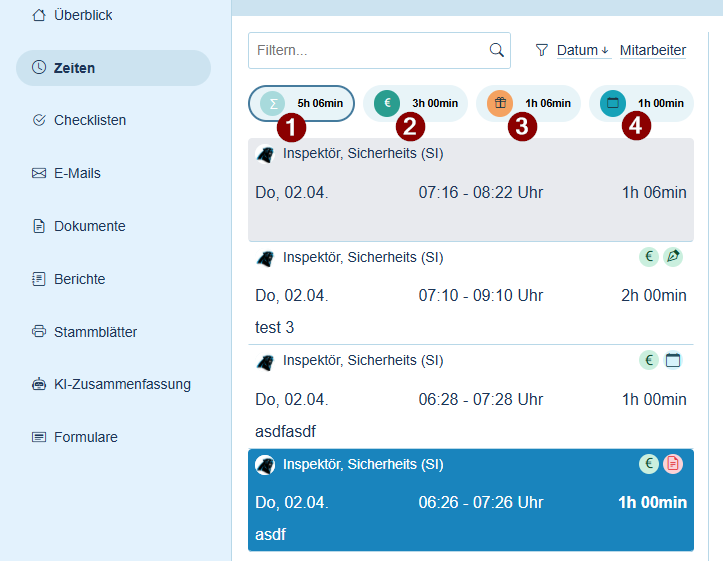
When you select the “Times” section in the ticket, you’ll now see, above the list of times, the four totals for “Total recorded times” (1), “Billable times (excluding planned)” (2), “Non-billable times” (3), and “Planned times” (4). You can also use a quick filter function by simply clicking on the respective total; the list of times will then be “filtered” to show only the times that belong to that total. The selected items are highlighted with a small border.
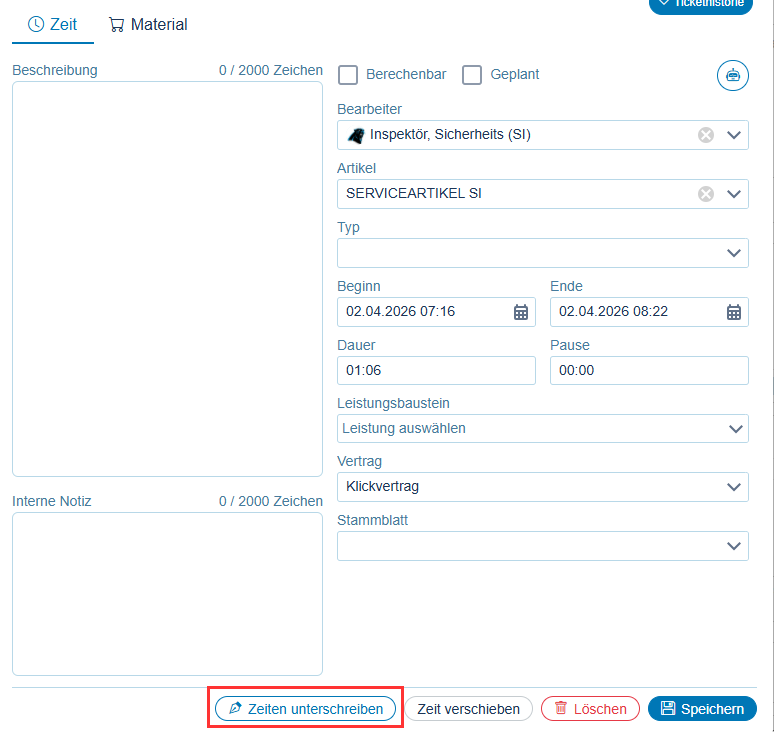
🆕 Sign the times (Available starting with release 2.0.2605.x)
You can now have your client sign off on times directly. To do this, select a time and click the new “Sign off on times” button in the bottom right corner.
A window will now open where you can select which times should be signed from among all the times that are “unplanned,” “not yet calculated” (transferred to the delivery note/invoice), and “not yet signed.”
The selected time is preselected, and you can now choose which times to sign from the list of available times on the left (1). To the right of that, you’ll find the “Type” for each selected time slot, as well as the “Start” and “End” times and their descriptions (2). Below that is the signature field for “all selected times” (3). The signature can also be “reset” (4) to sign again.
In the footer, you can either “Cancel” the process or confirm the signature. The “Sign x times” button (5) also shows how many times you’ve selected and how many will now be signed with this signature.

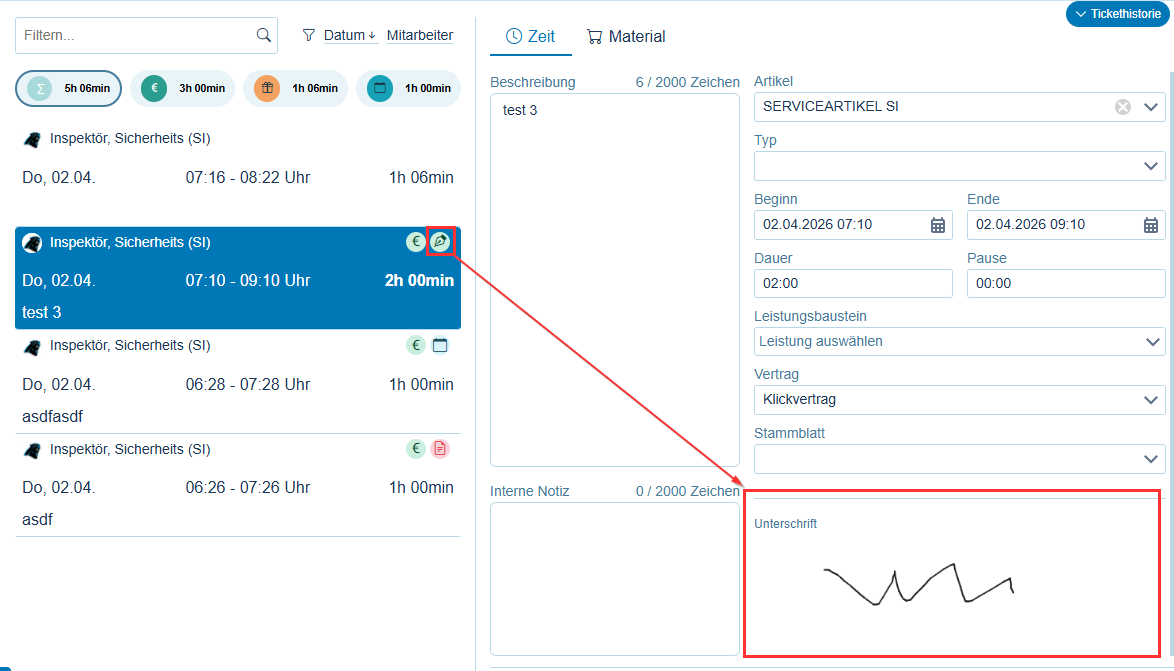
🆕 New Icons for the Times (Available starting with release 2.0.2605.x)
Two new icons have been added to make it easier to quickly identify and view the "status" of the times.
Times that have been "signed" are marked with a "pen" icon in the time list, and the signature also appears in the bottom-right corner of the time entry.
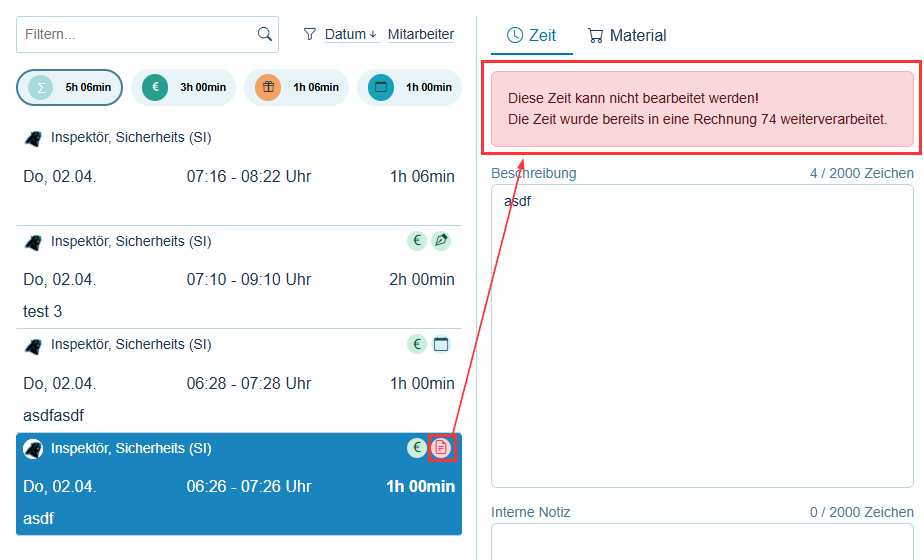
Times that have already been billed on a delivery note or invoice are marked with a “document” icon. In addition, the document number is displayed at the top of the time entry so you can quickly see which document the time was billed to.
🆕 New columns and filtering options (Available starting with release 2.0.2605.x)
In the ticket overview, the "From" and "To" columns have been renamed "Start" and "End." In addition, these fields can now be used as filters, allowing tickets to be narrowed down based on specific time criteria and displayed clearly.
The ticket lists now include the option to filter views by matchcode (address code).
Ticket history:
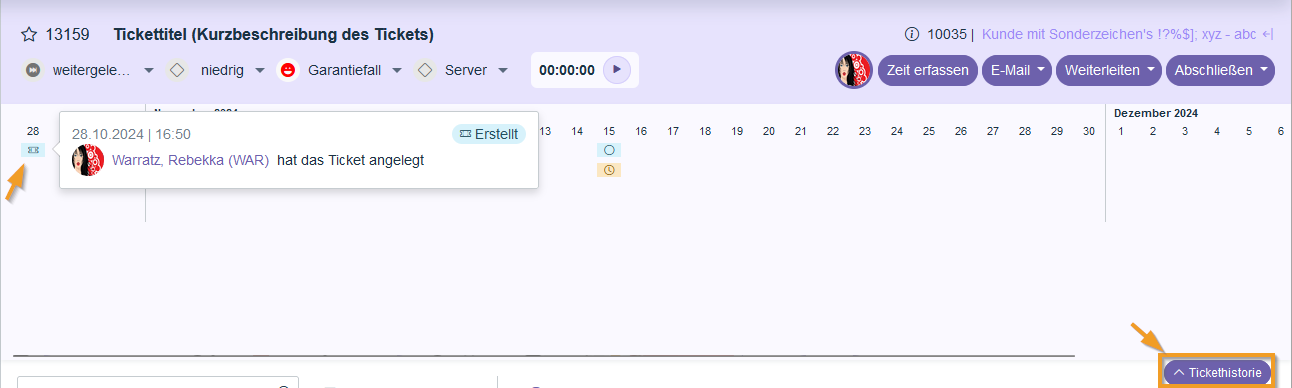
The history offers a A comprehensive overview of all past promotions within a ticket, such as changes, recorded times, or sent emails. It effectively supports the tracking and documentation of ticket activities, ensuring transparency regarding the processing history at all times.
Editing contacts:
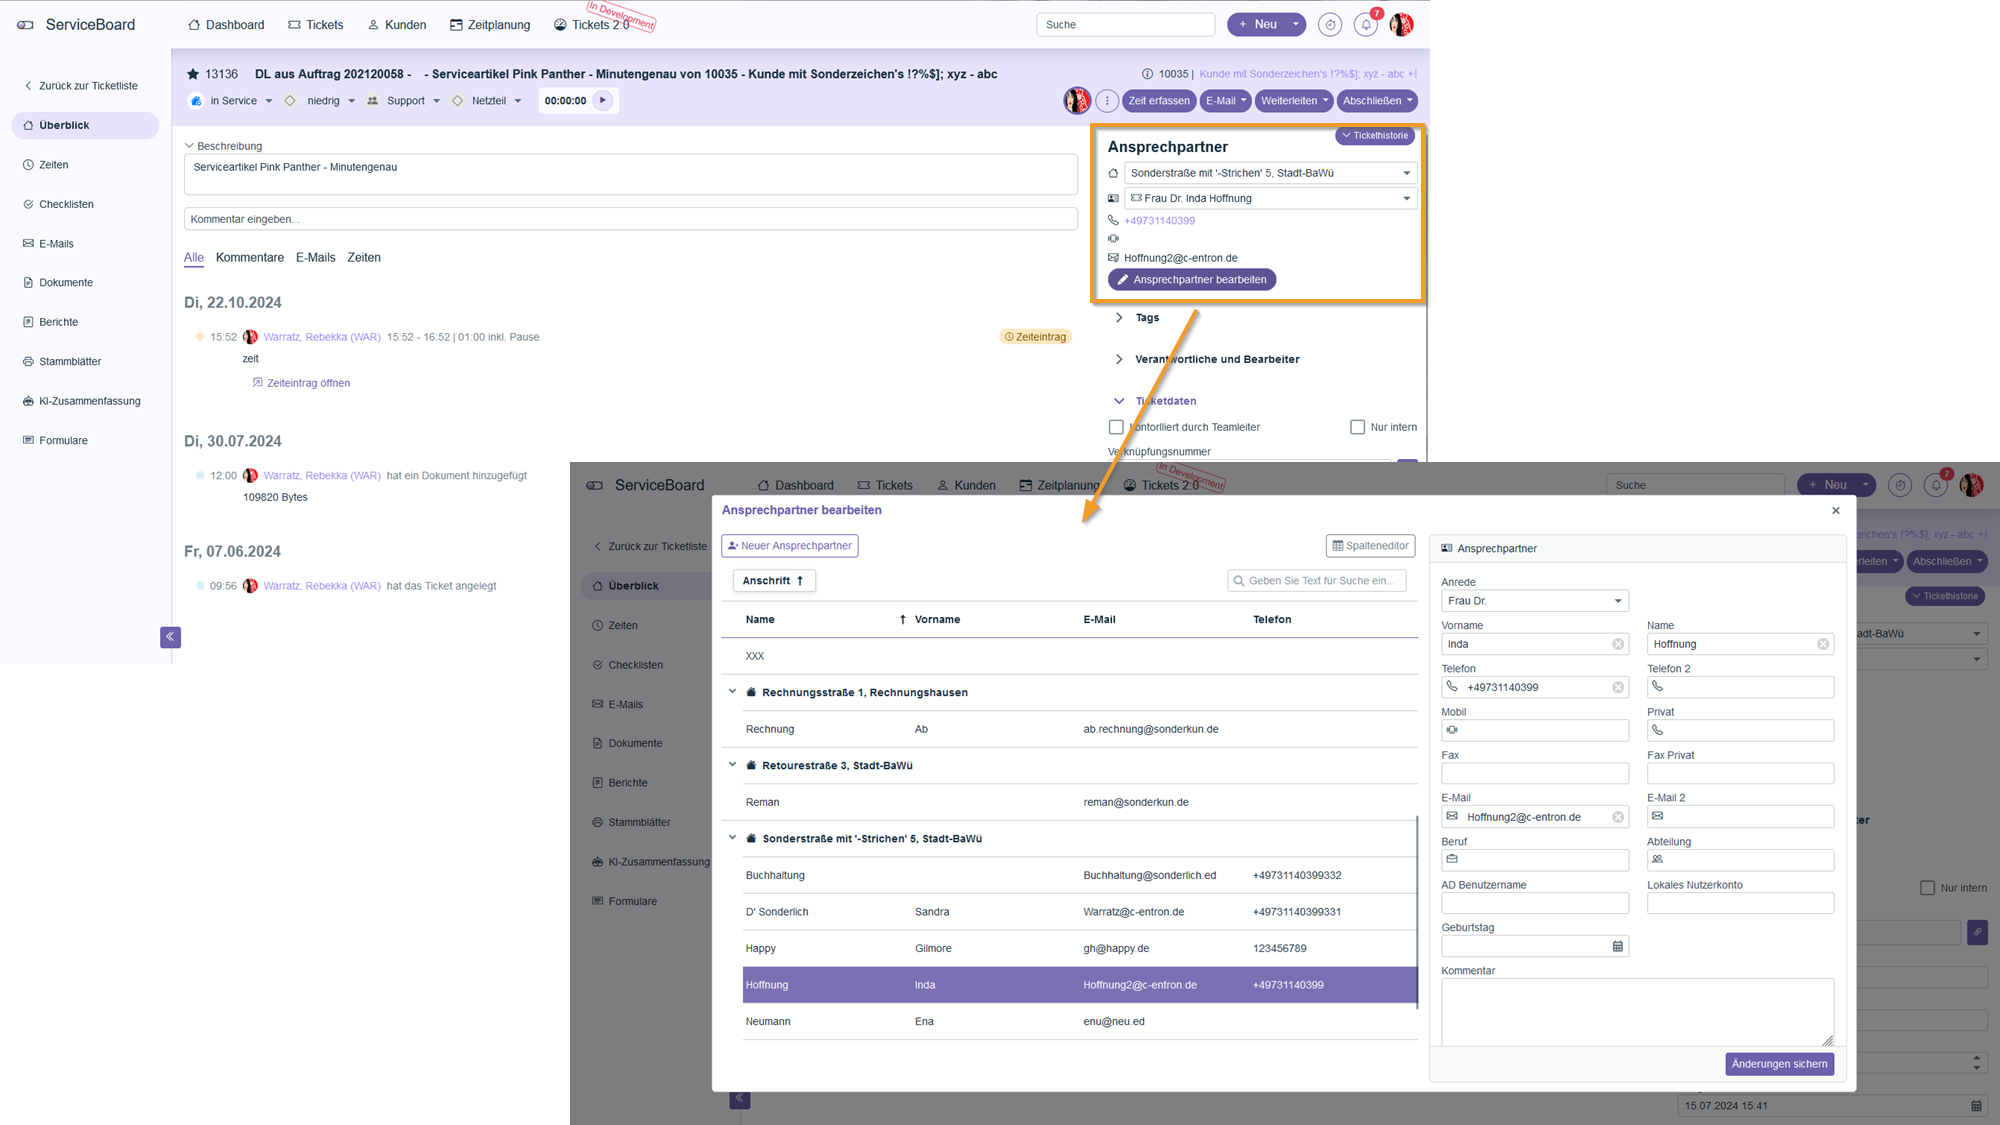
Contact person can directly in the system edited or added depending on the respective permissions. Changes, such as updating a name after marriage, can be made quickly and easily to ensure that the information is always up to date.
5. Communication and Integration
TeamViewer and Supremo Integration
ServiceBoard offers direct integration with the tools TeamViewer and Supremoto perform remote maintenance quickly and efficiently. To use this integration, you must enter the API keys for the respective tools in your personal settings.
TeamViewer:
The TeamViewer script token is generated in the TeamViewer Management Console and then stored in the employee's personal settings.
In the ticket overview, the "From" and "To" columns have been renamed "Start" and "End." Additionally, these fields can now be used as filters, allowing tickets to be narrowed down based on specific time criteria and displayed clearly.
The ticket lists now include the option to filter views by matchcode (address code).
Supremo:
An API token must also be stored in the global settings to use Supremo.
Microsoft Teams Integration
ServiceBoard also supports the integration of Microsoft Teamsso that calls and meetings can be managed directly through the ServiceBoard. This feature is made possible by integrating the Microsoft Graph API. In the API settings, the "Calendars Read/Write" and "Call Records Read All" permissions must be enabled.
6. Additional features and settings
Icons and Color Scheme
Categories and priorities can be assigned icons and colors to make it easier to identify tickets at a glance.
Dark Mode
To reduce eye strain, you can switch the entire service board to Dark Mode.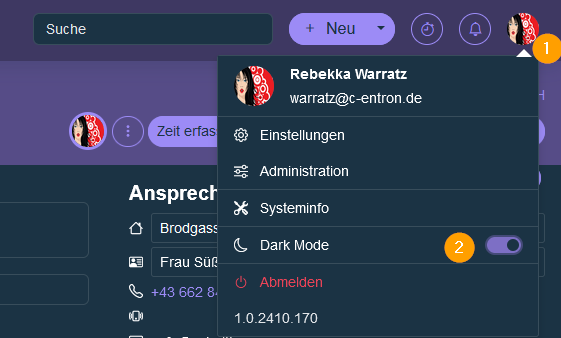
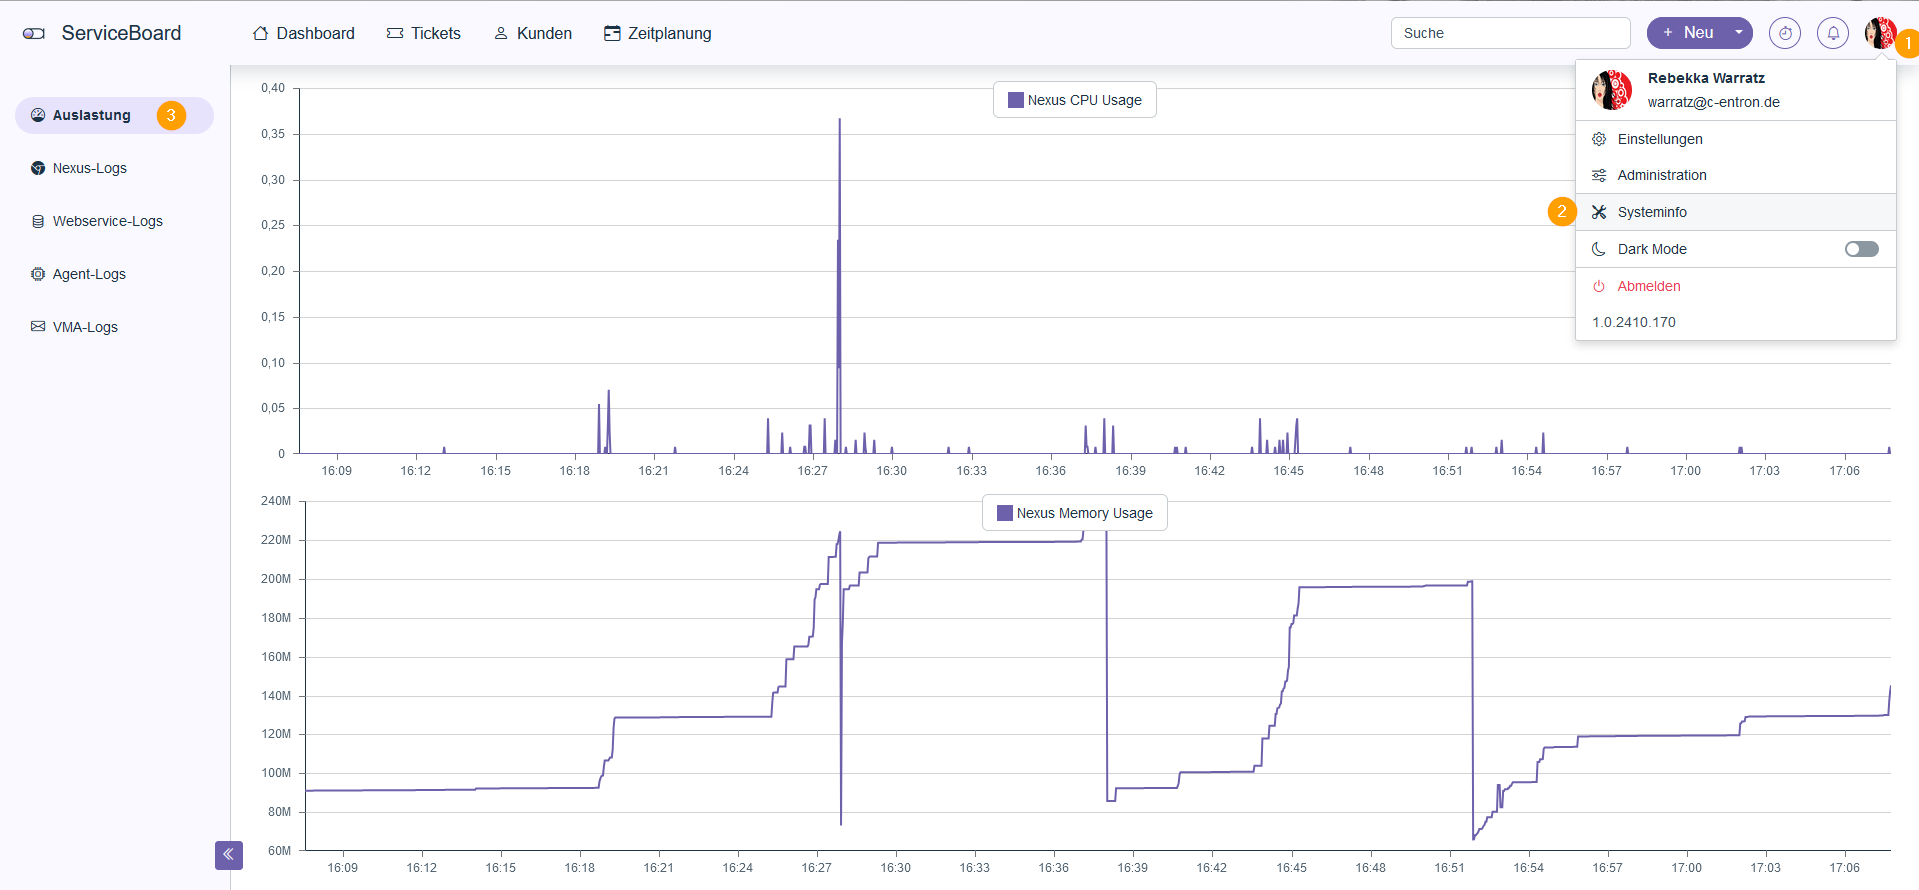
System Information
Administrators have access to system information such as system load and log files. This information helps them monitor system performance and diagnose problems.
7. Reports and Analyses
The new ServiceBoard allows you to create Service Reports directly from the ticket. These reports contain all relevant information recorded while the ticket was being processed, including the times logged, comments, and any attached files.
Create a service report:
The report can be generated and sent to the customer either immediately upon closing a ticket or at any time during the processing of the ticket.
Attached files:
Any files added to a ticket can be automatically attached when the service report is sent.
🆕 Attach service report (Available starting with release 2.0.2605.x)
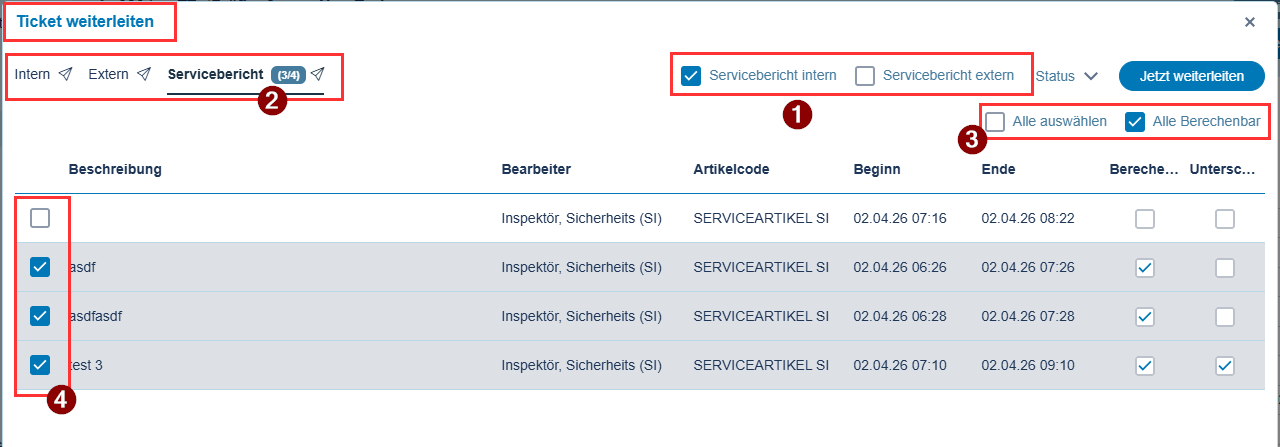
You can now attach the "Service Report" to any email as soon as a "recipient" is specified. To do this, simply check the box for "Service Report." For emails involving "internal and external mail" (forwarding & ticket closure), you can choose separately whether to attach the Service Report and to which email (1).
If you have enabled the service report, you will see the “Service Report” tab displaying the number of selected time slots—for example, “3 of 4 time slots selected” (2). You can also click to select or deselect “All” or to select or deselect “All Calculable” time slots (3). The standard email report for “Internal/External Helpdesk” will then be used, as you have configured it in Report Management—depending on whether it is an “internal” or “external” email. In the left-hand selection list, you can now choose which times should be included in the report, and the two right-hand columns show whether these times are “Calculable” and have already been “Signed.”
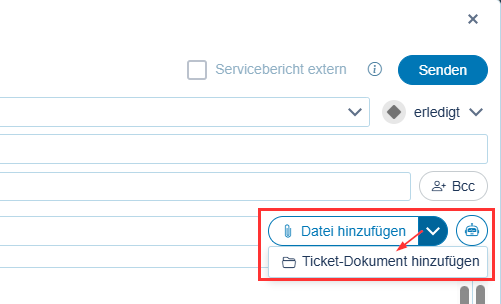
🆕 Attach ticket documents (Available starting with release 2.0.2605.x)
In any email, you can click the “Add File” button to select and attach a “regular, saved” file. Now you can use the small arrow next to it to attach a file that is available in the “Ticket Documents.” This allows you to access and attach solutions or files more quickly and easily if they are already in the ticket, without having to save them locally first.
8. User-friendly features
Favorites
Important tickets can be marked as favorites for quick access. This makes it easier to manage and process particularly urgent or recurring tasks.
Quick Access to Tickets and Time Entries
Each time entry and ticket can be opened and edited with a simple double-click. This feature saves time and allows you to quickly access important information.

9. CRM Activities
Starting with version 2.0.2602.x, CRM activities are also available in ServiceBoard Next.
You can find this in the customer overview in the side menu under "CRM".
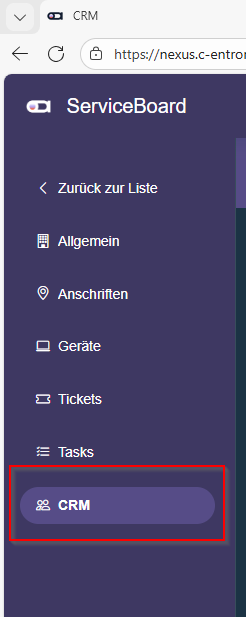
There, you'll see an overview of the customer's pending CRM tasks and can manage them in much the same way as you would in the c-entron application.
The view is divided into two sections:
(1) the Search and Filter Section
(2) the Scope of work
Search and Filter Section
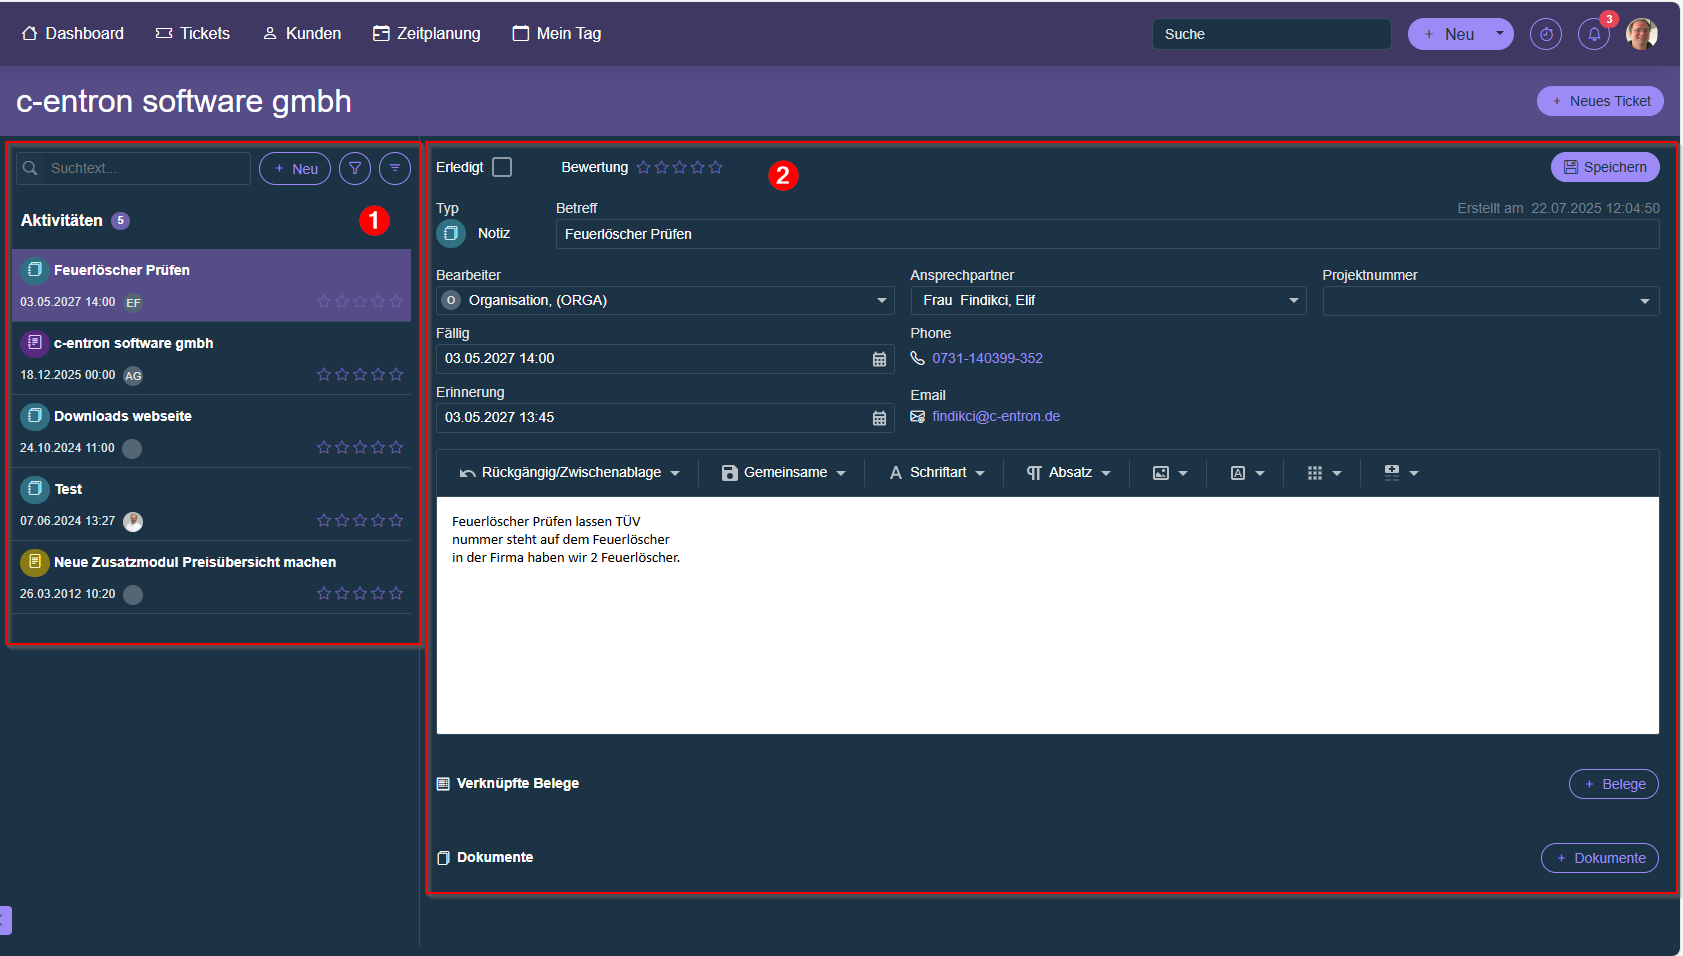
In the search and filter section, select the desired task to view and edit it in the workspace.
In addition, new CRM activities can be created here.

(1) You can use the search box to look for a keyword that appears in the subject line of the task.
(2) Click "+ New" to create a new CRM activity.
(3) Using the filter settings, you can filter activities by type and assignee.
In addition, you can also display completed tasks.
(4) Use the grouping button to group tasks by assignee, due date, or type.
Scope of work
The details of the selected CRM activity are displayed in the workspace.
Here you can edit and manage the task.
The following actions are available to you:
Mark the task as "completed"
Give a rating
Change the assigned staff member
Adjust due date
Change contact person
Select a CRM project
Add to description
link to open documents
Save documents
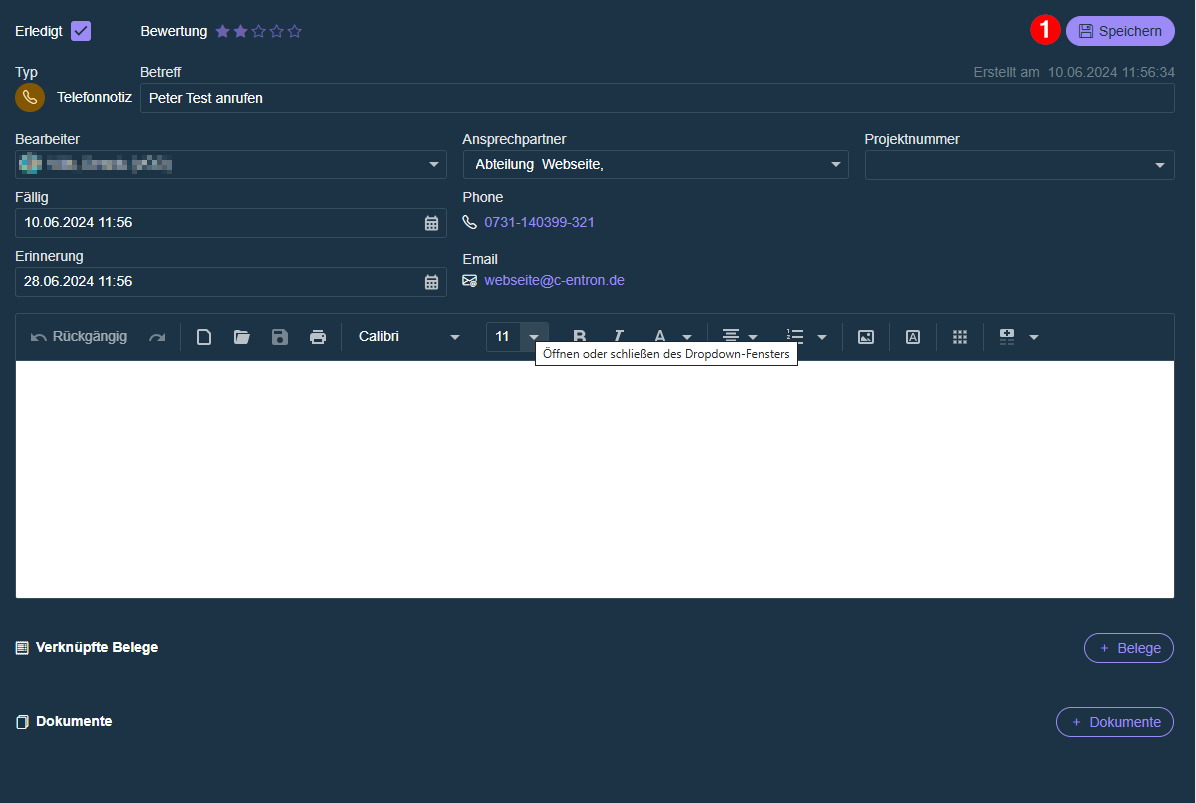
Please note that changes must be saved manually (1).
For newly created tasks, you can only link them to documents or upload documents after the task has been saved for the first time.
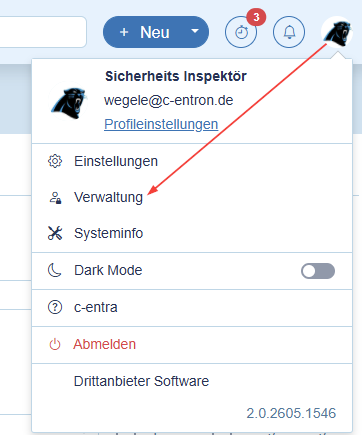
🆕 10. Administration (available starting with release 2.0.2605x)
When a logged-in user clicks on their “Account” in the top-right corner, they will see the new “Administration” section, provided they have access to at least one of the modules.
Task Management
![]() Available as a subscription: Pro · Ultimate
Available as a subscription: Pro · Ultimate
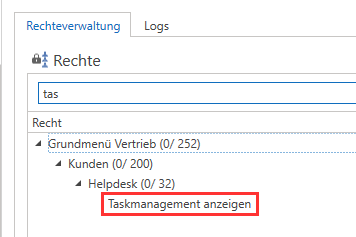
If the logged-in user has the "View Task Management" permission through one of their permission groups, they can open "Task Management" to manage tasks (recurring tickets).
Ticket Templates (c-flow)
![]() Available as a subscription: Pro · Ultimate
Available as a subscription: Pro · Ultimate
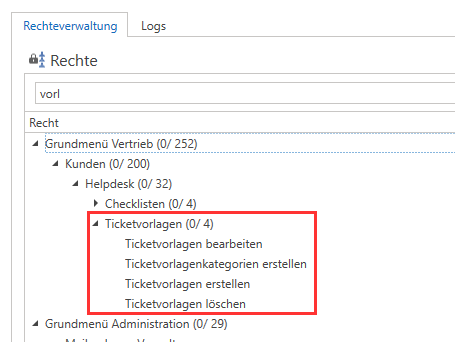
If the logged-in user has the "Ticket Templates" permission through one of their permission groups, they can open the "Ticket Templates" (c-flow) module and manage it based on their sub-permissions.
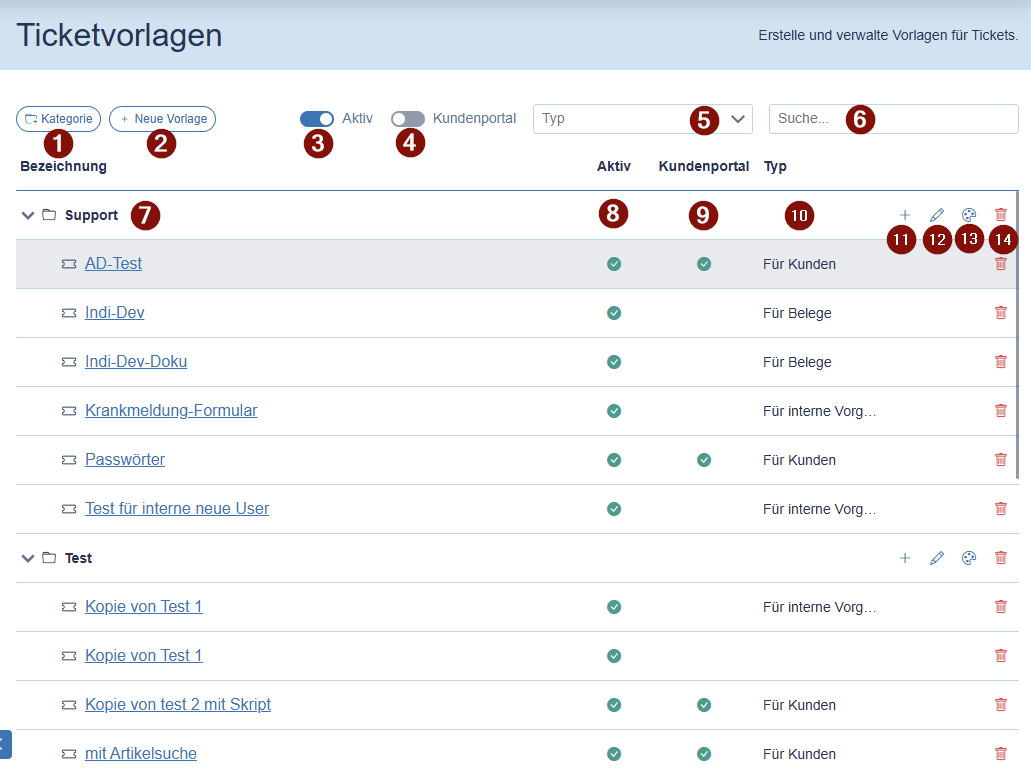
In the “Ticket TemplatesIn the “Administration” section, you’ll find an overview of your ticket templates. Here, you can create a “new category” (1), create a “new template” for the selected category (2)(11), and choose to display only “Active” templates by default or show inactive ones as well (3).
New feature (in the ServiceBoard customer portal): For ticket templates of the “For Customers” type, you can also control whether this template should be displayed to your WebAccounts or whether it should only be available to your employees. This does not affect the filter for customer selection. In other words, the customer selection allows you to control “which customers” this ticket template should be available to, and with this new setting “Customer Portal” (4) You can prevent the WebAccount from seeing and using this ticket template “on its own” in the Customer Portal under “Forms.” To do this, simply disable “Customer Portal” in the ticket template.
You can also filter the list by a specific “type” (5) or “search” for a specific keyword (6).
In the list, you’ll find the respective “categories” and, below them, your “ticket templates” (7). You’ll see whether the template is “Active,” whether you’ve enabled it for the “customer portal” (enabled by default) (9), and what “type” the template is.
You can also “rename” the category (12), select one of the available “icons” (13), or delete the category (including all templates) (14).
Create/edit ticket template:
You can find the instructions for the “ticket templates” in c-flow-Manual.
🆕 11. Profile Settings (available starting with release 2.0.2605x)
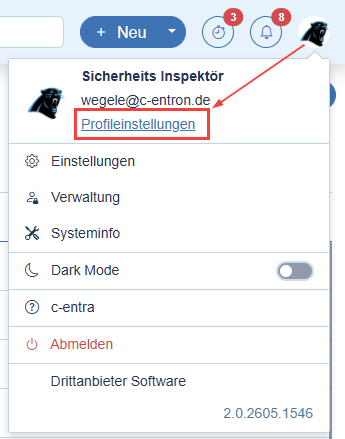
In the "Profile Settings" (click the user icon in the top right corner, then click "Profile Settings"), there are now two settings that each user can choose for themselves.
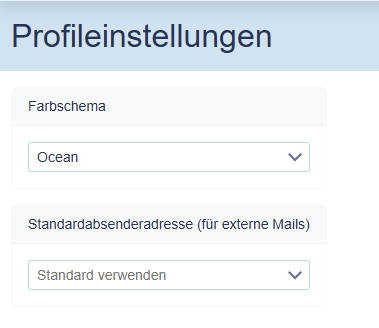
Color scheme
Here, each user can select one of the available “active” themes (see the global settings above) to use.
Default sender address
Here, each user can select a personal default sender address that differs from the global default sender address (c-entron → Global Settings → Administration → Mail / Calendar → General → Default Sender Email Addresses → “Helpdesk”). This address is preselected in the same locations as the “global default sender address,” but takes precedence over it. If no “personal” address is stored or selected here, the global address is used when sending “non-internal emails.” If no address is stored here either, the personal email address is preselected as the sender address. For internal emails, the personal email address is always used; for all others, the “default sender addresses” are used.
You can always choose between your personal address and all “default addresses” and “allowed addresses” from the global c-entron settings. Of course, these must also be permitted for sending via Web Service delivery methods (Exchange, SMTP, Graph).
Summary
The new ServiceBoard offers a centralized solution for ticket management, scheduling, and integration with other tools such as Microsoft Teams and TeamViewer. Thanks to its flexible configuration options and the tight integration of calendar and ticket data, all tasks can be planned and processed efficiently. Direct synchronization with Outlook and comprehensive permission and role management ensure optimal adaptation to your company’s specific needs.