%20(1).png)
Accounting export/import
The accounting interface/export in c-entron.NET
Under Modules on the left, select the module Accounting export/–Import select.
Here, customers and suppliers can be exported, or an OPOS import can be performed via the menu bar using the [Settings] button.

To do this, you must first configure the settings before anything can be exported.
The button [Settings] in the menu bar automatically takes you to the settings window (under Administration – Global Settings – Data Exchange – Accounting – Interface).
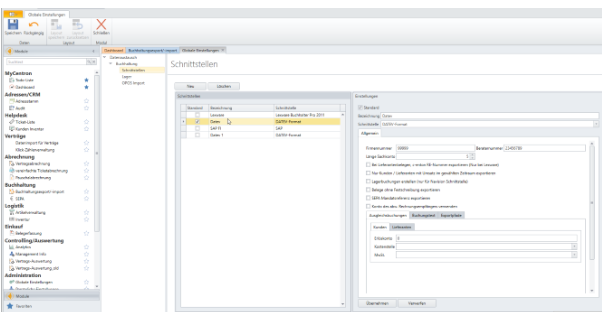
In the Interfaces section, you can create new accounting interfaces and edit existing ones.
Click the [New] button to create a new interface. On the right-hand side, under Settings, enter a meaningful name in the Configuration name field.
Under Interface (Export Type) select the type of interface (i.e., the interface itself). The drop-down menu contains an overview of the accounting interfaces available in c-entron.
By checking the box next to "Default," this will become the default export interface.
Under Company nameyou can enter the client number of your accounting software if this is required by your interface. The advisor number is the number of your tax advisor. If you have completely outsourced your accounting, you can ask your tax advisor for these two numbers.
In the area Length of general ledger account the number of characters in your revenue and expense accounts must be stored. For example, if you enter a five here and a sold item only has a revenue account of four characters, the fifth digit will be automatically filled with a zero during export, depending on the interface. ("1234" -> "12340"). If the revenue/expense account is too long, a message will appear during export.
According to this, the following Settings be taken if they are required for the interface/export used:
- For supplier documents, export c-entron RE number (only for Lexware)
- Export only customers/suppliers with sales in the selected period
- Create warehouse postings (only for Navision interface)
- Export documents without committing
- Export SEPA mandate reference
- Use account of the default invoice recipient
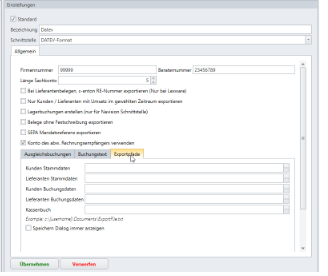
Under the tab Offsetting entries the revenue account, cost center, and VAT can be stored separately for customers and suppliers.
Under the tab Booking text an individual booking text can be stored separately for customers and suppliers using the available @@variables if the Use individual booking text checkbox is selected.
Under the tab Export paths specifies the path and name of the export file, whereby meaningful and recognizable file names should be chosen.
Once all settings have been made, save them using the disk icon (located at the top right).
The interface can now be used under Accounting -> Accounting Export.
When exporting, you can choose between customer accounting and supplier accounting, which are further divided into four areas:
Customers (customer data), booking data (customer booking data), suppliers (supplier data), booking data (supplier booking data).
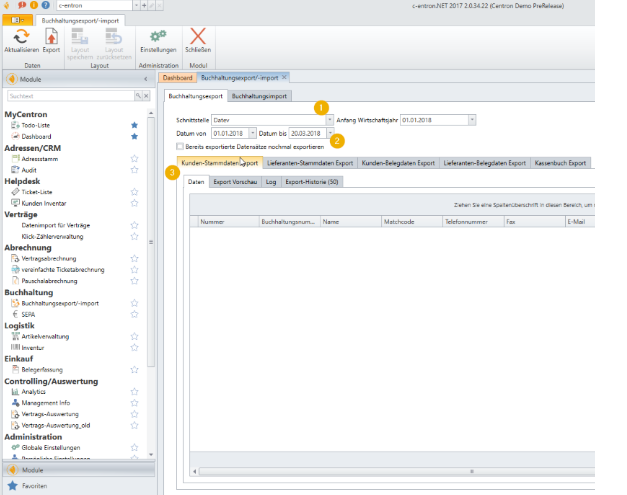
Here is the process using an example Customers (customer data) - The same procedure applies to the others, as the steps are identical.
First, select the desired interface at Interface selection select.
Then set the time period at Date from ... to ... specify (both dates must always be entered here).
By pressing the button Updateall data is displayed in an overview and can be exported using the Export button, making it ready for import into accounting software.
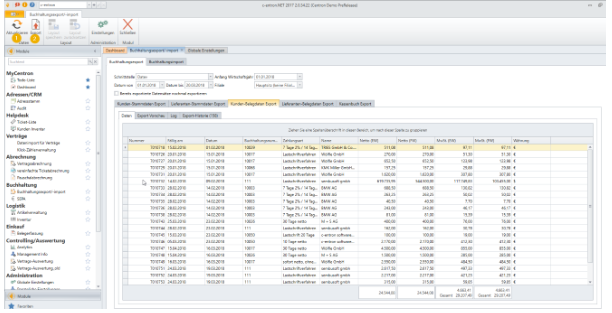
Is the catch with "Exporting data records that have already been exportedif no documents have been exported during the set period, no document data will be displayed here.
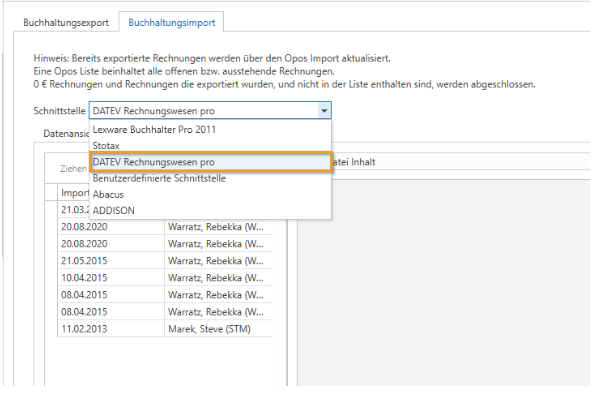
OPOS import via DATEV interface
Export from DATEV
In DATEV, navigate to the OPOS list of your debtors and open the OPOS list.
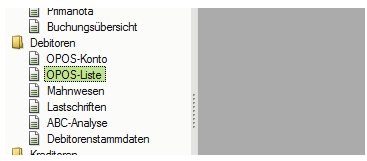
Pay attention to the filtering of the item scope: only "open items" should be displayed here.

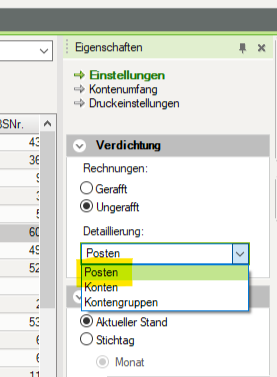
You may need to change the compression setting to "Post."
Ensure that the columns are sorted in the following order.
·Account
·Invoice number
·Date
·Due date
·Amount due
·Balance
·Balance
·Counter account
·Booking text
You can open this list in Excel using the context menu. Select "Standard (items)" here.

In Excel, save the list as a csv file.

Export to c-entron
The list created in this way corresponds to the format that c-entron can read and process in the Accounting Export/Import module using the "user-defined interface."

Select OPOS import interface
In order for the import to work in c-entron, the native interface "DATEV Rechnungswesen pro" must be selected in the "Accounting export/import" module under the "Accounting import" tab for OPOS import.