%20(1).png)
Address master data basics
Complete overview of address management:
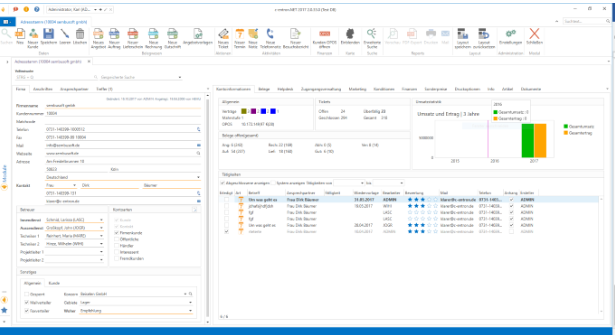
The address master can be visually divided into two main areas:
1.The central/general data for each address can be found on the left-hand side. This includes addresses and contact persons.
2.On the right-hand side, you will find all the settings options and detailed information about the respective address. To make this clearer, the individual topics have been divided into different tabs.
Depending on whether a contact/prospective customer, a customer, or a supplier has been selected, more or fewer tabs are displayed:
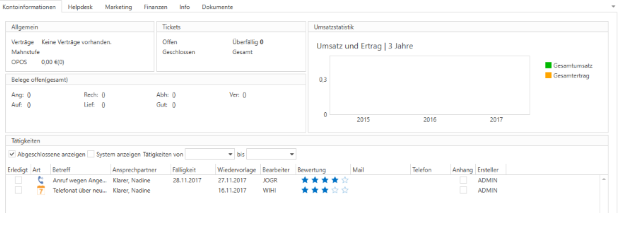
Contact/Prospective Customer Overview
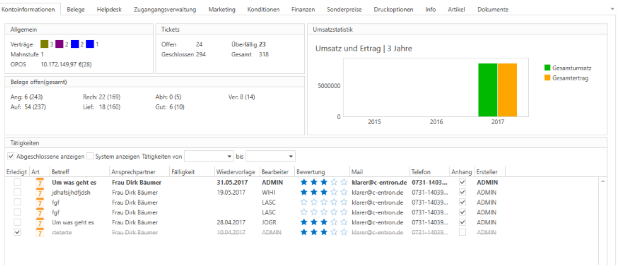
Customer overview
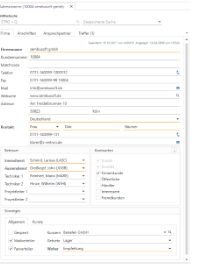
Company tab
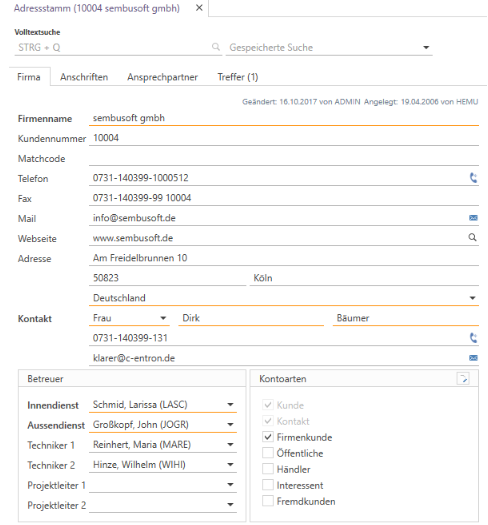
The full-text search is located at the top of the page. Here you can search for terms, partial terms, numbers, etc. Enter the desired term and press "F3" or click on the magnifying glass. ALL fields of the addresses will then be searched for the desired terms. If the search was unambiguous, the respective address will be called up immediately. If the search was not unambiguous, the addresses found will be displayed under the "Hits" tab.
When creating a new address, please note that the fields underlined in orange must be filled in (=mandatory fields), otherwise the address cannot be saved.
Most fields are self-explanatory and can be filled in with the desired information.
The fields Address Number, Customer Number, and Supplier Number are exceptions. These are filled in automatically and cannot be edited.
The numbers are also used to determine which account type the address belongs to. If only an address number is available, this is a pure prospect for whom only CRM activities can be created, but no documents or tickets. If a customer number is also stored, this is a customer for whom customer documents and tickets can also be created. If the supplier number is maintained, it is a supplier/manufacturer for whom supplier documents and tickets can be created. However, an address can also contain both a customer number and a supplier number, meaning that it is both a customer and a supplier, and both document types can be created.
In the Company tab, you can click on the icon next to fields containing telephone numbers to transfer the telephone number directly to your telephone. Prerequisite: The TAPI interface is available and set up on your system.
For fields containing email addresses, you can click on the icon to directly create a new email with the respective email address.
For fields with an Internet address, you can click on the icon to open the homepage directly.
Up to six caregivers for each address can be entered in the lower section. These fields can be renamed and are partly related to to-do list entries and evaluations.
The check mark also indicates the main account type (customer, supplier, and/or contact). The address can be assigned to other account types so that it can be searched for later and used, for example, to create campaigns or circular emails for specific account types.
The button can be used to create additional account types and rename existing ones, provided that you have administrator rights.
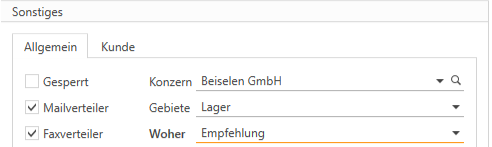
In the bottom section, "Miscellaneous," there are two completely variable drop-down menus where both the name and the content can be customized in the settings under Address Master->Specifications. These are additional search fields and criteria for campaigns. The "Group" drop-down menu allows you to link the address to a group in order to perform evaluations across an entire group or to create contracts for groups.
The "Mailing list" and "Fax distribution list" checkboxes are also filter options for campaigns and circular emails.
If you no longer want to work with an address, for example because the company has gone bankrupt, you can check the "Blocked" box and it will no longer appear in normal searches. It will only appear if you explicitly search for blocked addresses and also have the right to do so.
If the selected address is a customer, a second tab appears at the bottom labeled "Customer."
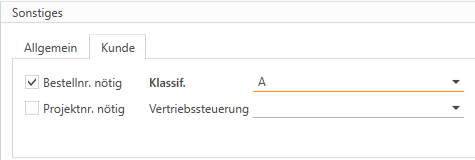
If the "Order no. required" and "Project no. required" checkboxes are activated, an order number and a project number must be entered in the customer documents. If the checkboxes are deactivated, these numbers can be stored in the documents, but they are not mandatory fields.
The content of the Classification drop-down menu can be customized in the settings and serves as an additional search and evaluation criterion.
The Sales Control drop-down menu is completely variable. Both the name and the content can be customized in the settings
Address master – Partner management
This feature allows you to add partners to an account. These partners are automatically added as CC email recipients for certain processes (CRM activities, quotes, and orders) when an email is sent.
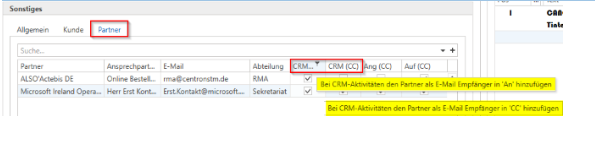
When an account has been loaded into the address master, the new "Partner" tab appears in the Miscellaneous section.
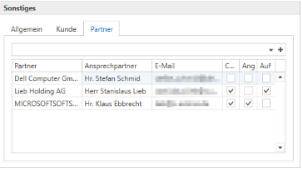
This is where partners are stored and managed for the account. Accounts that are used as partners appear as a preselection in the search. However, it is possible to store any account as a partner. Clicking on + or [Enter] opens a window where you can select the desired contact person.
The listed partners can be removed or opened again via the right-click menu (double-clicking is also supported).
In the options (on the right side of the table), you can specify for which objects the contact person should be stored as a CC email recipient.

When an account is loaded that is stored as a partner in other accounts, another tab appears: Is partner of.
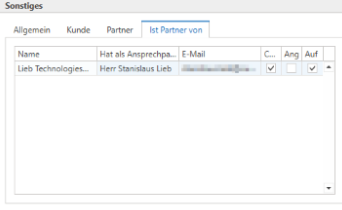
This view allows you to see who the account is registered with as a partner and who the contact person is.
It is also possible to delete the partner assignment via this list.
(Starting with release v2.0.2107.1094)
Improvements/changes have been made to partner management. The column names for the checkboxes have been changed to CRM (An), CRM (CC), Ang (CC), and Auf (CC), and BCC has been removed. The "Department" column has been added, and the columns in the partner list can now be selected.
The variable @@BodyBis€€Trennzeichen@@ (replaced with the body text up to "€€" in the body text) was created in the mail template for CRM activities. Furthermore, the CRM email has been revised so that if there are other recipients through partner management, the "processor" of the activity is NOT written in the "To" field, but if a partner is available and "CRM (To)" and/or "CRM (CC)" is checked here, only one email is now created for the "To recipients." The CC recipients, etc., are only in the CC field, but do not receive their own email.
Address tab
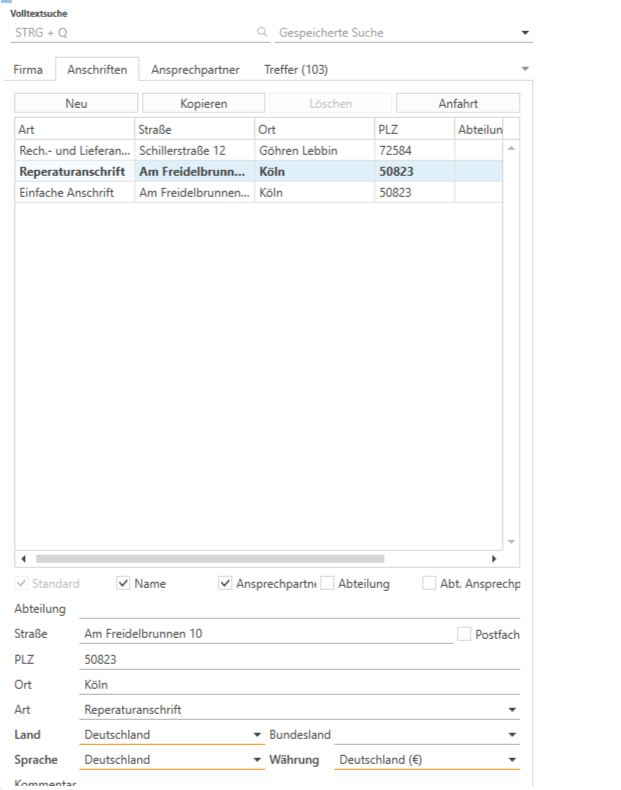
You can create one or more addresses. One address must be marked as the "default" address using the "Default" checkbox. For example, if a quote is created and no address has been explicitly selected beforehand, the default address will always be used.
The fields are self-explanatory. It is important to note that the fields underlined in orange are mandatory and must be filled in. Instead of a street address, you can also enter a PO box by checking the box next to "PO box."
The "Language" and "Currency" fields are also important for the receipts later on. Depending on which currency has been stored, the customer's receipts will also be displayed in the respective currency. With the "Language" field, the article texts and condition texts in different languages can also be used for the receipts, provided that these have been previously maintained in the respective language in c-entron.
The address type can be specified in the "Type" field. You can choose between several types here:
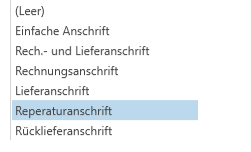
Simple address:
Used for contacts and not for customers and/or suppliers. For informational purposes only.
Billing and delivery address:
Used for customers/suppliers if they only have one address.
Repair address:
Required for RMA cases
Return address:
Required for RMA cases
Delivery or billing address:
Once one of these options has been selected, you will be asked whether the address should be entered as a different delivery/billing address. Confirm this by selecting "Yes."
c-entron then automatically jumps to the "Conditions" tab and enters the address you just created under "Different addresses."
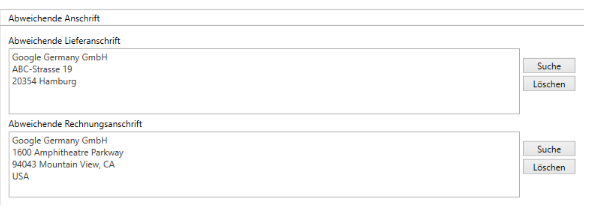
There, you can also assign the delivery or billing address of another customer/supplier using the "Search" button.
The checkboxes "Name," "Contact person," "Department," and "Department contact person" can be used to control which fields appear and are printed in the addresses of customer and supplier documents and which are not.
A new address can be created using the "New" button. An existing address can be completely deleted using the "Delete" button. The "Copy" button copies the currently selected address and inserts it again for the same customer.
Travel expenses can be entered using the "Directions" button.
Directions from addresses
Directions and/or travel expenses can be stored for each address.
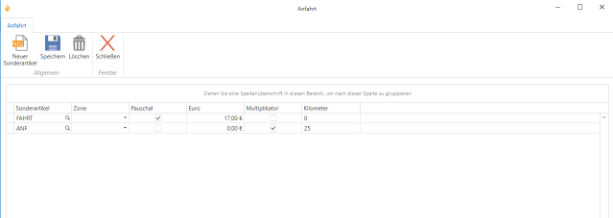
The button inserts a new line. The magnifying glass can now be used to search for items that have already been created and assigned to the service or route fee product group.
Once the item has been added to the route list by double-clicking, a route zone can be stored for evaluation purposes. It must also be determined whether the route is a flat rate (a fixed price) or a multiplier (price per kilometer).
With a flat rate, there is also the option of specifying a price. If a price has been entered in the travel list (even €0.00), this will be included in the receipts. If no price has been entered for a flat rate, the price will be taken from the article master.
For items with a multiplier, the number of kilometers must also be entered. This will later appear as the quantity in the receipts. Here too, if a price is entered, it will be used in the receipts, multiplied by the number of kilometers, of course. If nothing is entered, the price will be taken from the item master.
AD import of customer contacts into the address master data of c-entron.NET
Once you have inventoried customer Active Directory (AD) data with RiverSuite, you can easily create this AD data as a contact person in the customer's address master.
Furthermore, you can also link existing contacts to the AD data.
You can also use this information in the C-FLOW! module or make it available to the customer for selection.
Furthermore, the rights "Change customer" or "Create contact person" are required.
To do this, click the [Import from AD] button in the address master under Contact Person.

(If this button is grayed out, RiverSuite Inventory and the Riverbird web service have not yet been installed and no data has been inventoried.)
Then select the group to which it should be assigned.
Automatically assign salutation
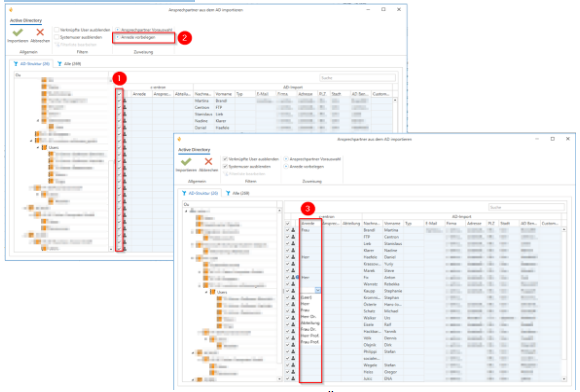
First, select the people you want to import (1). Using the "Pre-fill title" option (2), you can automatically fill in the titles with "Mr." and "Ms." (3). (Additional titles can be selected from the drop-down menu).
Contact person preselection
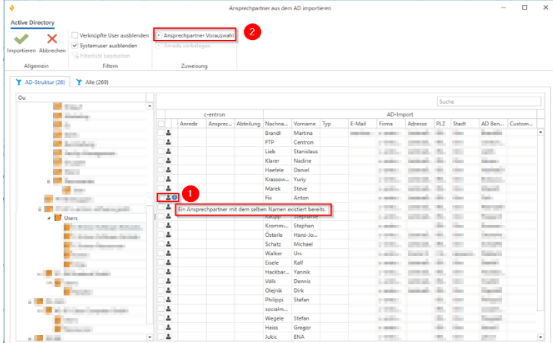
If a contact with the same name exists and is not yet linked to an AD user, this is indicated by the blue info icon (1). These can now be linked directly to each other using the "Contact preselection" option (2).
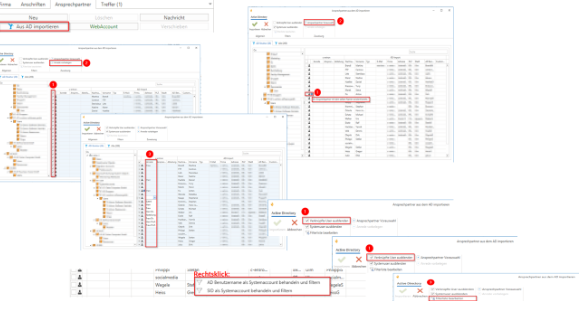
Hide AD users
1.Hide linked contacts
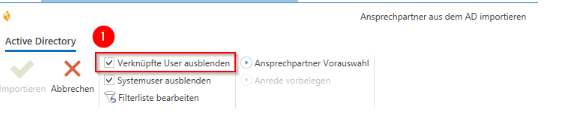
Hide linked contacts hides AD users who are already linked to a contact.
2.Hide system users
System users are service accounts that do not represent real people.
These can be filtered and hidden from the list in two ways by right-clicking.

1."Treat AD username as system account and filter"
This filter applies across AD for all of the user's inventories. This is for AD user names that may exist for multiple customers and should be hidden.
2."Treat SID as a system account and filter it"
This filters exactly this user; if there is another customer with the same name, they will not be hidden.

In Contacts, the interface has been revised so that the AD link is no longer a button but can be found in the context menu of a selected contact by right-clicking.

Results tab
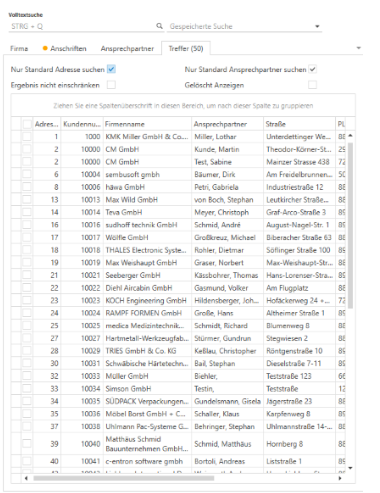
Here you can see the list of results for multiple or single addresses, depending on how specific your search query was.
You always have the option of setting filters in the c-entron application. In this case, for example, "Search only standard addresses," "Search only standard contacts," "Do not limit results" (= do not search for specific account types), or even "Deleted ads." Otherwise, you have the option of searching all fields under the "Company," "Addresses," and "Contact Persons" tabs.
Double-click to select the desired address from the list of results that you want to work with.
Account Information tab
Here you will find a complete overview of the selected address.
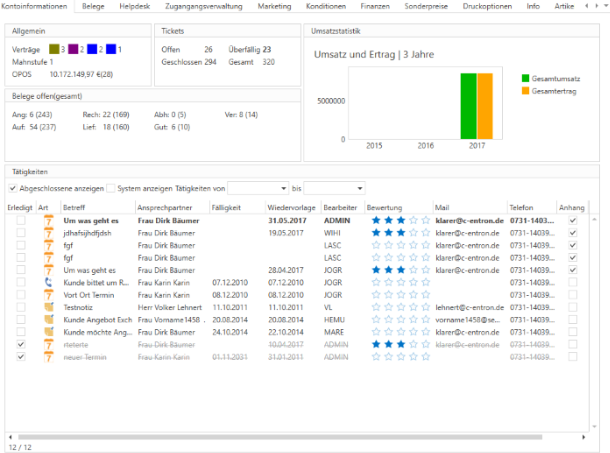
General
Which and how many contracts does the customer/supplier have in use?
What is the current dunning level for this item, and
How high are the outstanding items (unpaid invoices)?
Tickets
How many open tickets does the customer currently have in use (the status of the help desks must NOT be "completed").
How many of these are overdue (help desk due date is in the past)?
How many have already been completed (the status of the help desks must be "done")?
How many tickets does the customer have in total?
Open documents (total)
The number of open items for each document type is shown before the parentheses. The number of items already created for the customer is shown in parentheses.
Sales statistics
Here, the customer's sales (green) and earnings (orange) over the last three years are shown graphically. This allows you to see at a glance whether the collaboration with the customer is tending to grow or rather flattening out or declining.
Activities
In this area, all open CRM activities that still require action are visible by default.
The symbol immediately shows you what type of item it is (appointment, note, phone memo, or visit report). All other information, such as due date, current processor, etc., is also visible.
At this point, however, it is also possible to search for and filter specific activities.
In addition to CRM activities, system activities are also displayed here. Every document that is created (e.g., quotes, help desks, invoices, etc.) automatically generates a completed system activity.
This gives you a complete overview of everything that has happened at the address recently.
Documents tab
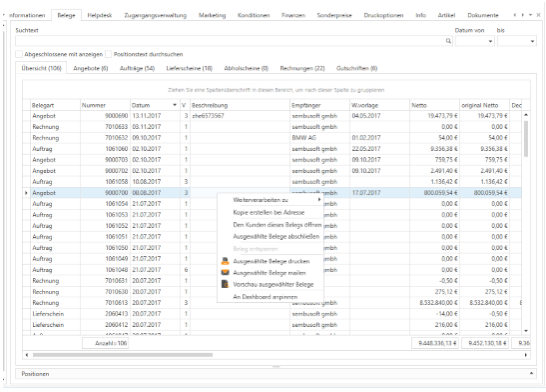
Here, all open documents can be displayed at once ("Overview") or individually by document type as standard.
There are various ways to search for one or more specific documents:
All columns in the document table overview can be searched in the "Search text" field. You can search by document number, net price, contact person, etc.
If you select the "Show completed" checkbox, the system will also search for documents that have already been processed or completed.
If you want to search not only the table fields visible here, but also the contents of the documents, you can activate the "Search item text" checkbox.
The "Date from" and "Date to" fields can be used to further narrow down the time period covered by the documents.
By right-clicking on one of the column tables, you can also activate and customize the filter editor, which means that there are virtually no limits to the filtering options.
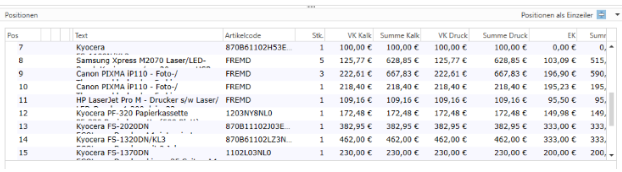
When a document is selected, you can view the items directly in the lower section by simply clicking on the arrow.
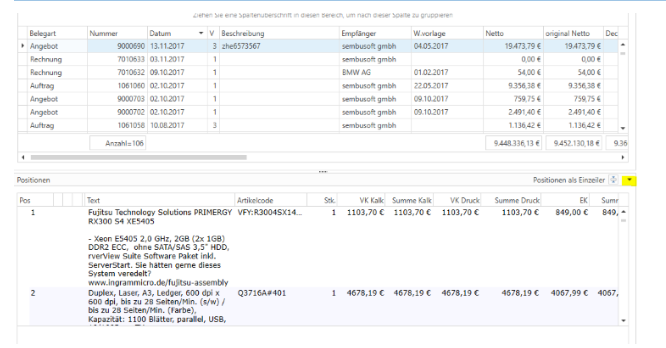
You can use the button to limit the items to one line each.
If you right-click on one of the documents, you have several options:
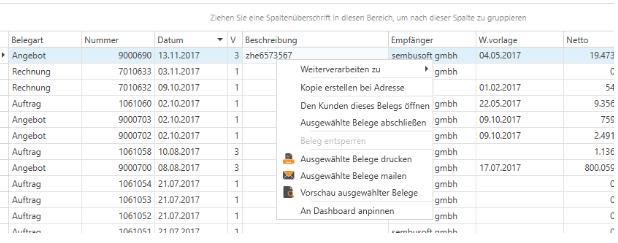
You can continue processing the document. For example, you can convert the quote into an order, the order into a delivery note or invoice, etc.
You can create a one-to-one copy of the document at other addresses (as many as you like).
If the customer/supplier has not yet been opened, the address associated with the document can be opened.
Offers, pickup slips, credit notes, and RMA delivery notes can be completed manually and thus set to "done."
If another person has the document open, you can unlock it to open and edit it yourself, provided you have the right to do so.
You can also select multiple documents using the CTRL or SHIFT keys and either print, email, or preview them all.
You can also pin each individual document to your personal dashboard if you know that you will want to continue working with the document in the near future.
Helpdesk tab
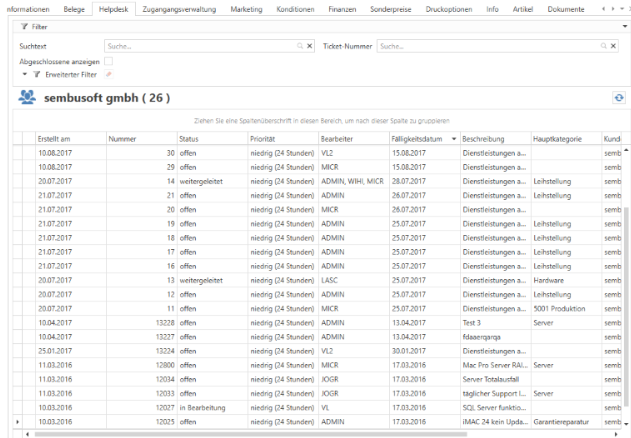
By default, all open tickets for the respective address are displayed here.
There are various ways to search for one or more specific tickets:
All columns in the ticket table overview can be searched in the "Search text" field. You can search by ticket number, agent, main category, etc.
If you select the "Show completed" checkbox, the system will also search for documents that have already been processed or completed.
If you really want to search specifically by ticket number, you can use the Ticket Number field.
If you want to combine multiple search queries, e.g., main and subcategories, status, due date, etc., you can open the "Advanced Filter" using the arrow and fill in any fields.

The filter fields can be cleared again using the eraser. The button updates the results of the tickets displayed.
By right-clicking on one of the column tables, you can also activate and customize the filter editor, which means that there are virtually no limits to the filtering options.
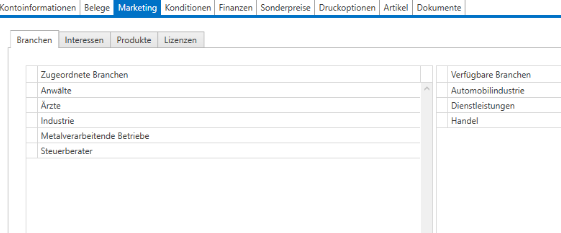
Marketing tab
Industries and interests
Here you can store a more detailed grouping of your customers, i.e., which industry your customer is in and what their interests are, so that you can send out invitations to updates, innovations, or in-house exhibitions with special campaigns from c-entron, for example.
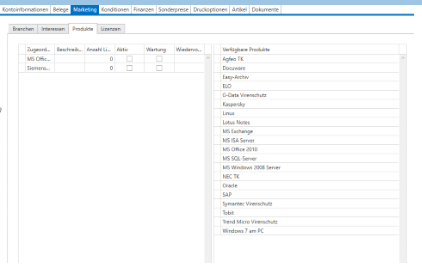
Products
The same principle that applies to industries and interests also applies to products. Here you can store products that are not from your portfolio and that you have not sold to customers via c-entron. This list can also be customized in the settings with admin rights.
You also have the option of adding a comment and/or an expiration date for the respective product, which will be added to your to-do list as a reminder.
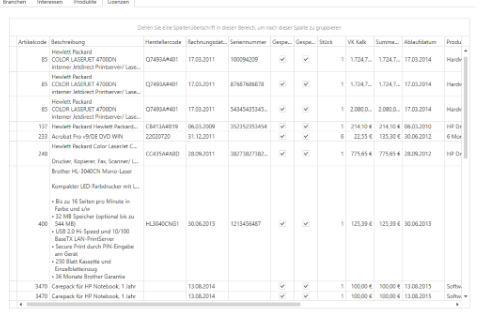
Licenses
With the PLM (Product Lifecycle Management) add-on module, you can see all the items sold to the customer that you have maintained as licenses in PLM. This includes the expiration date and all details such as SN, price, etc.
Conditions tab
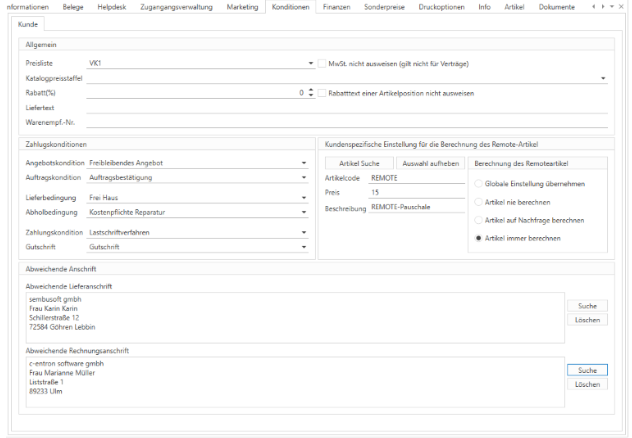
General
Price list: You can choose between 4 sales price lists, which you can calculate as a percentage of the product groups (Master data->Product groups->Sales markups).
For international customers, you must check the box "Do not show VAT" so that all customer receipts are created as net amounts. Except for contracts.
Catalog price scales: When you import scale prices from suppliers, these can generally be assigned to the customer.
Discount: Here you can set a general discount rate for all items for the customer and also configure the text design of the discount texts.
Delivery text: This text is added to all customer delivery notes if, for example, special considerations need to be taken into account during delivery.
Payment terms
Here you can store conditions that deviate from the standard using the dropdown menus. If no assignment has been made (empty dropdown menus), the global settings under Administration -> Settings will be used.
Custom setting for calculating the remote item
If you want to charge your customer a specific flat rate for each remote session, this item must first be created and then stored globally in the settings or here for the customer. Click on the "Item search" button to open the search window.
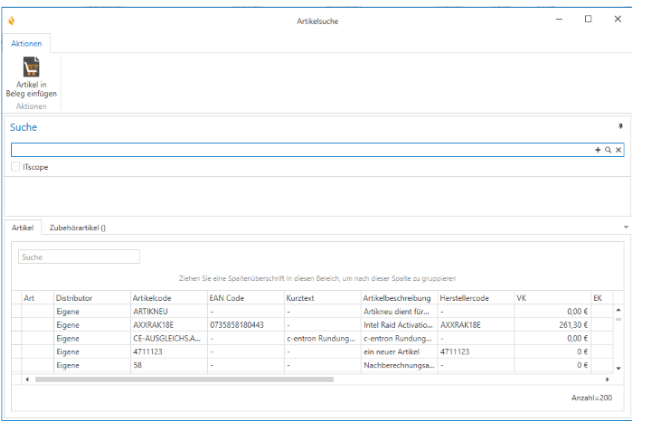
Now you can select the desired item by double-clicking on it. Next, you need to specify how the billing should be carried out.
Different address
Here you can see if different addresses have been stored for the document types delivery note or invoice. These can of course also be changed here. However, all addresses must first be permanently stored in order to be selected. Addresses from other customers/suppliers can also be selected. However, it should be noted that the sales will still be posted to the currently selected customer and not to the customer with the different billing address.
Finance tab
General
VAT ID number: Enter the VAT ID number of your customer/supplier here.
Registration number: Enter the registration number of your customers/suppliers here.
Tax ID: Enter your customer's/supplier's tax ID here.
Terms and conditions: When the customer receives your terms and conditions
Through: Through whom did the customer/supplier receive the terms and conditions?
Accounting number: You can use this field to set whether the customer number should be automatically transferred as the customer account number or whether the field should remain editable and be filled in manually.
FIBU collective account: If your company is based in Switzerland, you can also manually enter this FIBU collective account instead of the accounting number.
Customer details
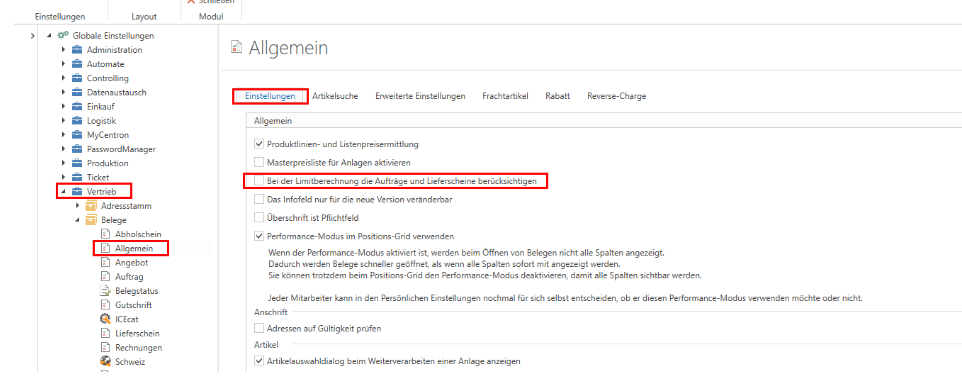
Limit: Here you can enter a gross limit, e.g., for first-time buyers/new customers/etc. This will alert you as soon as the customer exceeds this limit. By default, only invoices are included in the calculation. However, in the global settings, you have the option of including other document types in the calculation.
OPOS: At this point, c-entron shows you how much the customer owes (unpaid invoices minus credit notes).
Available: Limit minus OPOS. Here you can see how much of the customer's limit is still available.
Contact person for reminders: This is an internal mandatory field and must be maintained. Otherwise, no reminder can be generated.
Shipping method for reminders: Here you can specify how the customer would like to receive their reminders. If nothing is specified, the global setting will be used.
Sales / Previous year / Total: Here you can see the gross sales that have been generated with your customer to date, how sales were last year, and how they are today.
Default billing address automatically as reminder address: if you check this box, the billing address will always be used as the reminder address.
Reminder level: This shows the reminder level the customer is currently at. This also pops up as a note when the customer is reopened via the address master.
Default invoice recipient: Here, you can select a specific contact person who will receive all of the customer's invoices by email.
Shipping method for invoices: Here you can specify the shipping method for invoices. For example, if "Mail" is entered here and someone clicks on "Print" in the customer's invoice, a message will appear asking whether you really want to print the invoice, as "Mail" is stored for the customer.
CC recipient: Here, you can select a specific contact person who will receive all of the customer's invoices by email in CC.
Reminder periods: Here you can store reminder periods that differ from the default. If 0 is entered, the global settings are used.
Block order creation: Here you can set the reminder level at which order creation should be blocked.
Customer cost center: If you work with cost centers, you can store them here with their respective numbers and descriptions.
Bank details: Enter your customer's bank details required for SEPA direct debits here. One bank account can be defined as the default.
For direct debit type, you must specify which type it is.
FRST(1): First collection of a direct debit using the mandate issued by the payer for regular direct debits instructed by the payee.
RCUR(2): Follow-up direct debit, in which the mandate issued by the payer is used for regular direct debits instructed by the payee.
OOFF(3): One-time direct debit. The mandate issued by the payer was only for a single direct debit.
FNAL(4): Final debit
Mandate management: Here, the mandate (direct debit authorization) issued for the respective bank account can be maintained, as well as the necessary mandate number.
Credit limit calculation and credit limit warning
A credit limit can be set in the customer database under Finance in the "Customer Details" tab:
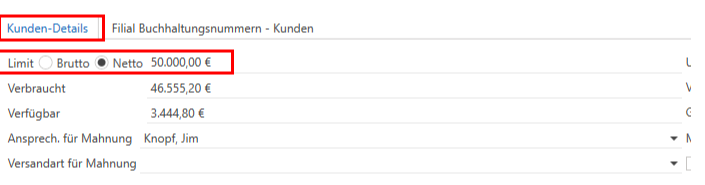
Here you can enter a gross limit, e.g., for first-time buyers/new customers/etc. This will alert you as soon as the customer exceeds this limit.
By default, only invoices are included in the calculation.
However, in the global settings, you have the option of including additional document types in the calculation.
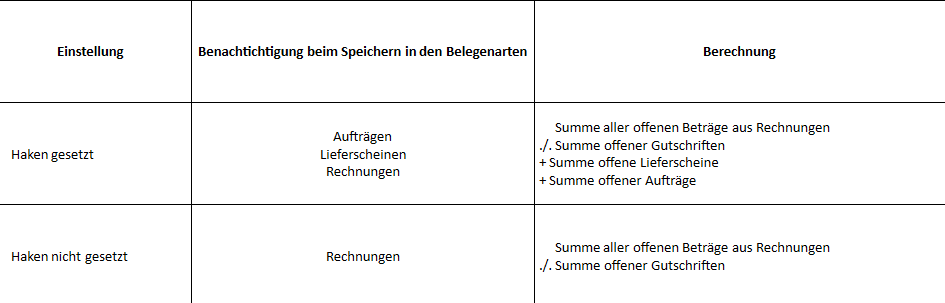
The credit limit warning currently works as follows:
When calculating the limit, there is a setting that influences the calculation:
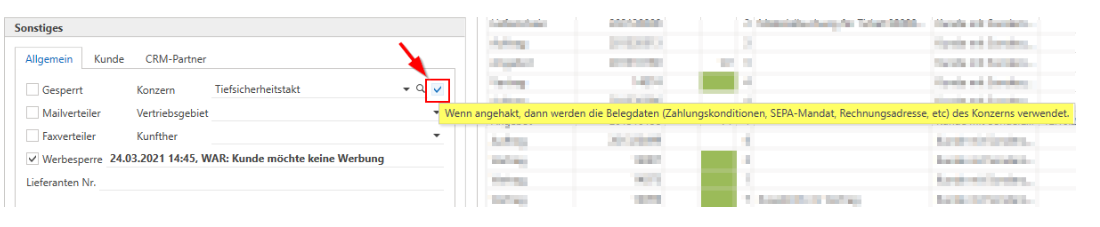
Checkbox – Use document data from the group
A new checkbox has been added to the account behind "Group." If this is active, the document data (payment terms, SEPA mandate, billing address, etc.) of the stored group will be used when creating the document.
When creating documents, the following data is transferred from the selected group:
The customer's settings are not taken into account, i.e., regardless of what is set for this customer, the data from the group is used
·All conditions for the document type
oOffer
oOrder
oDelivery note
e-invoice
oCredit
·SEPA mandate
oStandard
oOr selection
·Regarding the invoices
oDifferent invoice recipient
shipping method for invoices
oDifferent billing CC recipient
oDifferent invoice BCC recipient
oZUGFeRD invoice active
·Pricing
o1. Special contract prices
(remains as before – as this depends on the contract)
o2. Special customer prices
(here, the special price of the group is drawn instead of the customer)
o3. UK 1-4
(here, instead of the customer, the group's VK 1-4 is drawn)
Tab "Task"
The "Task" tab has been implemented in the address master.
This means that in future, a new task can be created or existing tasks can be changed or deleted in the address master for the respective customer.
In addition, the "Task" button has been added to the address master in the menu bar/ribbon bar in the "New" section, which can also be used to create a "new task."
