%20(1).png)
Address master data tips and tricks
The address master is used to manage all customer and supplier master data and contacts. It is also central to most activities relating to your customers and suppliers.
General handling tips
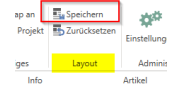
Actions are available via the context menu (right-click) in many places. Many of these functions are used to create a user-specific view that can be saved via the profile. To do this, you must select a personal or public profile and save the layout
The following functions are particularly noteworthy here:
• Window arrangement: Some windows and tabs can be detached from their position and docked elsewhere.
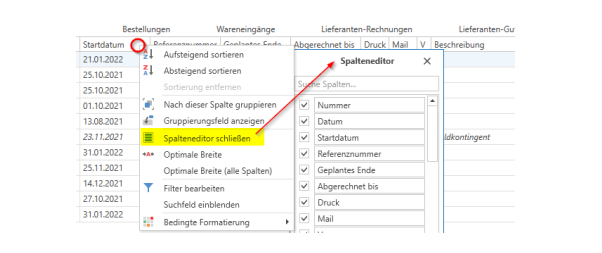
• Column order: Wherever data is organized in columns, you can determine which columns are displayed and in what order. To do this, right-click on one of the column headers and open the column editor. The column headers displayed there are available. Use the respective checkbox to show or hide the field, and use the drag & drop functionality to change the column order.
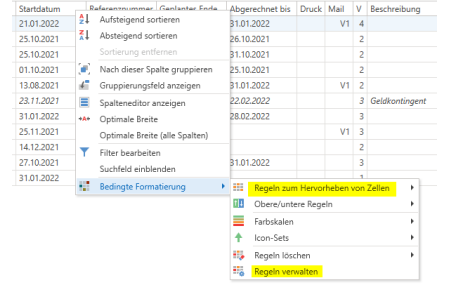
• Formatting rules: You can also use the context menu to create cell rules so that individual fields or entire rows are highlighted as soon as a specific value is entered.
Available function keys:
[F2] saves the changes made to the master data of the displayed data record
[F3] triggers the customer, supplier, and contact search using the search parameters previously entered in the mask
[Esc] clears the mask
[Ctrl] + [Q] places the cursor in the full-text search
[Ctrl] + [N] starts the creation of a new customer[
Ctrl] + [Shift] + [A] or [Ctrl] + [Shift] + [Ä] calls up the context search
The menu bar
Functions without selected data set
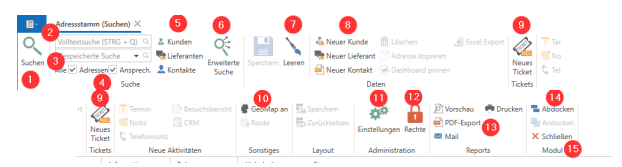
1 Trigger search (analogous to [F3])
2 Full-text search – triggered by pressing [Enter] after entering the search parameter
3 combines the search function with the parameters of a selected, previously saved "Advanced Search"
4 Extend/restrict the full-text search to addresses and contact persons
5 Extend/restrict the full-text search to customers, suppliers, and contacts
6 opens the Advanced Search
7 clears the mask (analogous to [Esc])
8 Create a new customer/supplier/contact
9 creates a new ticket and opens the customer search for this new ticket
10 displays the GeoMap tab
11 calls up the settings for the address master (admins only)
12 calls up the rights for the address master (admins only)
13 Left-clicking opens the standard report for the address master and the corresponding function; right-clicking allows you to select the report
14 detaches the tab and moves it to a separate window; the reverse function "Dock" becomes available as a result
15 closes the tab
Functions with selected data set
Customer
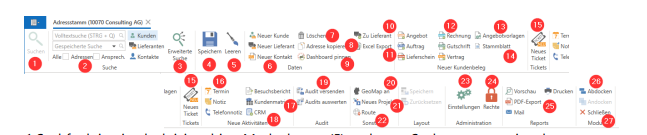
1 Search function is deactivated; please clear the mask (5) and enter new search parameters
2 Full-text search remains active with the additional filter options (see above)
3 opens the Advanced Search
4 saves changes to the data record (similar to [F2])
5 clears the mask (equivalent to [Esc])
6 Create a new customer/supplier/contact
7 "deletes" the data record; recovery is possible
8 copies the active address to the clipboard
9 Pin the data set to the dashboard
10 adds the "Supplier" property to the customer, thereby expanding the range of functions
11 exports master data from the active data record to an Excel file
12 create the respective documents for the active data record
13 opens the quote template management
14 creates a new master sheet for the customer
15 opens a new ticket for the active record
16 Create the respective activity for the active data record
17 calls up the customer matrix
18 creates a new CRM activity for the active record
19 enable the sending and evaluation of audits
20 displays the GeoMap tab
21 opens a new CRM project for the active data record
22 calls up route planning via Google Maps in the browser; active address is transferred
23 calls up the settings for the address master (admins only)
24 calls up the rights for the address master (admins only)
left-clicking opens the standard report for the address master and the corresponding function; right-clicking allows you to select the report
26 detaches the tab and moves it to a separate window; the reverse function "Dock" becomes available as a result
27 closes the tab
Supplier
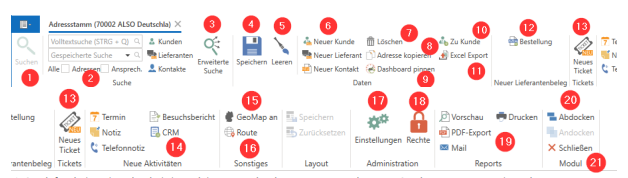
1 Search function is deactivated; please clear the mask (5) and enter new search parameters
2 Full-text search remains active with the additional filter options (see above)
3 opens the Advanced Search
4 saves changes to the data record (similar to [F2])
5 clears the mask (equivalent to [Esc])
6 Create a new customer/supplier/contact
7 "deletes" the data record; recovery is possible
8 copies the active address to the clipboard
9 Pin the data set to the dashboard
10 adds the "Customer" property to the customer, thereby expanding the range of functions. 11 exports master data from the active data record to an Excel file
The address master in detail
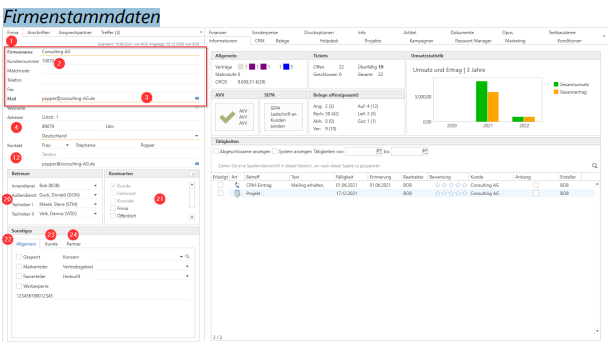
1 Key company data. For private customers, please enter only first and last name.
2 The customer or supplier number is automatically assigned when the record is created
3 Maintain a central email address here; this is not linked to any specific person
4 Enter the customer's/supplier's main address here; this will be transferred to the Addresses tab and printed in bold as the default address (see 9).
Addresses
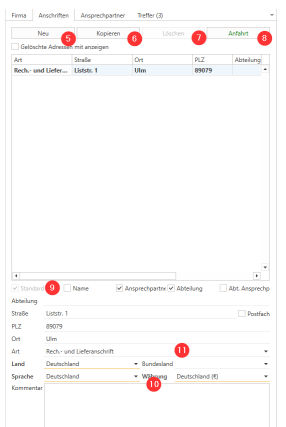
If you select a different address in this screen, this address will also be displayed as the "active" address in the main screen (1). New transactions are always created for the selected contact person of the active address.
5 Create additional addresses.
6 Create a copy of an address that has already been created
7 Delete an address for the customer (not possible for the default address)
8 Enter a call-out charge for this address
9 The "Default" checkbox specifies the main address for the data record. Use the other checkboxes for each address to control which details are displayed when the address is used in the document header
10 For customers abroad, make sure that the "Country" and "Currency" fields are filled in correctly to ensure that tax rates and texts are used correctly. You can use the "Language" setting to control the use of texts in the selected language.
11 Using the Address types drop-down menu, you can specify the address as a delivery address, billing address, or both delivery and billing address. If you have selected Delivery address or Billing address as the type, you will be asked whether the address should be entered as a different delivery/billing address. Confirm this with "Yes" if necessary.
Contact person
12 Enter the customer's/supplier's main contact person here; this will be transferred to the Contact Person tab and printed in bold as the default contact person.
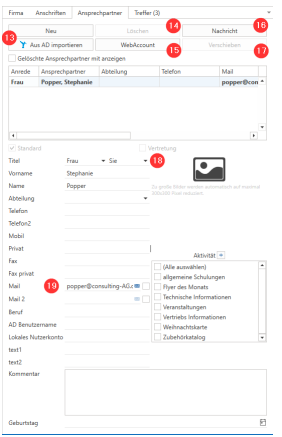
13 Create additional contacts for the active address (see above). If you have installed the Riverbird Agent at the customer's site, you can use it to import people from the customer's Active Directory and create them as contacts.
14 Delete a contact person for the customer (not possible for the default contact person).
15 Create a web account (Service Board Online) for the active contact person.
16 Send an internal message via email containing the contact information of the selected contact person.
17 Move a contact person to another address at the customer's premises (not possible for the standard contact person).
18 Choose whether you want to communicate with the person informally or formally.
19 Enter the email address used for personal communication with the contact person here.
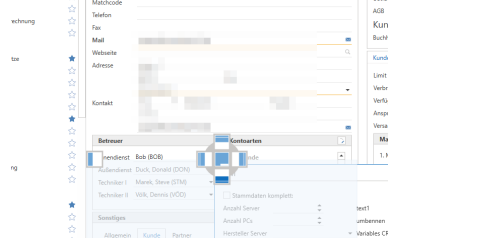
20 Account Managers: Key accounts/main account managers are stored here. The field name can be changed administratively. (This fixed assignment of employees to customer data often serves as the basis for commission. Contact your c-entron consultant for further information or details).
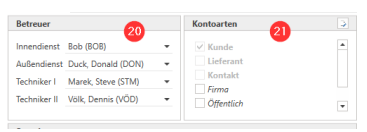
21 Account type: This is the initial broad classification of the customer (you can then select this in the search). The name and number can be changed administratively.
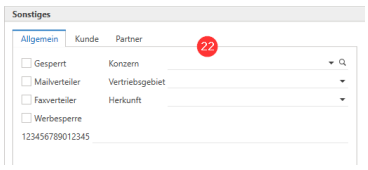
22 Miscellaneous: Only specific employees with the appropriate rights may set customers to 'Locked' mode. The customer will then no longer appear in normal searches. Other flags are primarily used to create customer lists via the advanced search, e.g., for mailings. Group management can be used to map groups and sponsors, which enables the shared use of quotas and conditions. You can control access to customer data via the sales area.
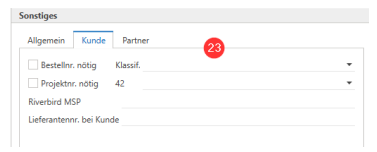
23 Here you can define the order number and/or project number as mandatory fields. These will then be requested when the order is saved. Classifying customers is crucial for evaluating and filtering various customers; here, too, you can define the content administratively.
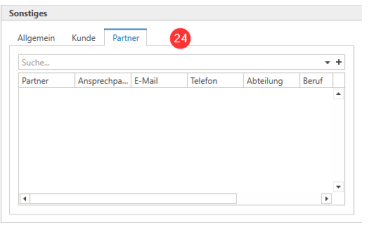
24 Use partner management to link this customer with a contact person from another customer or supplier so that you can more easily inform them about processes such as joint project support for the customer.
The Riders
Information
This section is useful for gaining a quick overview of the customer's relevance
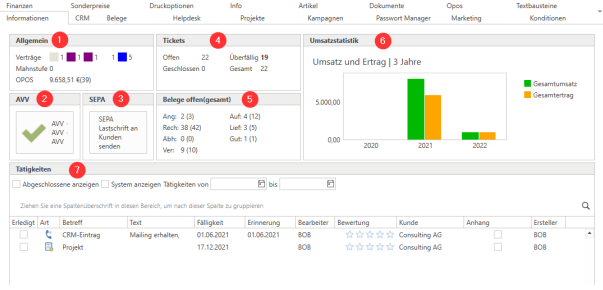
1 Under General, you will find the number and type of contracts that the customer has concluded with you. You will also see whether the customer currently has any outstanding invoices and what their current balance (OPOS) is.
2 Click the button to send the data processing agreement (DPA) to the customer and see whether the customer has already signed one with you.
3 If you have received a direct debit mandate from the customer, you can send a digital confirmation of this agreement to the customer and also store it in the customer data
4 View the customer's current ticket status here.
5 The number of currently open and historically processed documents for the customer is displayed here.
6 Graphical sales statistics relating to the customer over the last 3 years.
7 Shows you the tasks/activities that are recorded for the customer.
CRM
This area is primarily used to record customer systems during the acquisition phase. Almost all fields can be renamed and hidden if necessary. Possible assignments via the drop-down menus must be made in the global settings.
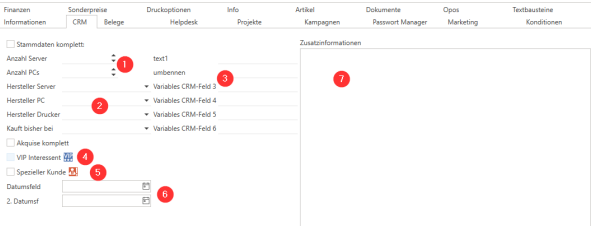
1 Two number fields
2 Four drop-down fields
3 Six free text fields for up to 100 characters each
4 VIP license plates
5 characteristics for special customers
6 Two date fields
7 a large free text field for continuous text
Receipts
Here you can see an overview of the customer's or supplier's documents. This tab is also displayed as long as no data record has been selected. In this case, you will find a complete overview of all documents for all customers and suppliers here.
1 The overview displays all of the customer's receipts
2-8 are the individual document types that can be created separately for customers.
9-13 are the individual document types that can be created separately for suppliers. If a data record has both properties (customer and supplier), all document types can be created and viewed.
14 The customer's master data sheet overview.
15 The preview for the currently selected document. It is possible to switch between header data, item view, and document-specific file structure.
16 The document preview can be collapsed here, or expanded again if it has been collapsed
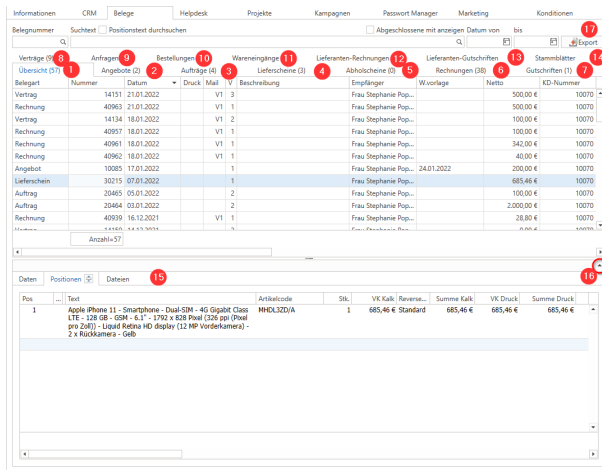
17 The Export button creates an Excel file of the displayed document overview. Existing structures and sorting are also transferred.
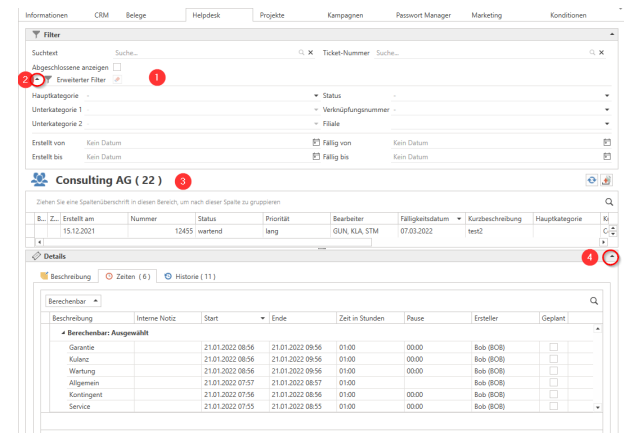
Help desk
Here you will find an overview of the customer's tickets. This tab is also displayed as long as no data record has been selected. In this case, you will find a complete overview of all tickets for all customers here. You can start processing a ticket by double-clicking on it.
1 Standard search options via search text and ticket number
2 The advanced filter options can be expanded to refine the search parameters
3 Here is the ticket list based on the search and filter options you have set
4 The preview for the selected ticket. It is possible to switch between description, time overview, and ticket history
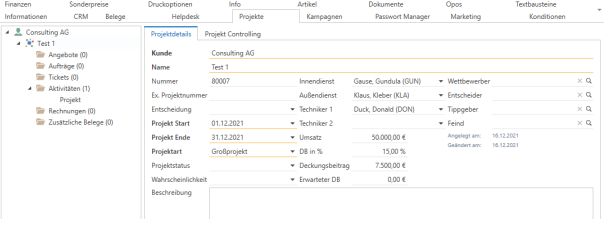
Projects
New projects are created using the button in the menu bar. Here in the tab, you will find the active customer's current projects, including the linked document directories and processes
Campaigns
If you have started a campaign using the campaign module, the relevant data will be displayed for the customers included in it in the Campaigns tab.
Password manager
Here you will find the password and access data created for the customer. To reset the password
To access the manager, the logged-in user must authenticate themselves again with their own password. The password manager is available via the Service Board license.
Marketing
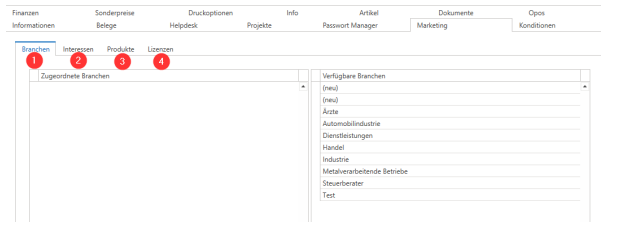
Industry:
Here you can store a more detailed grouping of your customers, i.e., which industry my customer is active in, in order to send out special mailings from c-entron with updates, innovations, or invitations to in-house events, for example. Available industries are maintained in the settings.
Interests:
The Interest tab has the same functionality as the Industry tab.
Products:
Here you can store products that are not part of your portfolio and that you have not sold to the customer via c-entron. With the additional license management module, you also have the option of adding a comment and/or an expiration date for the respective product, which will be displayed in your to-do list as a reminder.
Licenses:
The entries visible here originate from the PLM module (Product Lifecycle Management) and reflect the licenses/product family items sold to the customer, including prices and expiration dates.
Terms and conditions
General section:
1 Price list: Assign the customer the price list (VK 1-4) for the items that are relevant to them.
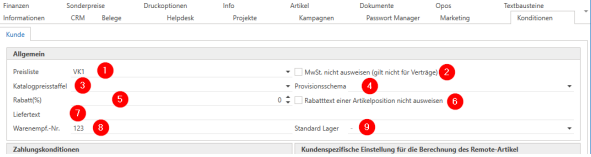
2 Do not show VAT: c-entron now recognizes whether the customer is located abroad based on the address and does not show VAT—provided that the address and country settings are correct. If, in special circumstances, it is necessary for a domestic customer not to be shown VAT, this can be controlled using the checkbox.
3 Catalog price scales: When you import scale prices from suppliers, these can be assigned to the customer generally.
4 Commission scheme: Enter a previously created commission scheme here that is to be used for this customer.
5 Discounts (%): Here you can set a general discount rate for all items for the customer and also configure the text layout of the discount texts (6).
7 Delivery text: This text is added to all of the customer's delivery notes if, for example, special considerations need to be taken into account during delivery.
8 Goods receipt no.:
9 Standard warehouse: If a customer is always served from a specific warehouse, this can be stored here.
Payment terms section:
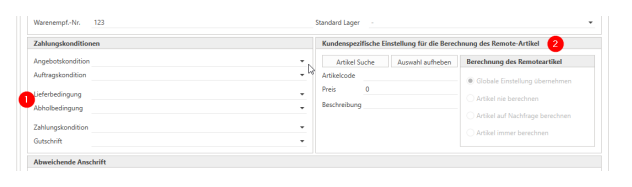
1 Here you can store terms and conditions or operating conditions for the selected customer using the pull-down menus. If no assignment has been made, the global settings under Settings -> Sales -> Documents -> Payment terms will be used.
2 Store customer-specific settings for the remote item here.
Different address section:

1 Direct delivery: Set the default setting for direct delivery here
2 Different delivery address / 3 Different billing address: Here you can see if different addresses have been stored for the document types delivery note or invoice. These can of course also be changed here. However, it is advisable to set all addresses permanently, as manually stored addresses are not evaluated and cannot be used for EDI orders. You can also set the address of another customer. Please note that this function only affects the address field in the document; the document continues to be issued to the original customer and contact person. Different addresses are entered directly into the corresponding fields in the Addresses section for quotes and orders, but only when continuing to the corresponding attachment is a pop-up window displayed asking whether the stored address should also be used.
Finance
General section
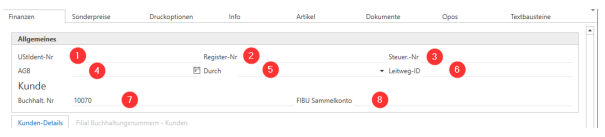
1 VAT ID number: Enter your customer's VAT identification number here so that it can be printed on invoices.
2 Register number: Enter your customer's register number here.
3 Tax ID: Enter your customer's tax ID number here.
4 Terms and Conditions: Fill in this field with the date on which you last sent the Terms and Conditions to the customer and..
5 … which employee did this.
6 Routing ID: This is required to create X-invoices correctly.
7 Accounting No.: For this field, you can set administratively whether the customer number should be automatically transferred as the customer number or whether the field should be filled in manually. In any case, it remains editable (numeric values only).
8 FIBU collective account: If your company is based in Switzerland, you can also manually enter this FIBU collective account instead of the accounting number.
Customer details section
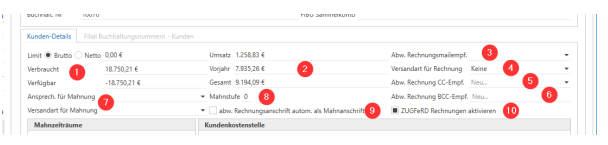
1 Here you can enter a limit in gross or net, e.g., for first-time buyers/new customers/etc. This will alert you as soon as the customer exceeds this limit. By default, only invoices are included in the calculation. However, in the global settings, you have the option of including other document types in the calculation. In the Availability field, you can see the customer's available amount.
2 Sales: View abbreviated sales statistics for the customer here.
3 Default invoice email recipient: If invoices sent by email are always to be sent to a specific email address, enter the contact person for whom this email address is stored here.
4 Shipping method for invoices: Set here whether the customer prefers to receive their invoices via email or printed by mail.
5 CC recipient: If a specific contact person also needs the invoice email, they can be added to the distribution list as a CC recipient.
6 BCC recipients: You can also enter an email address here to send the invoice email to this address as BCC.
7 Reminder: Define a contact person for reminders and the shipping method here. These are mandatory fields and must be filled in. Otherwise, no reminder can be generated.
8 Dunning level: Here you can see which dunning level the customer is at with you.
9 Use billing address automatically as reminder address: if you check this box, the billing address will always be used as the reminder address.
10 Activate ZUGFeRD invoices: Control here whether the customer should receive X-invoices or not
Section: Conduct in the event of a reminder
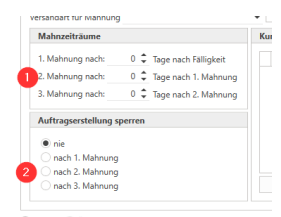
1 Reminder periods: Here you can define reminder periods that differ from the default settings. If you enter "0," the global settings will be used.
2 Block order creation: Here you can set the reminder level at which order creation should be blocked.
Customer cost centers area
Customer cost centers: If you work with customer cost centers, you can store them here with their respective numbers and descriptions

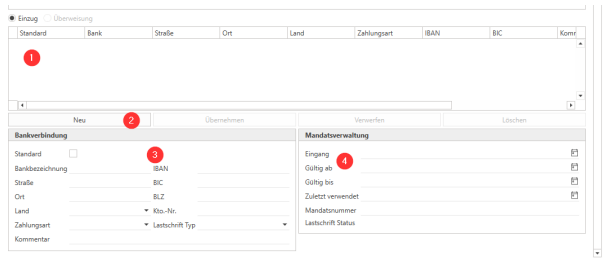
Bank details section
1 Here you can see the bank details created for the customer
2 To save new bank details, click "New" and, once you have entered the details, click "Apply" before saving the customer record again.
3 Enter your bank details here and, if applicable, associated payment methods and direct debit types.
4 In order to use a SEPA mandate, it must be registered with the corresponding bank account.
Special prices
Here you can store various discounts or surcharges for items or product groups, either time-limited or unlimited. Project prices are particularly important to note; this function is interesting for system houses that work with OPG or SPO prices. To do this, you should import this list under Master Data Project Prices and then store it here for the customer. If you need more information on this topic, please contact your c-entron consultant.

Printing options
Here you can control reports/forms specifically for a customer, deviating from the standard print settings, and, if necessary, the corresponding number of copies to be printed.

Information
Enter important information here, specific to the document type if necessary, so that this information is displayed in a pop-up window when the customer or a corresponding document is called up.
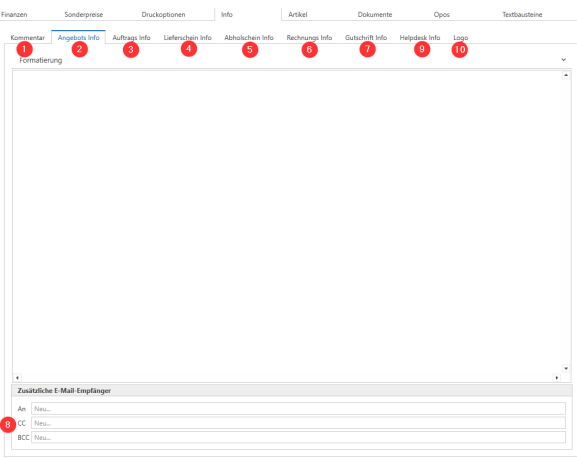
1 comment: Enter general information for this customer, which will then be displayed in a pop-up window when the customer is called up. This information can also be displayed to technicians in the service board.
2-7 Document-specific information: The information entered here is displayed in a pop-up window when the corresponding document type is called up or newly created. Please note that you also have the option of adding additional email recipients for each document info (8).
9 Helpdesk info: This info is displayed in a pop-up window when a ticket is created or opened; this info is also displayed to technicians in the service board.
10 Save a customer logo so that it is displayed in the Service Board Online at the customer's site.
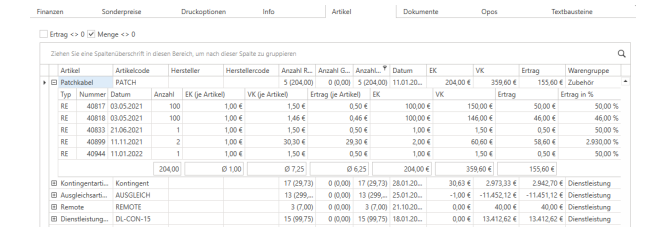
Article
Here you can see all items sold and offered to your customers. You can right-click on individual items and decide whether you want to create a new offer, order, etc. From there, you also have the option of opening the original receipts.
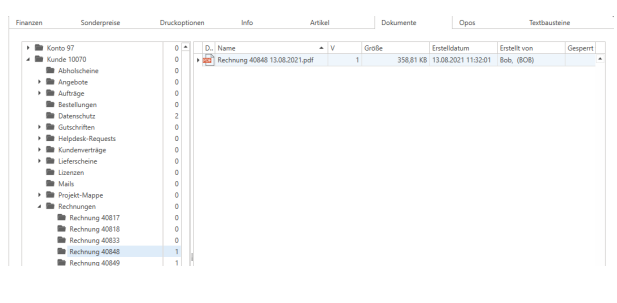
Documents
A standard tree structure is always created under Documents, which you can expand. You can drag and drop new files here or right-click and select "Add files." All documents are versionable and are stored in the database. Whenever you generate a PDF from a document for a print job, export, or email, c-entron saves a copy of the PDF in the corresponding directory so that you can regenerate the original PDF that was sent to the customer at any time
Opos
Here you will find all of the customer's currently open invoices; if payment is overdue, the invoices will be displayed in red letters

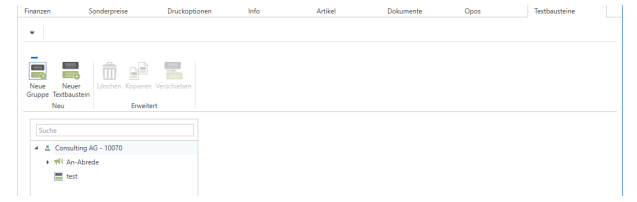
Text modules
Here you can store special text modules for the selected customer, deviating from the standard text modules. Here, too, you have the option of working with variable placeholders.