%20(1).png)
Article import
Basics of the "Article Import" module
The article import temporarily imports the data into the ManufacturerArticle table (article data, prices, etc.) according to the field assignment and, if necessary, into the ManufacturerArticleGraduatedPrices table (when configuring graduated prices).The imported articles are then available as "EXTERNAL" articles and can be used in "Quotation" and "Order" documents as needed and converted to "Own articles."
Create new article imports
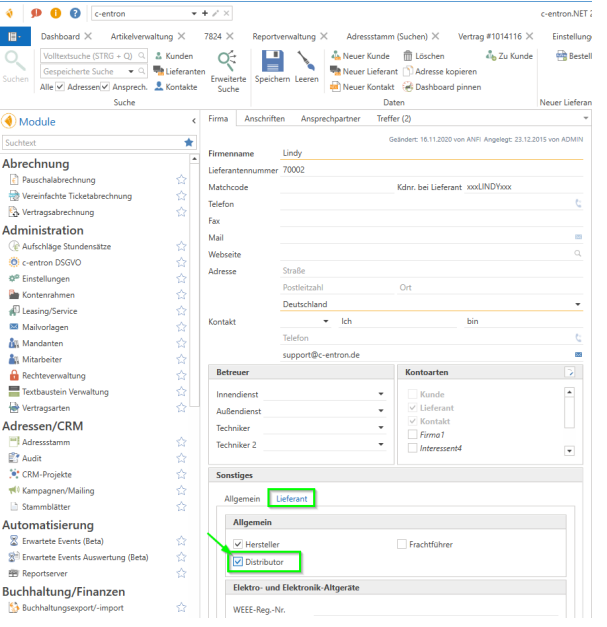
Address master - Supplier
Before the "item import" can be created, the corresponding supplier/distributor must first be created in the address master (in this example, Lindy). This supplier must also have the "Distributor" property activated:
"Article Import" module
Overview
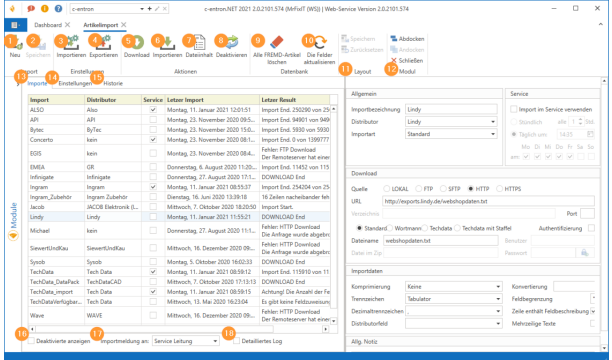
1. [New Import] So that we can manually create a new article import
2. [Save Import] This button becomes active as soon as changes that can be saved have been made to an import.
3. [Import]This opens a dialog box that allows you to import a predefined import file into your database
4. [Export]This creates an export file that you can import into other databases.
5. [Download]Starts the download of the defined file in order to assign fields based on this file.
6. [Import] Imports the defined file based on the field assignments. NOTE: Depending on the file size, this process may take several minutes
7. [File contents] After step 5, you can view an excerpt from the file contents here (50 data records). This display shows the file in raw form and additionally formatted according to the specifications in the "Import data" section
8. [Deactivate] & [Activate]This deactivates the selected article import. At the bottom left of the module, you have the option to display "Deactivated items." With [Activate], you can reactivate deactivated imports (same button).
9. "Layout" This button is used to save your personal layout or reset the layout to the default
10. "Module" This button allows you to dock and undock the module from the application.
11. "Imports" tab Lists all active article imports • "Import" column: Shows the selected "Import name" in the overview • "Distributor" column: Shows the selected "Third-party manufacturer/distributor" in the overview • "Service" column: Shows whether an import interval has been defined. NOTE: For cyclic imports, the integrated services must be activated in the c-entron WebService Connection Manager.• "Last import" column: Displays the date and time when the last download or import took place• "Last result" column: Displays the last result of the import from the log
12. "Settings" tab: Here you can assign or edit the field assignments c-entron fields <-> file fields
13. "History" tab: Shows you the logs/results of the actions performed. You can also configure various filter settings here.
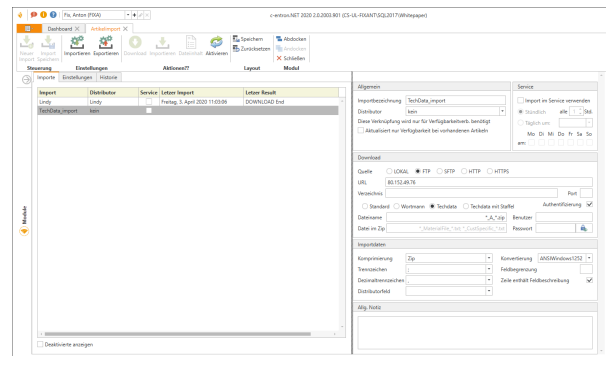
Settings for the selected article import
When you select one of the imports, the corresponding settings open in the right-hand half of the application (here using Lindy as an example):
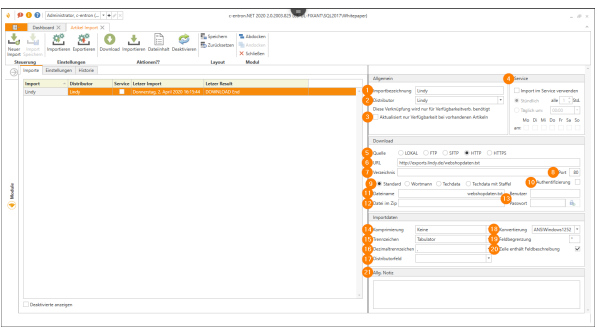
"General" section
1. "Import name": Free text for naming the import
2. "Distributor": A "third-party manufacturer" must be defined here if it is a single import. For collective imports such as EGIS, Concerto, etc., no selection may be made here.
3. "Only update availability for existing items": This setting is only required if a distributor provides available quantities in separate files that are usually updated hourly (e.g., Ingram and TechData). This flag must not be set for a "normal single import" of items.
"Service" section
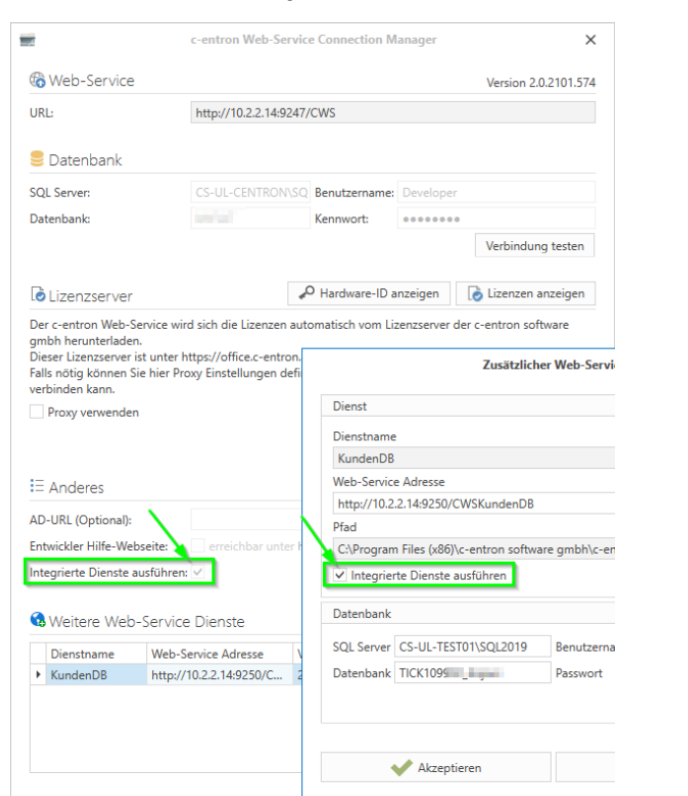
4. Use import in service: Here you can activate or deactivate whether the c-entron WebService processes imports cyclically. In the WebService, this can be completely deactivated for the WebService by deactivating the "Execute integrated services" property. NOTE: For cyclical imports, the integrated services must be activated in the c-entron WebService Connection Manager. a. Hourly: You can specify the interval in hours at which the import is to be performed
b. Dailyhere you can define both the time of execution and the day of the week on which the import should be carried out. NOTE: When selecting the import time, please consider when and how often this file is generated by the distributor. For example, it is unnecessary to re-import a file that is updated and provided by the distributor once a week every day. Similarly, if the file is updated and provided daily at around 4:00 a.m. and you configure the import for 3:00 a.m., the file from the previous day will always be imported.
Download section
“5. “Source”:
a. Local: If it is a file stored locally on your device (ideally UNC path or a network drive) b. FTP: For the old but still widely used File Transfer Protocol c. sFTP: For the modern SSH File Transfer Protocol d. HTTP: For unencrypted HTTP connections. HTTPS: For encrypted HTTPS connections. 6. "URL": For FTP, sFTP, HTTP, and HTTPS connections, the corresponding URL for the connection must be specified here. NOTE: URLs that contain a username and password are also possible
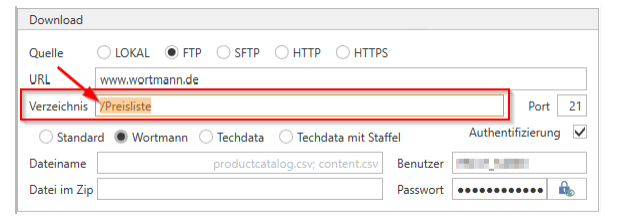
7. "Directory": For Local, FTP, and sFTP, you can specify the path where the file to be imported is located here. "Port": For specifying the port. Standard ports are, for example, HTTP: Port 80; HTTPS: Port 443; FTP: Port 21; sFTP: Port 229. Type of import (for special cases): a. Standard: This setting should be selected for all imports except Wortmann and TechData. A file is downloaded and imported according to the specifications. b. Wortmann: This property downloads both the "productcatalog.csv" and "content.csv" files from the server and merges them into a table. For this, it is essential that the distributor field "ReferenceNo" is assigned to the CENTRON field "Hest. Code" because the JOIN of the two data records is based on this number. In principle, the Wortmann import can also be carried out as a "Standard" import, but then the detailed descriptions contained in the "content.csv" file cannot be used/selected.c. TechData: This feature downloads both the defined import file, usually "*_MaterialFile_*", and the "*_CustSpecific_*" file from the server and merges them into a table. The "*_CustSpecific_*" file contains your special prices at TechData. The TechData import can also be performed as a "standard" import, but then only the regular purchase prices for third-party items are available. d. TechData with graduated pricing: This feature downloads both the defined import file, usually "*_MaterialFile_*", and the "*_CustSpecific_*" and "*_CustSpecificQty_*" files from the server File from the server and combines them into a table. The "*_CustSpecific_*" file contains your special prices and the "*_CustSpecificQty_*" file contains your graduated prices at TechData.
10. "Authentication": This property must be set if the file download requires authentication with a username and password, even if these are encrypted or unencrypted in the URL.
11. "File name": Enter the name of the file to be loaded here.
12. "File in archive": If the downloaded file is a compressed archive (*.ZIP and *.GZ are supported), you must specify the name of the file to be imported here.
13. "Username" and "Password": If "Authentication" is enabled, a username and password for the download can be specified here. An entry is not necessary here if the URL already contains this information.
"Import data" section
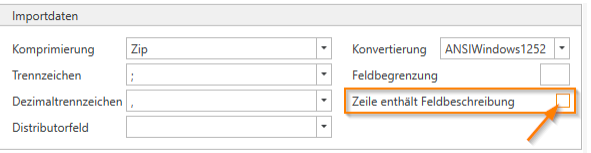
14. "Compression": If the downloaded file is a compressed archive (*.ZIP and *.GZ are supported), the type of compression must be specified here.
15. "Separator": Here you must define which character in the file to be imported should be used as the column separator. You can choose between "Tab," "'" (apostrophe), "," (comma), ";" (semicolon), and "|" (pipe)
16. "Decimal separator": Here you must define whether the separator for numerical values in the file to be imported is "," (comma) or "." (period). NOTE: Selecting the wrong decimal separator would result in significantly higher or lower values.Example 1: The purchase price is specified as 1,999.99 in the file. The decimal separator "." would import a value of 1.99999 EUR. Example 2: The purchase price is specified as 999.99 in the file. The decimal separator "." would import a value of 99999 EUR
17. "Distributor field": Here, you can select a column from the file to be imported, which is used for distributor assignment in collective imports such as EGIS, Concerto, etc. NOTE: If a column is defined here, no distributor may be defined under 2. "Distributor."
18. "Conversion": This option allows you to set the conversion of the import file to ANSIWindows1252, ASCII, or UTF8 format. DOS-compliant texts have ASCII format, while texts created in Windows have ANSI format. UTF-8 is identical to ASCII format in the first 128 characters and covers most encodings of Western languages.
19. "Field delimiter": In addition to the regular separators, some imports have a field delimiter for individual or all data records, e.g., if the separators used are also used in various fields such as the description. Here is an example from INTOS, where quotation marks are used in the columns Type designation, Short description_de, and Description_de
The import then ignores these otherwise incorrectly recognized separators if they are within a field delimiter. Quotation marks or apostrophes are often used as field delimiters. 20. "Line contains field description": Many files have a description of the respective columns in the first line, which facilitates the manual creation of a new import as well as the plausibility check during field assignment. 21. "General note" area: Here you can store notes on the respective import. E.g., update time of the distributor file, etc
Import an existing configuration
The corresponding import *.json file can be selected using the [Import] button in the ribbon under "Settings": Here, for example, is the FTP import from TechData:
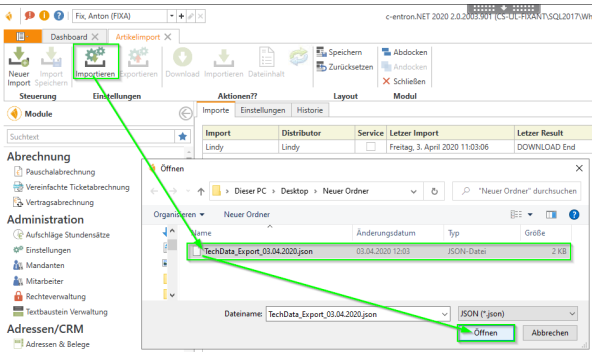
The selected import is now in the list of article imports and can be edited
Editing an imported or otherwise existing article import Here, continuing with the TechData example:
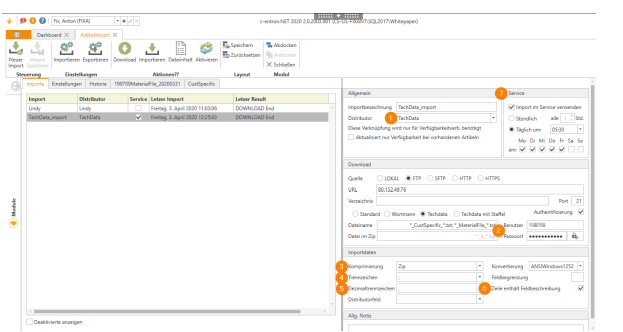
1. Since this is not a bulk import, first assign the distributor.
2. TechData Import also requires authentication with a user name and password.
3. The file is compressed with Zip
4. The unzipped file has ";" semicolon as column separator
5. The separator for numerical values is "," comma
6. The first line contains the column/field description
7. To configure the import time, you should check directly on the server when the distributor generates this file and define the time with a time buffer. In the TechData example, the files were created between 4:17 a.m. and 5:01 a.m. over the last 6 days, so my chosen import period here is the maximum value + ~30 minutes, i.e., 5:30 a.m. Monday to Friday.
NOTE: If you select the import period too early, this would mean that you would always import the data from the previous day, i.e., not the current day's data.
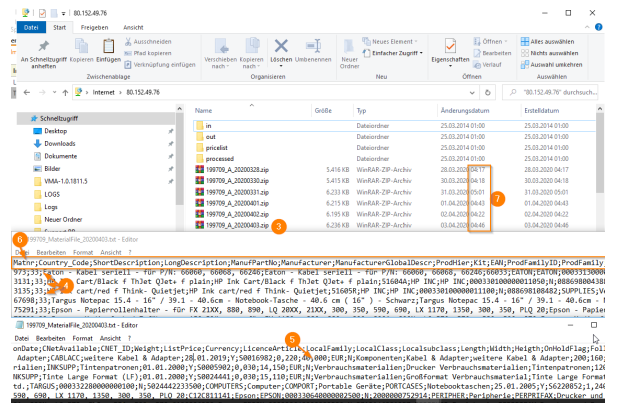
After successful download, the field assignment can be made or checked:
NOTE: Some distributors allow the import file to be configured manually, which means that the import file may differ significantly from your file. In this case, the configuration and field assignment must be completely revised.
The Distributors Field Assignment
The "Distributor Field" column: Here, a field from the file to be imported should/must be assigned to the corresponding "c-entron field." The names of the distributor fields can vary greatly from distributor to distributor. In rare cases, the import file does not contain a "field description" (or is deliberately deselected), ..
...then the assignment must be made based on the column number (e.g., ALSO): In this case, the letter in the import file corresponds to the column number (A=1, B=2, C=3, D=4, E=5, ..., Y=25, Z=26)
The "Prefix" column
Prefixes for the "Distributors Field" column can be defined here. For example, Wortmann provides product images, but the import file only contains the name of the image file (in the "ImagePrimary" column). Since the URL from Wortmann is always the same and only differs in the name of the image file, the URL https://www.wortmann.de/content/files/images/ProductImages/medium/ can be stored here as a prefix, and the entry from the "ImagePrimary" column is then appended directly to the defined prefix:
The "Postfix" column
Postfixes for the "Distributors Field" column can be defined here. This is rarely needed, but can be used as in the example under "Prefix," e.g., for the URL, to generate the file name for images from the article code + postfix. In the case of Wortmann, to stay with the example from the prefix, this would look as follows:
Possible variables and their possible applications"\n" Inserts a line break and then inserts the assigned field there
Manual download and import of the distributor file
Manual import is started by clicking the [Import] button.
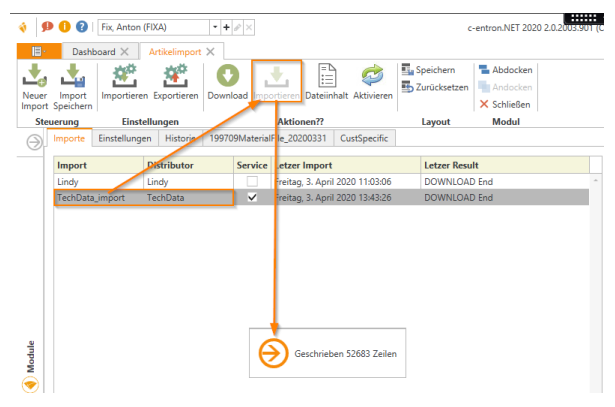
The activity icon displays the number of records currently being imported. Once the import is complete, the number of imported records is listed in the "Last Result" column

Automatic, cyclical article import
Basics of the article import service
Cyclical article import is part of the c-entron WebService. This uses the same logic as manual article import in c-entron .NET. Only the executing device changes accordingly. If article import is performed manually via c-entron .NET (native SQL connection), the client performs the import. If, on the other hand, the article import is performed manually via c-entron .NET (WebService connection) or cyclically via the WebService, the WebService server performs the import. The WebService server/WebServer is often set up in a restrictive environment, so if the import can be performed manually but not cyclically, the cause is usually the server environment/firewall of the WebService server.The c-entron WebService performs the services at 10-minute intervals, which means that a cyclical import can be delayed by a maximum of 10 minutes.
Example:
c-entron WebService starts at 8:55 a.m., and an article import is to be performed daily at 9:00 a.m. => The import then starts at 9:05 a.m. During the first run at 8:55 a.m., no import is due. During the second run at 9:05 a.m., the import due at 9:00 a.m. is then due for import and is processed.
NOTE: We recommend running these "overnight" or "in the morning," e.g., 6:15 a.m., 6:30 a.m., 7:00 a.m., ... until 8:00 a.m., so that they do not "burden" or interfere with ongoing operations, which, depending on the work and queries or reports, can otherwise lead to higher utilization and timeouts.
Execute integrated services in the c-entron WebService and/or sub-WebServices In the c-entron WebService or in the sub-WebServices, cyclical article import (and thus also escalation servers) can be deactivated using this property
The API article import
In order to get the article import running for API, a correct and current URL is required first.
To generate this URL, go to the URL https://pricelist.api.de/
Configure your API price list here:
If you need assistance with configuration, please contact your API support representative
Authentication: User ID: Your customer number/user ID
Password: Your personal password
Authentication method: simple
Action:
Promotion: Full
Individual SKU: no entry
Output format:
Format: csv
Character set: utf-8
Content Type: text/plain
Delimiter: ; (we recommend using the standard semicolon delimiter)
Limit: No entry
Decimal separator: , (we recommend using the standard decimal separator comma) Content-Disposition-Filename: Here you define the file name of the import file
Options: Everything can remain disabled here.
Format:
Standard: Default
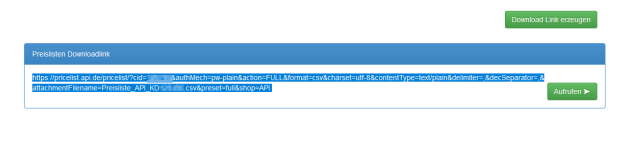
Once you have made the appropriate settings, click on the [Generate download link] button. You will now receive your individual download link. Select it and copy it to the clipboard
In the c-entron article import module, enter the settings as follows:
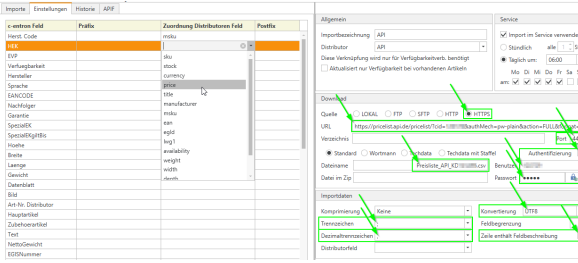
Download:
• Source: HTTPS
• URL: Here you can now enter the download link you just created from the
• Paste clipboard • Port: 443
• File names: Here you can now enter the file name that you specified in the API configuration
• individually selected and specified under "Content-Disposition-Filename:".
• Authentication: Enable
• User: Your API customer number/UserID
• Password: Your personal API password
Import data:
• Compression: none
• Separator: Here you can enter the separator you want to use in the API
Configuration individually selected and specified under "Delimiter:".
• Decimal separator: Here, you can now enter the decimal separator that you have individually selected in the API configuration and specified under "Decimal separator:".
• Conversion: Here, you can now enter the file encoding that you selected individually in the API configuration and specified under "Charset:".
• Line contains field description: Activate
Now save the changes with [Save import]. You can then download the import file with [Download] and assign or check the fields in the "Settings" tab.
NOTE: Regarding automatic, cyclical imports, we recommend that you contact your API support representative to clarify when and at what cycle is the best time to import the data.
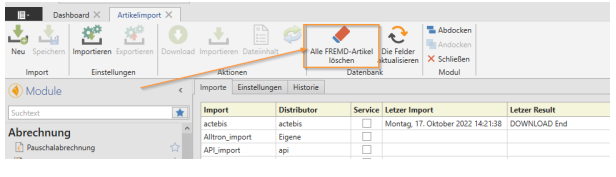
The [Delete all FREMD articles] button in the article import
The [Delete all third-party items] button in the item import empties the Manufacturer items table. This removes all third-party items from your database so that none remain.
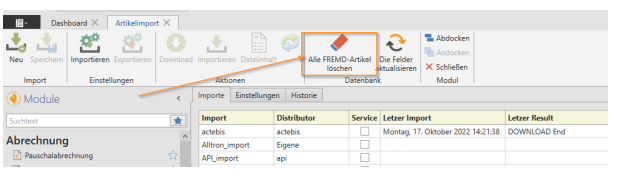
IMPORTANTplease note that after executing the command, third-party items will no longer be available until the item import is executed again (either manually or via the service). It is therefore recommended to execute this command shortly before closing time so that the items are stored again overnight by the service
Error analysis: The import history can be viewed in the "History" tab. With a little technical know-how, the messages listed here can be used to identify the cause.
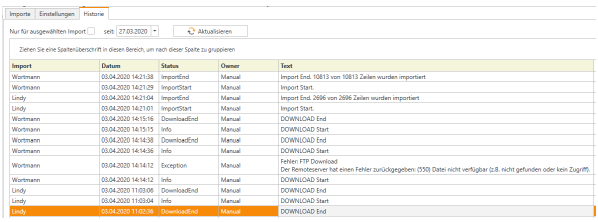
Case study: In the screenshot above 03.04.2020 14:14:12 – "Error: FTP download The remote server returned an error: (550) File not available (e.g., not found or no access) The subdirectory "/price list" (at Wortmann) was not specified on the FTP server, so the specified file could not be found and therefore could not be downloaded
Frequently occurring errors and FAQs
Problem: Article imports all run through with 0 articles, even though the source data is available and has content – article import fails. Solution: Check whether the table for external articles is "full" by running the following query on your database (c-entron SQL Manager): SELECT MAX(i3d0) FROM ManufacturerArticle
If a larger i3D number than 2,000,000,000 (billion) appears here in the "I3D0" column, then the i3D table for third-party items is full (integer data type -> 2.x billion). To reset the "Manufacturer items" table, simply click on the [Delete all THIRD-PARTY items] button in the item import. This will remove all third-party items from your database so that none remain.
You should then be able to import items successfully again.
IMPORTANTplease note that after executing the command, third-party items will no longer be available until the item import is executed again (either manually or via the service). It is therefore recommended to execute this command shortly before closing time so that the items are stored again overnight by the service.
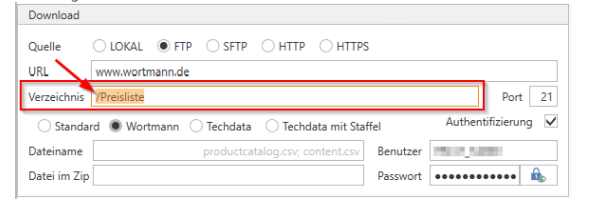
Problemerror: FTP download The remote server returned an error: (550) File not available (e.g., not found or no access)
Solution:The subdirectory "/price list" (at Wortmann) was not specified for the FTP server, so the specified file could not be found and therefore could not be downloaded.
Problem: The "Service" section is disabled.
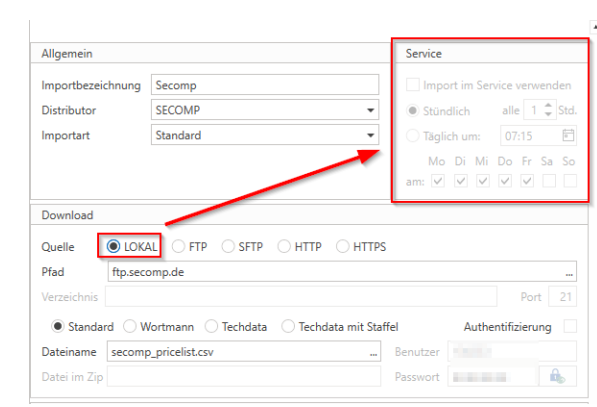
Solution: If the "local" download option is selected in the settings during article import, the "Service" section is deactivated, as this can only be executed manually.
Problem: How can the old prices from the article import be deleted from the database?
Solution: Clear the Manufacturer Items table by clicking the [Delete all third-party items] button in the item import. This will remove all third-party items from your database so that none remain.
IMPORTANT: Please note that after executing this command, third-party items will no longer be available until the item import is executed again (either manually or via the service). It is therefore recommended to execute this command shortly before closing time so that the items are stored again overnight by the service