%20(1).png)
Bill of materials manages serial numbers
(available from release v2.0.2211.x)
Application example: Your customer orders PCs, which you assemble and, if necessary, process individually, deliver, invoice, etc.
In the module itself, you will also find the info symbol "i," which you can use to display our "tips."
Requirements:
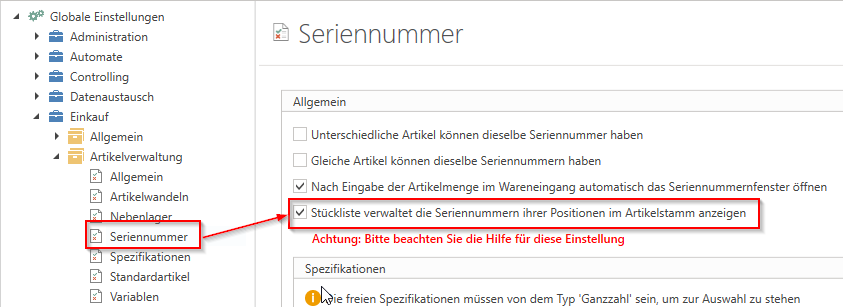
In the global settings under "Purchasing -> Item Management -> Serial Numbers," the checkbox "Show BOM manages the serial numbers of its items in the item master" is active.
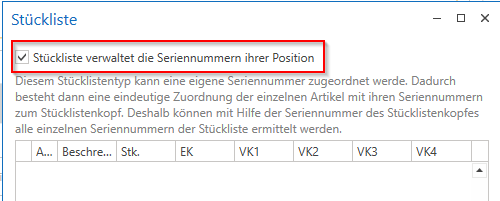
In item management, for the desired items that have the property "Item is a bill of materials," the checkbox "Bill of materials manages serial numbers" is active in the "Bill of materials" area (visible due to the above setting). This item automatically receives the necessary (and therefore grayed out) activated property "Serial number required."
Procedure:
Now you can insert this bill of materials header item into a document or create a bill of materials with this "bill of materials header."
If this bill of materials contains items with "serial number-required articles," you can scan them unchanged by clicking on "Scan serial numbers" (of course, the serial numbers can also be stored automatically during picking).
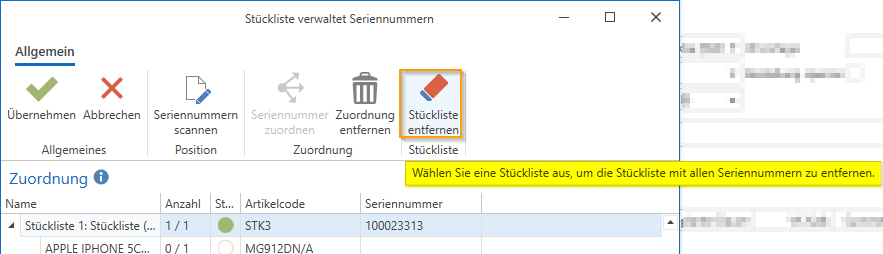
If you now select the position of this bill of materials header and click on [Scan serial number], the "Bill of materials manages serial numbers" management screen appears.
Here, it now displays as many of these "parts lists" (with the "serial number required" items in the parts list) as the parts list header item has in terms of quantity. (In the screenshot below, the parts list for this item contains 3 items – therefore, three "parts lists" for the selected item are displayed for assignment).
In the "Assignment" area, you can now select the bill of materials header or the respective item and use "Scan serial numbers" to select or remove the serial numbers for this item.
Alternatively, you can also enter the serial number in the "Not yet assigned serial numbers" area, enter the desired serial number in the "Search for exact serial number" field, or scan it with a barcode scanner and assign it to the respective item (must be unique or found). The item itself is automatically "recognized" by the serial number.
The serial numbers of the individual items that have not yet been assigned by default can then be found in the lower section "Serial numbers not yet assigned."
Now the serial numbers of the BOM items must be assigned to the correct BOM header.
There are two options for this:
Option 1—manual assignment:
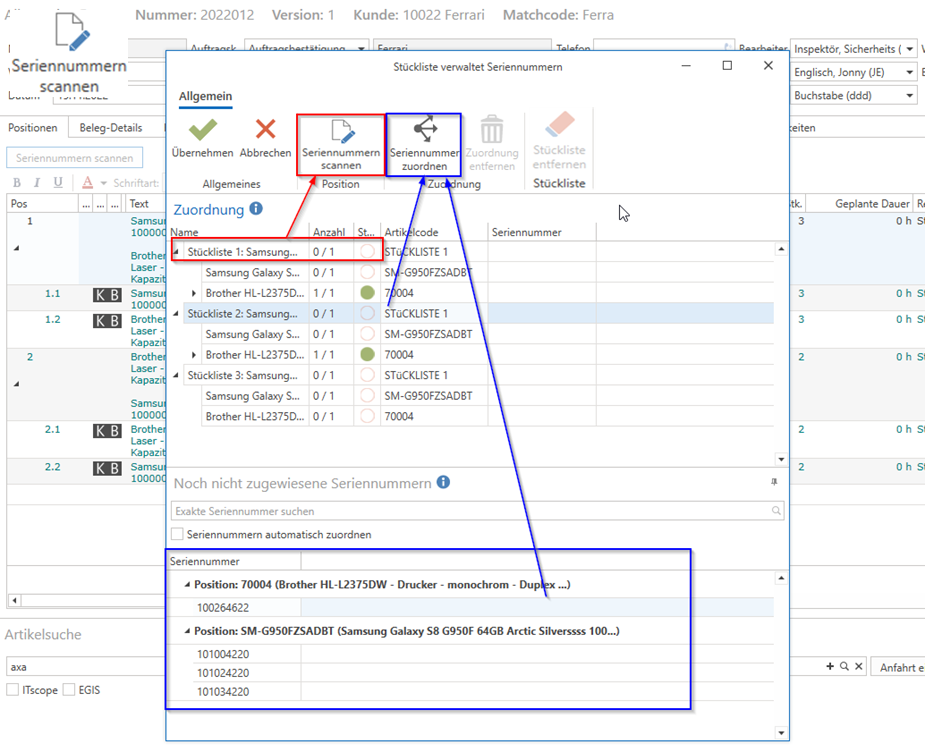
In the "Assignment" area, select an item from the parts list to which the serial numbers will now be assigned (it does not matter which one you choose, as the serial number will be assigned to the corresponding item in the parts list – it just has to belong to the respective parts list). You can then double-click on the desired serial number in the "Serial numbers not yet assigned" area to assign it to the bill of materials selected above, or you can simply select the bill of materials and assign it using the "Assign serial number" button.
The assigned serial number is removed from the lower area (and if it was the last "unassigned serial number for this item," the item is also removed) and the serial number appears in the upper assigned area for this item (can be expanded/collapsed). You can continue to assign serial numbers until all parts lists and items have been completely assigned serial numbers (number 1/1; 2/2, or green SN circle).
You can apply the changes you have made by clicking "Apply."
If you have assigned the wrong serial number, you can "expand" the parts list and the parts list item and undo the incorrect assignment by double-clicking or selecting and clicking on "Remove assignment." The serial number is now no longer assigned to this item in this parts list and reappears under "Serial numbers not yet assigned."
Option 2 – Assign serial numbers automatically – Scanning
You can activate the "Assign serial numbers automatically" checkbox. If you now scan several serial numbers for the parts list items and also the serial number for the parts list header of the desired parts list, all of the serial numbers you just scanned will be automatically assigned to the parts list whose parts list header has the scanned serial number. The order does not matter here.
However, if you want to scan and automatically assign serial numbers from multiple parts lists, always scan the serial number of the parts list header first, followed by the serial numbers of the items in this parts list.
Example: You have 3 bills of materials with 2 items in each bill of materials – but the serial numbers for one of the two items in the "middle/second" bill of materials are still missing. In this case, please scan as follows:
Serial number from the bill of materials header of the first bill of materials
Serial numbers of the two (all) items in this bill of materials
Serial number from the bill of materials header of the next bill of materials
Serial numbers of the items in this bill of materials (if available)
Serial number from the bill of materials header of the next bill of materials
Serial numbers of the items in this bill of materials
So you simply start with the serial number of the head, and all subsequent serial numbers are assigned to the parts list of this last scanned head.
You can then transfer fully assigned parts lists to the same or different follow-up documents. In the follow-up document, you can also remove entire parts lists in the "Parts list managed serial numbers" management if you do not want to "deliver/invoice" all parts lists at once.