%20(1).png)
c-Flow - English
Our new C-FLOW! module is available on the Service Board and Service Board Online
In "C-FLOW!", you can create templates for public, customer-related, and internal applications and make them available to your employees and customers.
Digitize your (internal) processes with C-FLOW! using the new form system in the Service Board for smoother operations.
Possible areas of application:
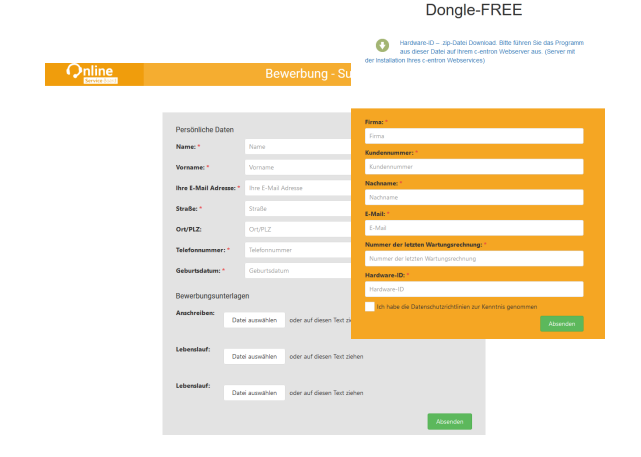
Public web form – can be published on a website Possible examples that are currently in use: c-entron OSID registration / Dongle Free, as well as applicant management
2. Global templates – every system house customer can access these templates via a predefined web account
3. Customer-specific templates – either for all customers or only selected customers, who can then access their approved templates via their account. The templates can also be sent by email.
4. Internal templates – Used to improve your company's internal processes. These are visible to logged-in employees in the Service Board and Service Board Online.
Basic settings for the C-FLOW! module
Current Service Board version including complete configuration
Current service board online version including complete configuration
For the use of RiverSuite Inventory data:
Complete RiverSuite configuration, RiverSuite Inventory
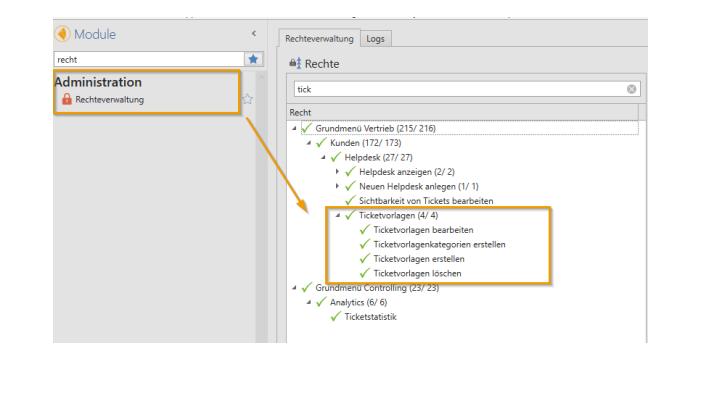
.NET rights management for the C-FLOW! module In c-entron.Net, you will find the rights management settings under Administration -> Rights Management
Settings for the service board for customer access
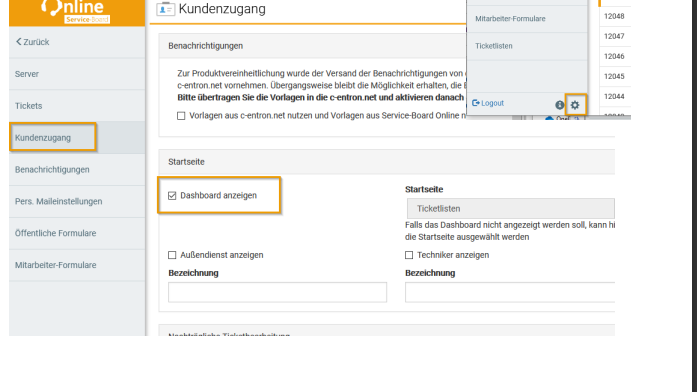
Log in as an internal user in Service-Board Online, then go to Settings (gear icon) in the lower left bar: There, select the Show Dashboard function.
Setting for external URL generation
The settings for AV contracts can be found in c-entron.NET under Global Settings -> Mail/Calendar -> Documents -> Order Processing Contract
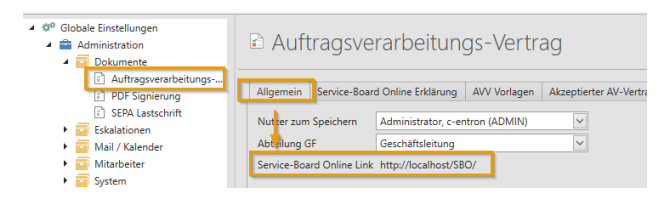
Enter your Service Board Online URL under the Service Board Online Link item.
Select a URL/address that is accessible "from outside," as the URL for ServiceBoard Online will be sent to the recipient in an email.
logically, "localhost" cannot be accessed from outside.
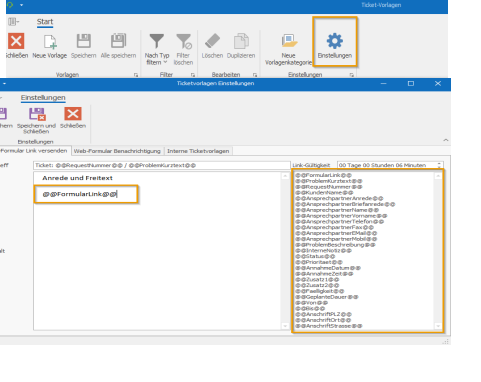
Setting for sending ticket templates by email
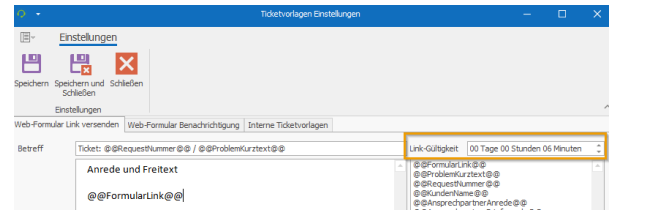
You can define the template, including the variables for sending the forms by email, under Settings > Web Forms. You can use the variables on the right in your text. To display the form in the email, you must use the variable @@FormLink@@
You can set the link validity here. Please note that this value is globally valid for all links sent for the form. This value is checked when the link is accessed, so if you change this validity after sending the email, this value will also be used here.
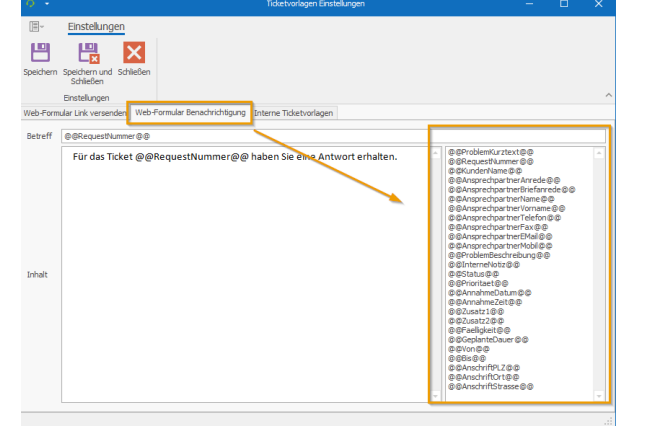
You can define the reply email to your agent at the following location:
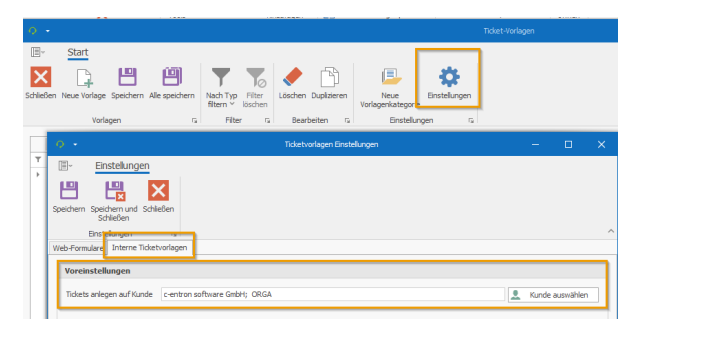
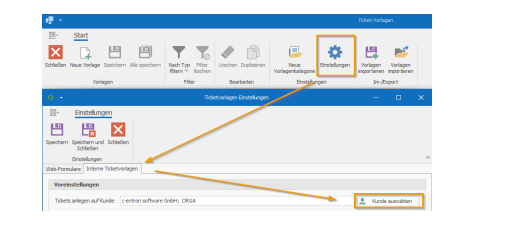
Setting the editor for internal ticket templates
Internal tickets are created by default for an internal user in your company. You can configure the default settings in the ticket templates under Settings. To do this, go to internal ticket templates and select the default processor (e.g., Support, Orga, etc.). It is also possible to make subsequent changes to individual internal tickets. For more information, see the section: "Internal."
Creation of ticket templates
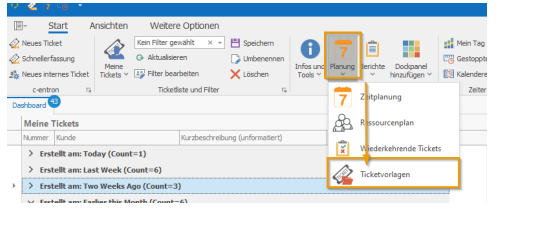
You can find the ticket templates in the Service Dashboard -> Planning -> Ticket Templates.
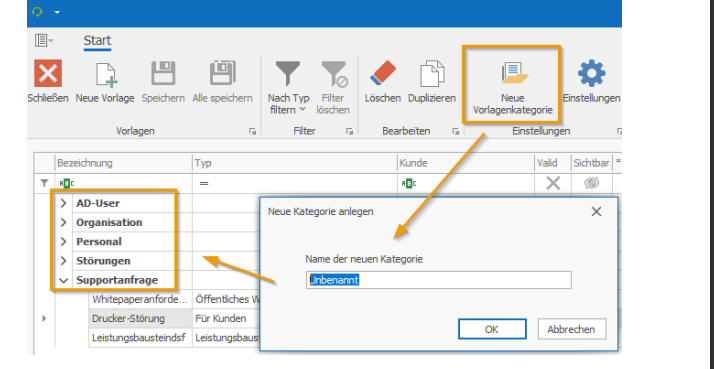
To create new templates, the first step would be to create a template category
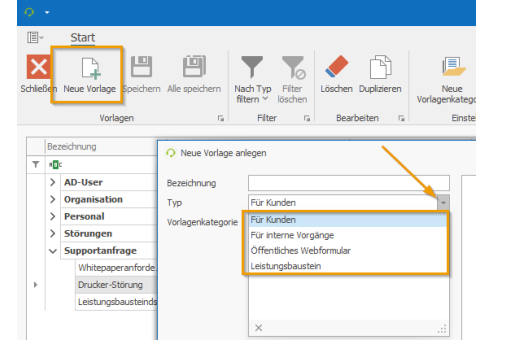
To create a template, click on the "New Template" button, select a suitable name, the previously defined template category, and the type of template (for customers, for internal processes, or public web form)
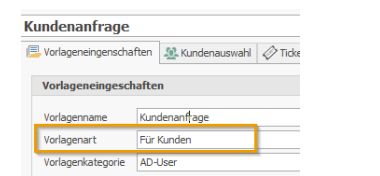
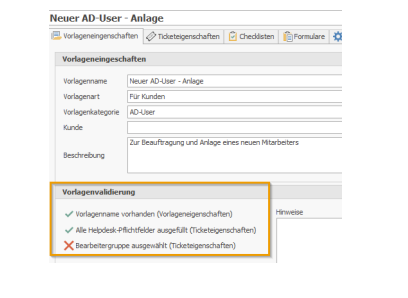
Template properties
Once the template has been created, you can adjust your settings again in the template properties.
In the description field, it is possible to enter a "help text" for the user.
For template types "For customers," you can either share the template with all customers or make it available only to a selected company in the "Customer" field
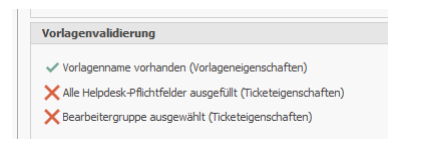
Template validation
The template validation section shows you which necessary elements have already been set in the ticket creation process and which are still missing.
You can define visibility in the template properties using the "Template Visible" flag.
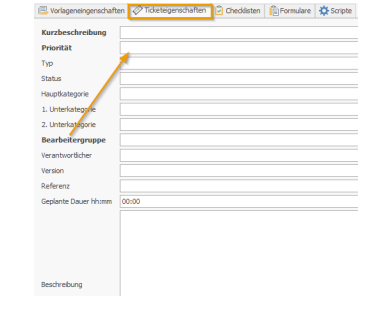
Ticket properties
In the "Ticket Properties" tab, you can define the criteria for ticket creation. These fields are analogous to ticket creation in the Service Board.
Checklists
The Checklists tab takes you to checklist management. Predefined checklists from the service board can be attached to the ticket here.
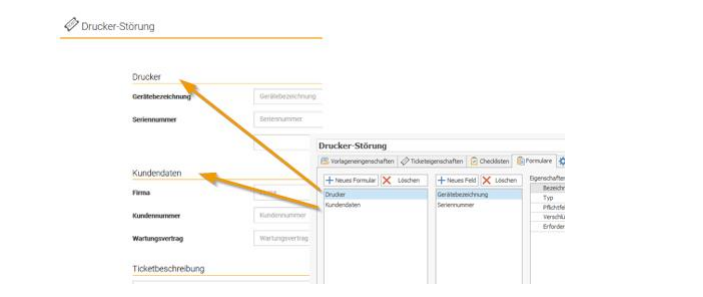
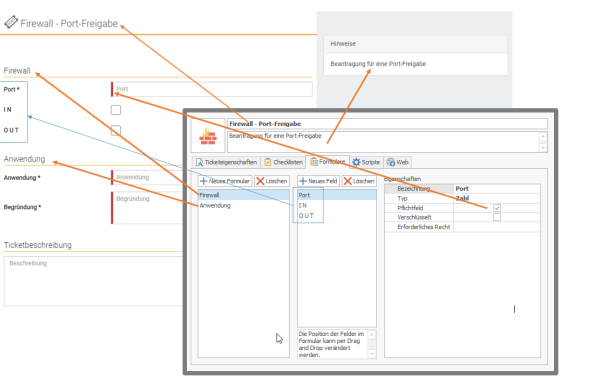
Forms
You can define the actual forms in the tab of the same name. Here, on the right-hand side, you can set visual theme blocks under "New form" that function as "headings" and visual separators in your form.
For new form fields, you can choose between the following definitions under "Type":
Text line, email, date, password, number, decimal number, time, text field (multiline), checkbox, file: server, workstation, SNMP, AD user (last 4 fields require a RiverBird connection)
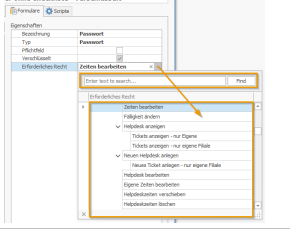
Fields can be defined as mandatory fields, and encrypted content is supported. In the Required Rights section, you can define who can see this data once you have activated the "Encrypted" flag.
This right is linked to .NET rights management and shows you the usual .NET rights tree:
Here is a comparison of the backend and frontend – what information is displayed where:
Important! Subsequent changes to forms only affect newly created form versions; tickets that have already been created with forms are not affected by these changes.
Customer forms
You can define customer-specific forms in the template properties using the template property "For customer":
If this form is used for "all customers," select the corresponding button. There are two ways to release the form only for certain customers:
1. Providing the form via a predefined "advanced search" from centron. Here, the web service checks hourly which customers meet the conditions of the "advanced search."
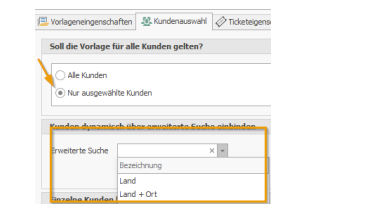
It is also possible to combine this search with search option 2. If customers have been excluded in the lower section, they remain excluded even if they would appear in the "Advanced Search."
2. In the lower section, you will find the function area for manually selecting and adding or even excluding customers for this form:
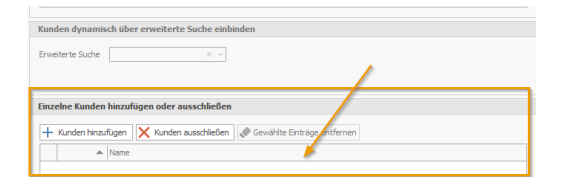
This gives you many filter options: All companies provided by filter X, excluding companies 1, 2, and 3, or all companies provided by filter X, plus companies 4 and 5
C-Flow contact management in the customer area
In the "Contact List" field type, your customer can make changes to the contacts and add new ones.

(This feature is only available for forms that are sent directly to a customer via email.)
The required settings are the mandatory fields for contact persons defined in c-entron.net:
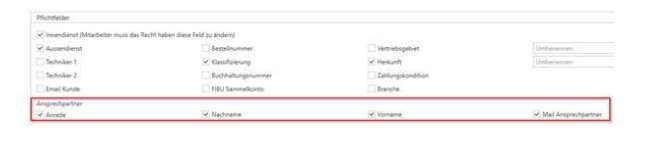
These mandatory fields are checked when creating new contacts and editing existing contacts.
(NOTE: There is no verification for contacts that the customer does not edit.
Further tests:
Standard contact persons and alternative invoice recipients cannot be deleted
Number of representatives must remain the same
Setting new default contacts and alternate invoice recipients removes this property from the previous contacts

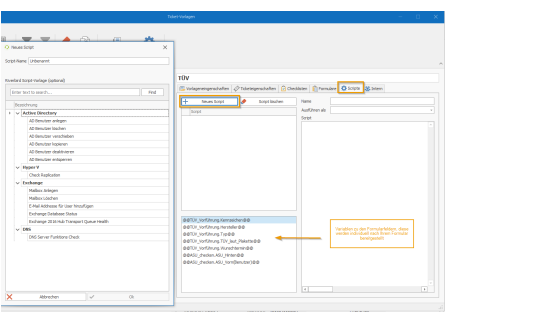
Scripts
The Scripts tab allows you to create your own PowerShell scripts and then select them.
The script can be filled in accordingly using the variables based on your defined form fields, and you can use this for quick further processing (e.g., creating an AD user). The data in the form fields is thus used and inserted into your PowerShell script via variables. Now your processor can simply insert this script into the front end and apply it.
For the sake of completeness, we have included some examples of these PowerShell scripts in the glossary, which you can use as templates.
Public web form
For public web forms that can be sent by email or integrated into the website, it is possible to generate a corresponding URL under the "Public web form" tab. Please note the necessary settings under "Settings for external URL generation."

You can duplicate, delete, or filter predefined templates using the menu bar:

Internal
In the Internal tab, which is displayed when you have selected a template of type "Internal," you can define for the template itself which customer the ticket should be created for. This field is pre-filled with the values you entered in "Ticket Templates -> Settings -> Internal Ticket Templates."
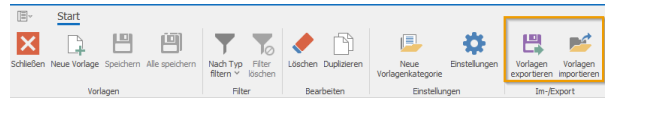
Exporting and importing templates
In the ticket templates, you will find the import/export function in the top menu bar
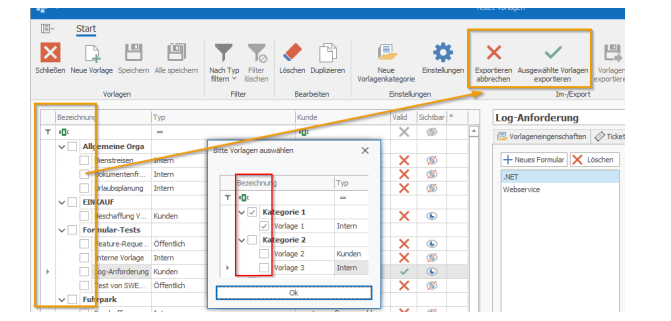
Export templates
To export a template, select the "Export templates" function. A pop-up message will appear, which you should confirm by clicking "OK." Now select the templates you want to export using the checkboxes and click "Export selected templates." A save dialog box will open, allowing you to save the templates to your hard drive.
The import function works in a similar way: a Windows dialog box appears where you can select the file. The corresponding template is then available.
Basic settings
If a default customer for internal tickets has already been selected before importing templates, the imported templates will already be presented with this customer. To do this, please select a default customer for internal tickets under Settings.
Import templates
Perform import:
1. Click on "Import templates" and select the file

The templates are then imported, but not yet saved in the database. More on this later.
Categories are created for the templates if they do not exist on the target system. Otherwise, templates are created under existing categories.
Select and save templates
You can now either save all templates to the database by clicking "Save all" or save individual templates. If you do not want to save the other templates, please close the window without saving.
Please note the information in the template validation and follow the instructions displayed
C-FLOW! in action
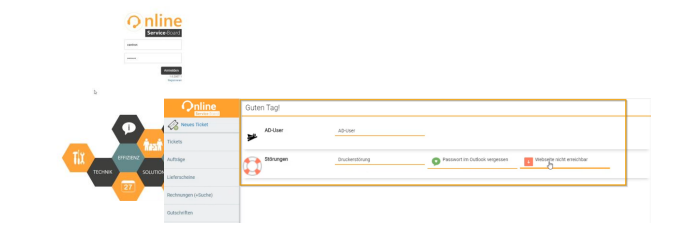
m Service Board Online
The view from your system house customer – registration via the WebAccount in the Service Board Online:
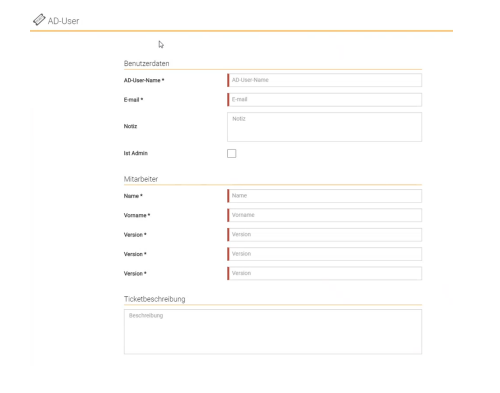
After selecting the form, you will see the mandatory fields marked with (*) and a red bar:
From the service board
Ticket function Quick entry
The quick entry feature of the service board also accesses the ticket templates. To do this, go to Quick Entry -> Select Customer/Contact
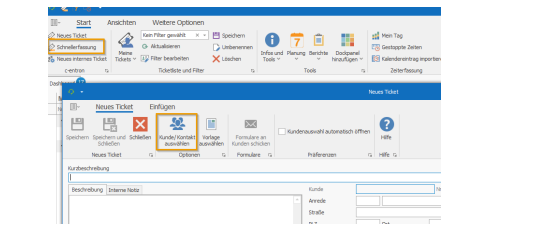
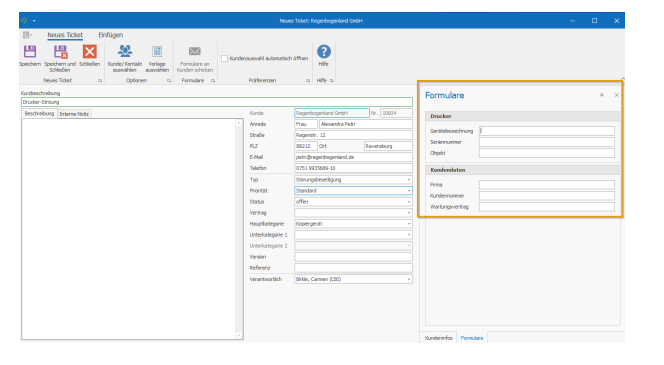
There you will find the new ticket, the predefined form that is either globally available or has been made available specifically for this customer (customer-specific form)
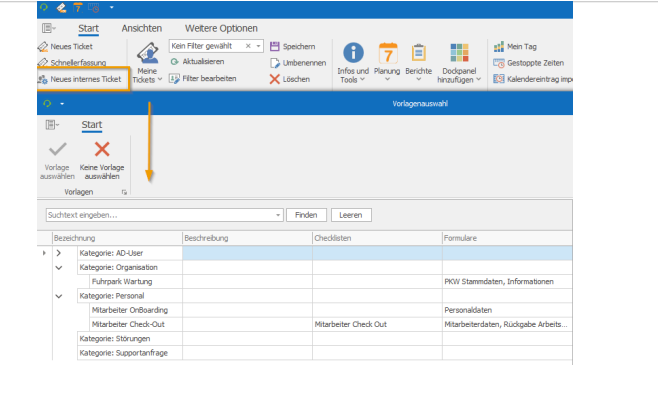
Ticket function Internal ticket
You can create internal forms via "New internal ticket" and thus quickly and easily create tickets for your internal processes:
Once a ticket has been created using a form, you will see a note in the upper ticket header

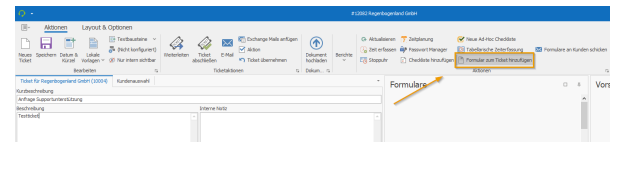
Existing ticketYou can also add a form to an existing ticket in the open ticket:
Glossary: PowerShell scripts for the following use cases:
CopyUser
# Set variables
# Copy from existing user
$copyfrom = 'NDS'
# New user data (River variables)
$samaccountname = '$username'
$displayname = '$####'
$firstname = '$firstname'
$lastname = '$####'
$name = '$name'
$logon_name = '$####'
$password = '#Start123'$description = '
$####'$DN = 'OU=Service Accounts,OU=Users,OU=ORG,DC=ndsedv,DC=de'
$enable = $true
$password_never_expires = $true
$cannot_change_password = $false
# Filling variables
$copy = Get-Aduser $copyfrom -Properties memberOf
$params = @{'SamAccountName' = $samaccountname;
'Instance' = $ad_account_to_copy;
'DisplayName' = $displayname;
'GivenName' = $firstname
LastName = $lastname;
PasswordNeverExpires' = $password_never_expires
'CannotChangePassword' = $cannot_change_password;
'Description' = $description;
'Enabled' = $enable;
'UserPrincipalName' = $logon_name;
'AccountPassword' = (ConvertTo-SecureString -AsPlainText $password -Force);}
# Create new user New-ADUser -Name $name @params
# Transfer group memberships$copy.Memberof | % {Add-ADGroupMember $_ $samaccountname }
# Move to OU Get-ADUser $samaccountname | Move-ADObject -TargetPath $DN
Disable user and move to OU
Import modules ActiveDirectory
# Set variables
# User to be deactivated (Riverbird variables)
$samaccountname = 'DUser'
$DN = 'CN=Disabled
User,OU=Testing,OU=User,OU=celos,DC=group,DC=celos,DC=en'
# Start log file / transcript
Start-Transcript -Path $logFile -Append
# Deactivate user
Get-ADUser $samaccountname | Disable-ADAccount
# Move user to OU
Get-ADUser $samaccountname | Move-ADObject -TargetPath $DN
# Stop log file / TransscriptStop-Transcript
New user
Import modules ActiveDirectory
# Set variables
# New user data (River variables)
$logFile = 'C:\TEMP\RemoveADUser.txt'
$samaccountname = '$username'
$displayname = '$####'
$firstname = '$firstname'
$lastname = '$####'
$name = '$name'
$logon_name = '$####'
$password = '#Start123'
$description = '$####'
$DN = 'OU=Service Accounts,OU=Users,OU=ORG,DC=ndsedv,DC=de'
$enable = $true
$password_never_expires = $true
$cannot_change_password = $false
# Filling variables
$params = @{'SamAccountName' = $samaccountname;
'DisplayName' = $displayname;
'GivenName' = $firstname;
'LastName' = $lastname;
PasswordNeverExpires' = $password_never_expires;
'CannotChangePassword' = $cannot_change_password;
'Description' = $description;
Enabled' = $enable;
'UserPrincipalName' = $logon_name
'AccountPassword' = (ConvertTo-SecureString -AsPlainText $password -Force);}
# Start log file / TransscriptStart-Transcript -Path $logFile -Append
# Create new user New-ADUser -Name $samaccountname @params
Remove ADUser with logging
Import modules ActiveDirectory
# Set variables
# User to be deleted (Riverbird variables)
$samaccountname = 'DUser'
$logFile = 'C:\TEMP\RemoveADUser.txt'
# Start log file / transcript
Start-Transcript -Path $logFile -Append
# Document all user settings Get-ADUser
$samaccountname -Properties * | fl
# Delete user Get-ADUser $samaccountname | Remove-ADUse
# Stop log file / TransscriptStop-Transcrip
Unlock AD User
Import modules ActiveDirectory
# Set variables
# User to be unlocked (Riverbird variables)
$samaccountname = 'DUser'$logFile = 'C:\TEMP\RemoveADUser.txt'
# Start log file / transcript
Start-Transcript -Path $logFile -Append
# Unlock account
Get-ADUser $samaccountname | Unlock-ADAccount
# Stop log file / transcript
Stop Transcript