%20(1).png)
"Checklists" module in c-entron.NET
(As of: May 2026)
Available as a subscription: Core · Pro · Ultimate
Re:
⚙️ Administration
💬 Support/Service
Checklists are used to provide structured guidance for tasks and can be created in advance or directly from a ticket.
The checklists have now been completely revised and improved in c-entron.NET, starting with version 2.0.2104.x!
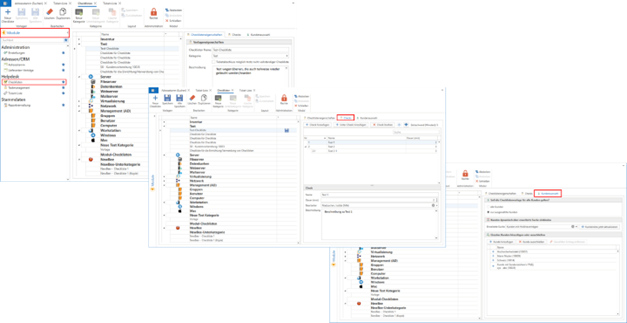
You can find the "Checklists" module in c-entron.NET under "Modules" in the Helpdesk section.
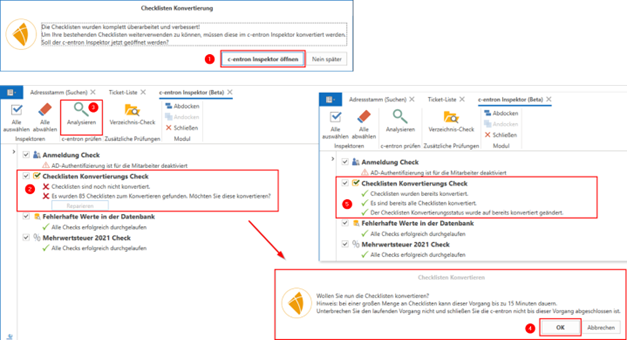
To continue using your existing checklists, they must be converted in c-entron Inspector. (NOTE: This can only be done by an administrator and may take up to 15 minutes if there are a large number of checklists. The process must not be interrupted, and c-entron must not be closed.)
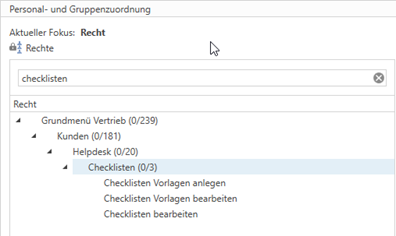
Permissions – Settings
There are separate permissions for checklists. Here, you can specify which employee groups can create "checklist templates" and "edit templates," and which employee groups can only "edit checklists."
You can find these settings under Global Settings – Sales Main Menu – Customers – Helpdesk – Checklists:
Required report
To use these new checklists, you will need the "Service Report 21-4-SP-VL," which you can download from the report portal and then save.
NOTE: The "Service Report 21-4-SP-VL" report can only display 3 levels.
Here's an example of how it works:
Level 1 is being printed
Sublevel 1.1 is being printed
Sublevel 1.1.1 is being printed
Sublevel 1.1.1.1 is no longer printed
The settings for the new V3 versions have already been configured.

How do you create a checklist?
You can create checklists in c-entron.NET in the "Checklists" module under "Helpdesk" if you have been granted the necessary permissions ("Create checklist templates").
Create categories/subcategories
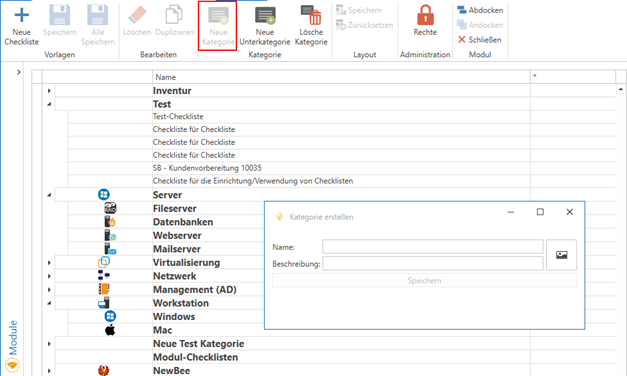
You can create different categories and subcategories for the various checklists here by clicking the [New Category] button and then [New Subcategory] to organize the checklists.
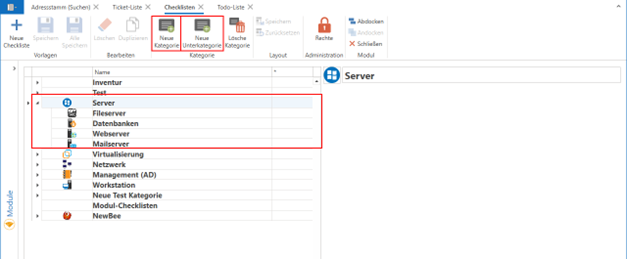
In the "Create Category" window, you can now enter a name, a description, and an image for the category:
You can also delete them by clicking the [Delete Category] button.
If this category contains checklists, a message will appear stating that they will also be deleted when the category is deleted.

Create checklists
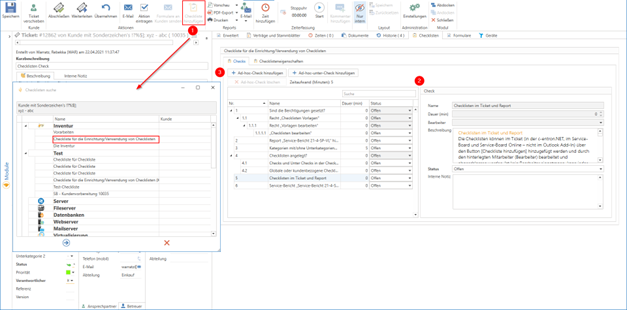
To create a new checklist, select the category or subcategory where you want to create it, and then click the [New Checklist] button.
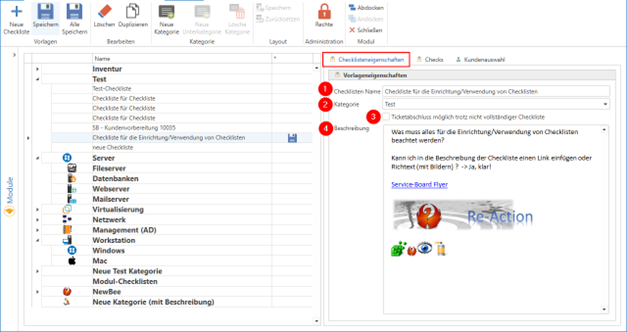
To do this, click [New Checklist] and enter the following under the "Checklist Properties" tab:
Checklists Name
Category (pre-filled with the selected category and can be changed using the dropdown menu to choose from existing categories),
Enable "Ticket closure possible even if the checklist is incomplete"
Description (also in RTF text format, with hyperlinks and the option to insert images here)
It is no longer possible to nest checklists.
(In other words, with the new checklists, it is no longer possible to add items to or populate them using items from an existing checklist.)
Create checks and sub-checks
In the "Checks" tab, you can add items to the new checklist using the [Add Check] button (1) and sub-checks using the [Add Sub-Check] button (2).
The checks can be created at the same level or one level below; the order of the checks can be changed later. (3)
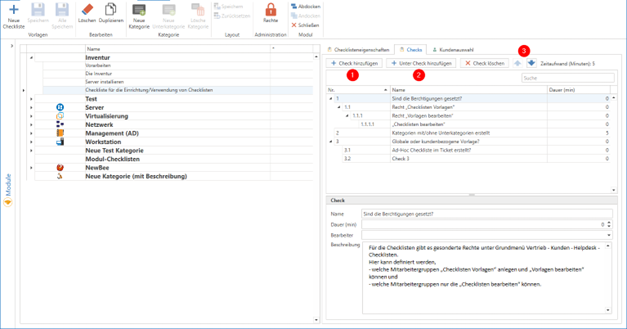
The checks are created in a specific order, but this order can be adjusted using the arrow buttons (3). You can add a description and an estimated duration to each check or sub-check. This duration serves as a guideline for employees regarding how long the check should take.
NOTE: The "Service Report 21-4-SP-VL" report can only display 3 levels.
Here's an example of how it works:
Level 1 is being printed
Sublevel 1.1 is being printed
Sublevel 1.1.1 is being printed
Sublevel 1.1.1.1 is no longer printed
The settings for the new V3 versions have already been configured.
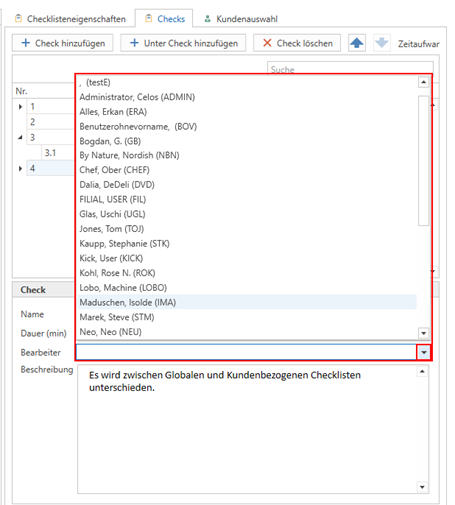
NEW: In the new checklists, you can now assign a specific user to be responsible for processing the check. Only that user can then process the check. For other users, the check will be "grayed out."
If your entries haven't been saved yet, you'll see the save icon next to the respective category or checklist.
Client Selection
A distinction is made between global checklists and customer-specific checklists.
Therefore, you can choose here whether the checklist should apply to all customers or only to specific ones.
All customers -> The checklist is available to all customers
Only selected customers -> The checklist is available only to selected customers
If you select "only selected customers," you now have two options again:
Engage customers dynamically through advanced search
Here, under "Advanced Search" (1), you can now select the customers from your saved searches. You must now save this (2)—only then will the [Update Customer List Now] button become active (3).
After you click the [Update Customer List Now] button, the following message will appear: "The template is now being assigned to the appropriate customers. The list will now be updated hourly by the web service." (4) And the customers will be listed for you (5).
Here, too, you have the option to manually add customers to the list using the [Add Customer] button, exclude them using the [Exclude Customer] button, or remove them from the list using the [Remove Selected Entry] button (6).
NOTE: A "deleted entry" is reactivated by the hourly "search" via the web service—if this is not desired, you should exclude the customer.Add or exclude individual customers
You can use the [Add Customer] button (1) to search for and add individual customers (2), or use the [Exclude Customer] button (which is then marked with a red X) (3), or remove a selected customer from the list using the [Remove Selected Entry] button (4). You must now save these changes.
Checklists in Tickets and Reports
Checklists can be added to a ticket (in c-entron.NET, Service-Board, and Service-Board Online—but not in the Outlook add-in) using the [Add Checklist] button (1) and can be processed and completed by the assigned employee (assignee) (2). If no assignee is specified, any employee can process the checklist and update its status.
Here, you can choose from the following predefined statuses:
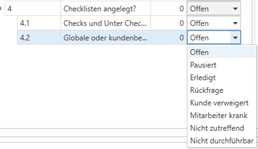
Open
Paused
Done
Follow-up question
Customer declined
Employee is sick
Not applicable
Not feasible
NOTE: The "status" of the checklists cannot be defined, as it is predefined by c-entron.
If a check has sub-checks, its status cannot be changed (the option is grayed out). This can only happen automatically once all sub-checks no longer have the "Open" status—it doesn't matter what status they have, since any status other than "Open" is considered "Processed."
If a check cannot be performed, or if other information regarding the check needs to be recorded, an "internal note" can be created for that check.
Alternatively, you can create an ad hoc checklist (3) for the ticket. The ad hoc checklist applies only to this specific ticket and is not saved in the templates.
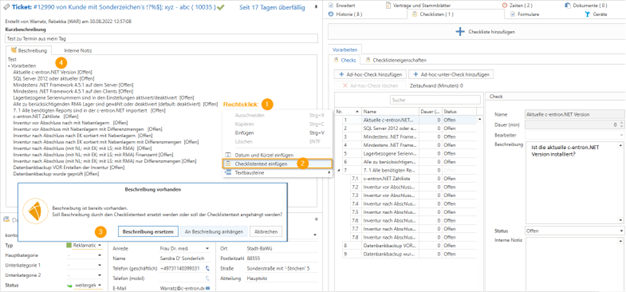
NEW Insert the checklist as text in the description/internal note (Available starting with release 2.0.2211.x)
In the ticket, you can now right-click in the context menu to select "Insert checklist as text" for the description and internal notes. You can choose to replace the description or append the checklist text to the description.
Service Report "Service Report 21-4-SP-VL"
In the service report "Service Report 21-4-SP-VL," which you can download for free in c-entron.NET via Report Management -> Load Portal Reports, the checklist is displayed by default.
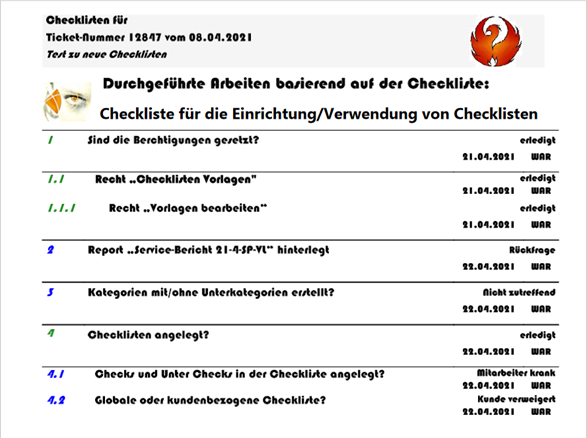
NOTE: The "Service Report 21-4-SP-VL" report can only display 3 levels.
Here's an example of how it works:
Level 1 is being printed
Sublevel 1.1 is being printed
Sublevel 1.1.1 is being printed
Sublevel 1.1.1.1 is no longer printed
The settings for the new V3 versions have already been configured.
If you do not want to attach the checklists, set the "SelectChecklists" switch to "Off".
Using the "bool PrintChecklistOnly" switch, you can configure the service report to print only the checklist.