%20(1).png)
Create a new vendor invoice (without source documents)
Available starting with release: v2.0.2509.x
Re:
🛒 Shopping
💶 Accounting
What are the benefits of this feature?
This feature allows you to create a supplier invoice with items directly in the address master without having to go through the usual process of creating a purchase order, processing a goods receipt, and then assigning the invoice. This saves time and gives you more flexibility, especially when you have invoices that aren’t linked to a purchase order. At the same time, traceability is ensured, as you can link the invoice to a work order or purchase order if needed.
You can add items either using the standard item search if they are your own items, or via the "Insert Attachment" menu option, where you can import the relevant line items from a purchase order or sales order. This method automatically links the documents, making it easier for you to keep track of them later.
It is also possible to upload a ZUGFeRD invoice. The system automatically identifies items based on the manufacturer/vendor code. If an item cannot be clearly identified, it can be searched for and assigned manually at any time.
Background/Case Study
You have purchased items and received an invoice for them (without a purchase order), and you now want to enter the invoice and the items into c-entron.
How do I proceed?
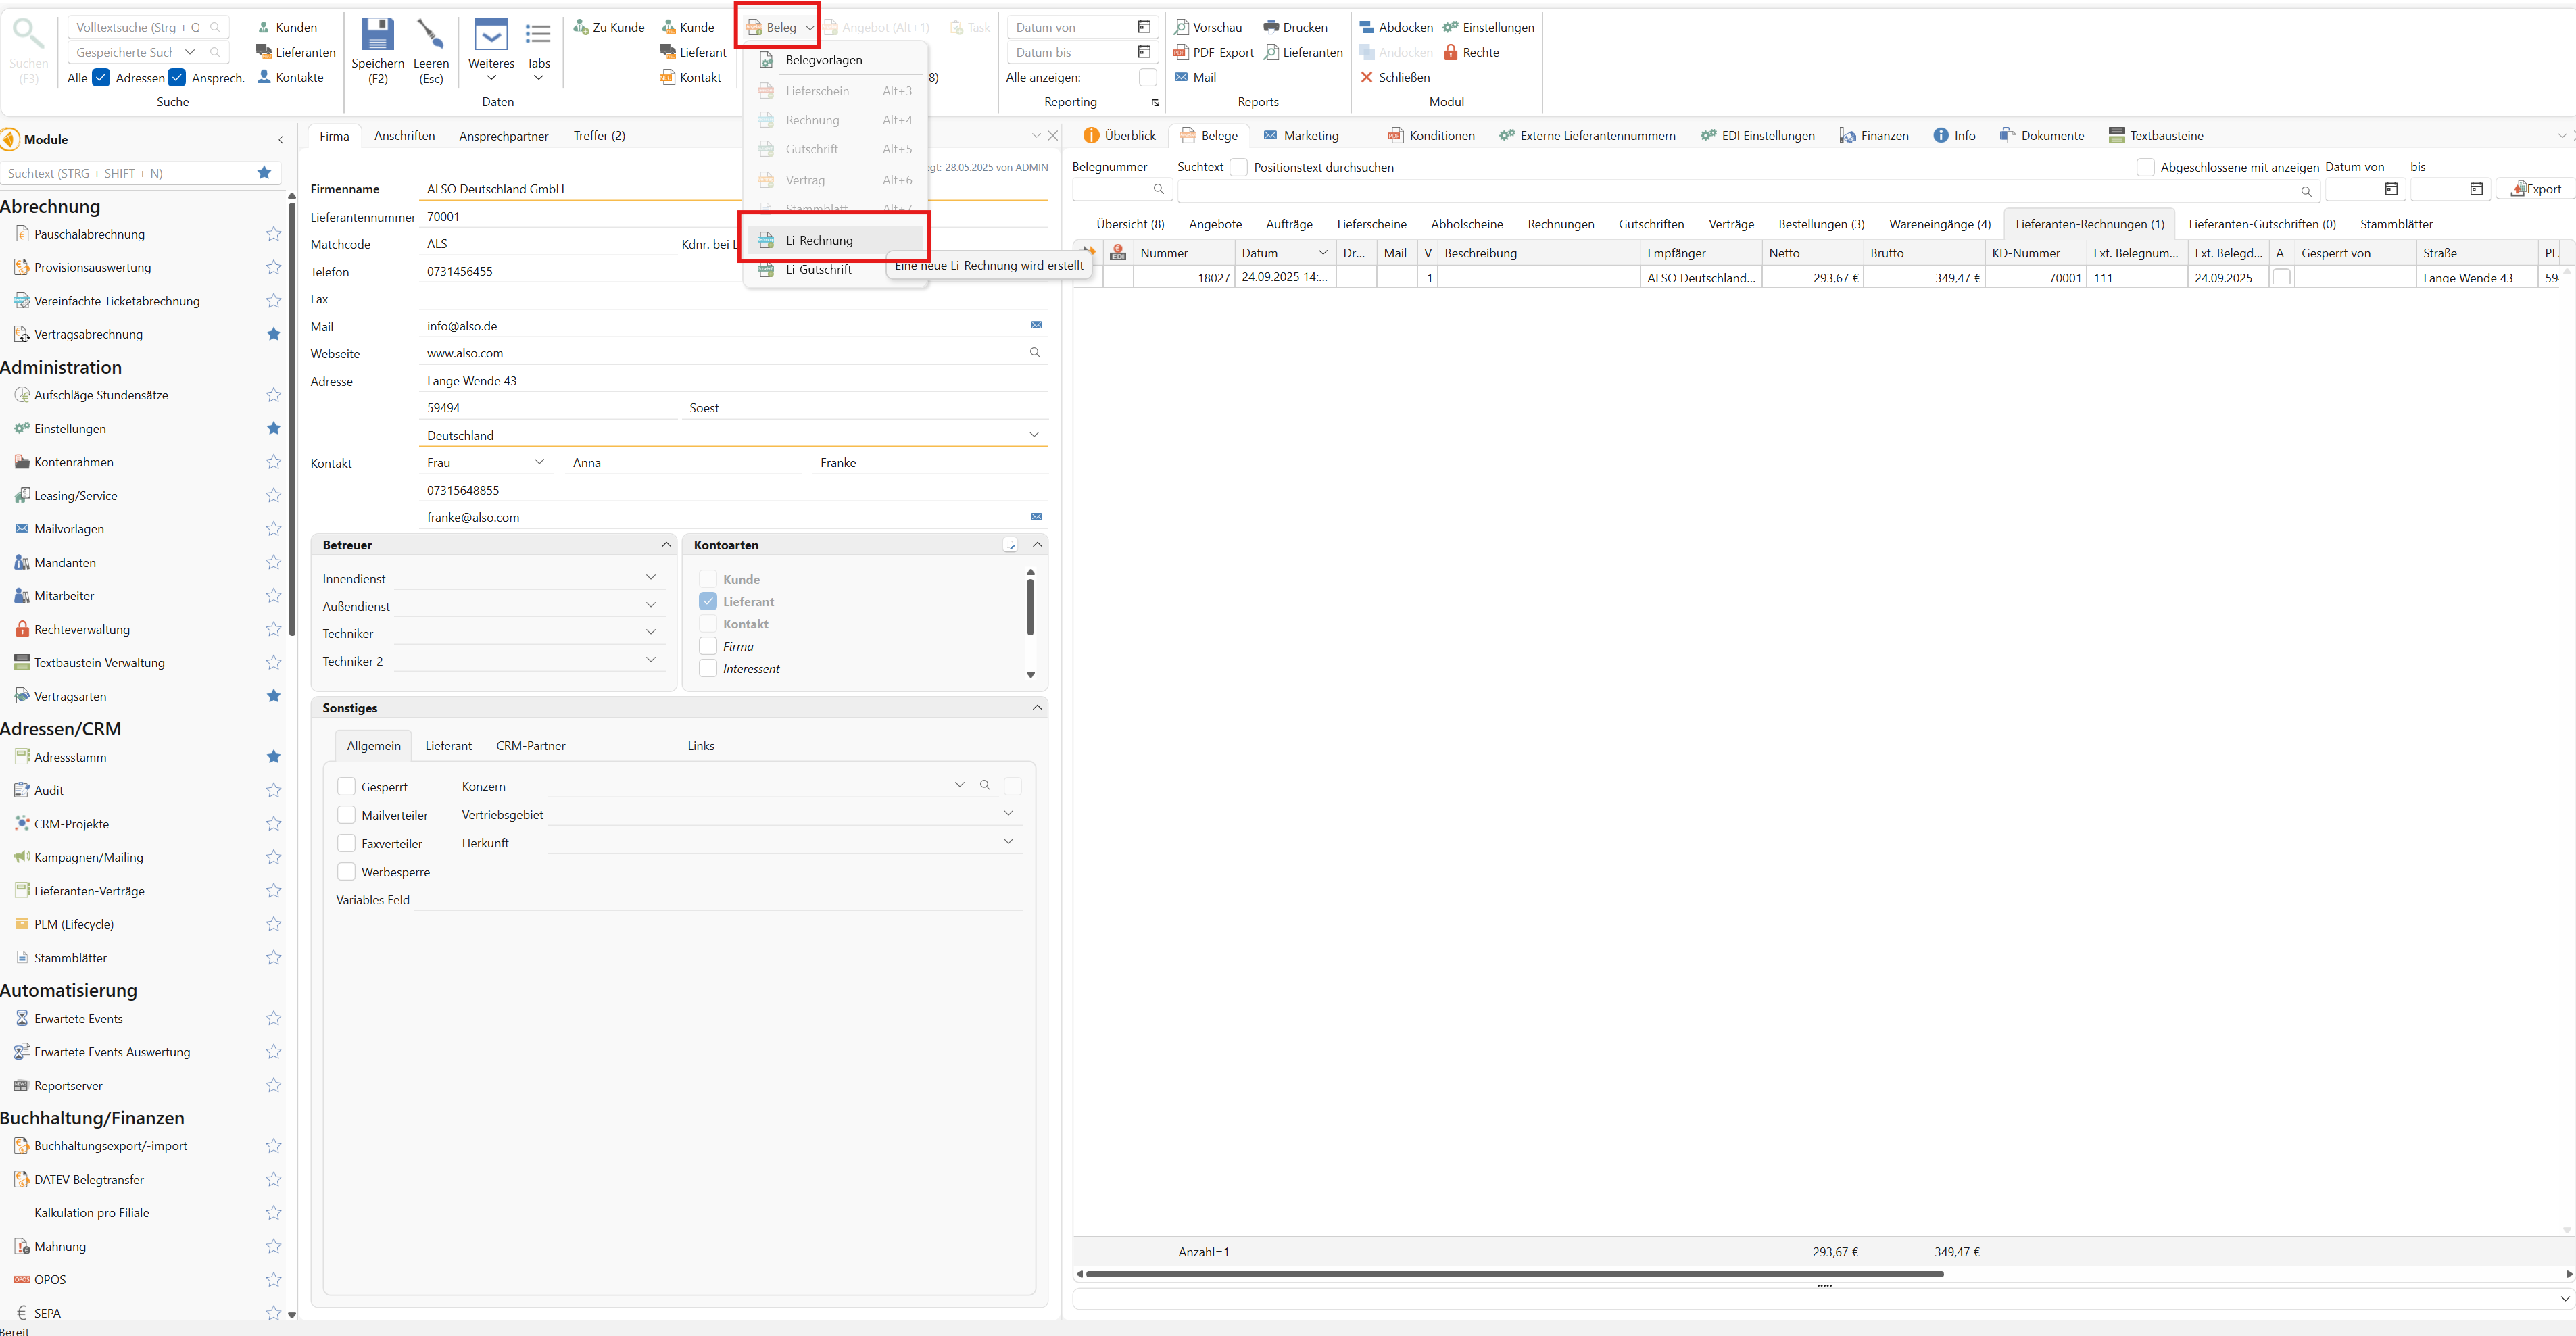
First, open the address master and search for the appropriate supplier
Once you've opened the appropriate supplier in the address master, you can now create a supplier invoice for them. To do this, select "Document" from the menu bar and click on "Supplier Invoice."
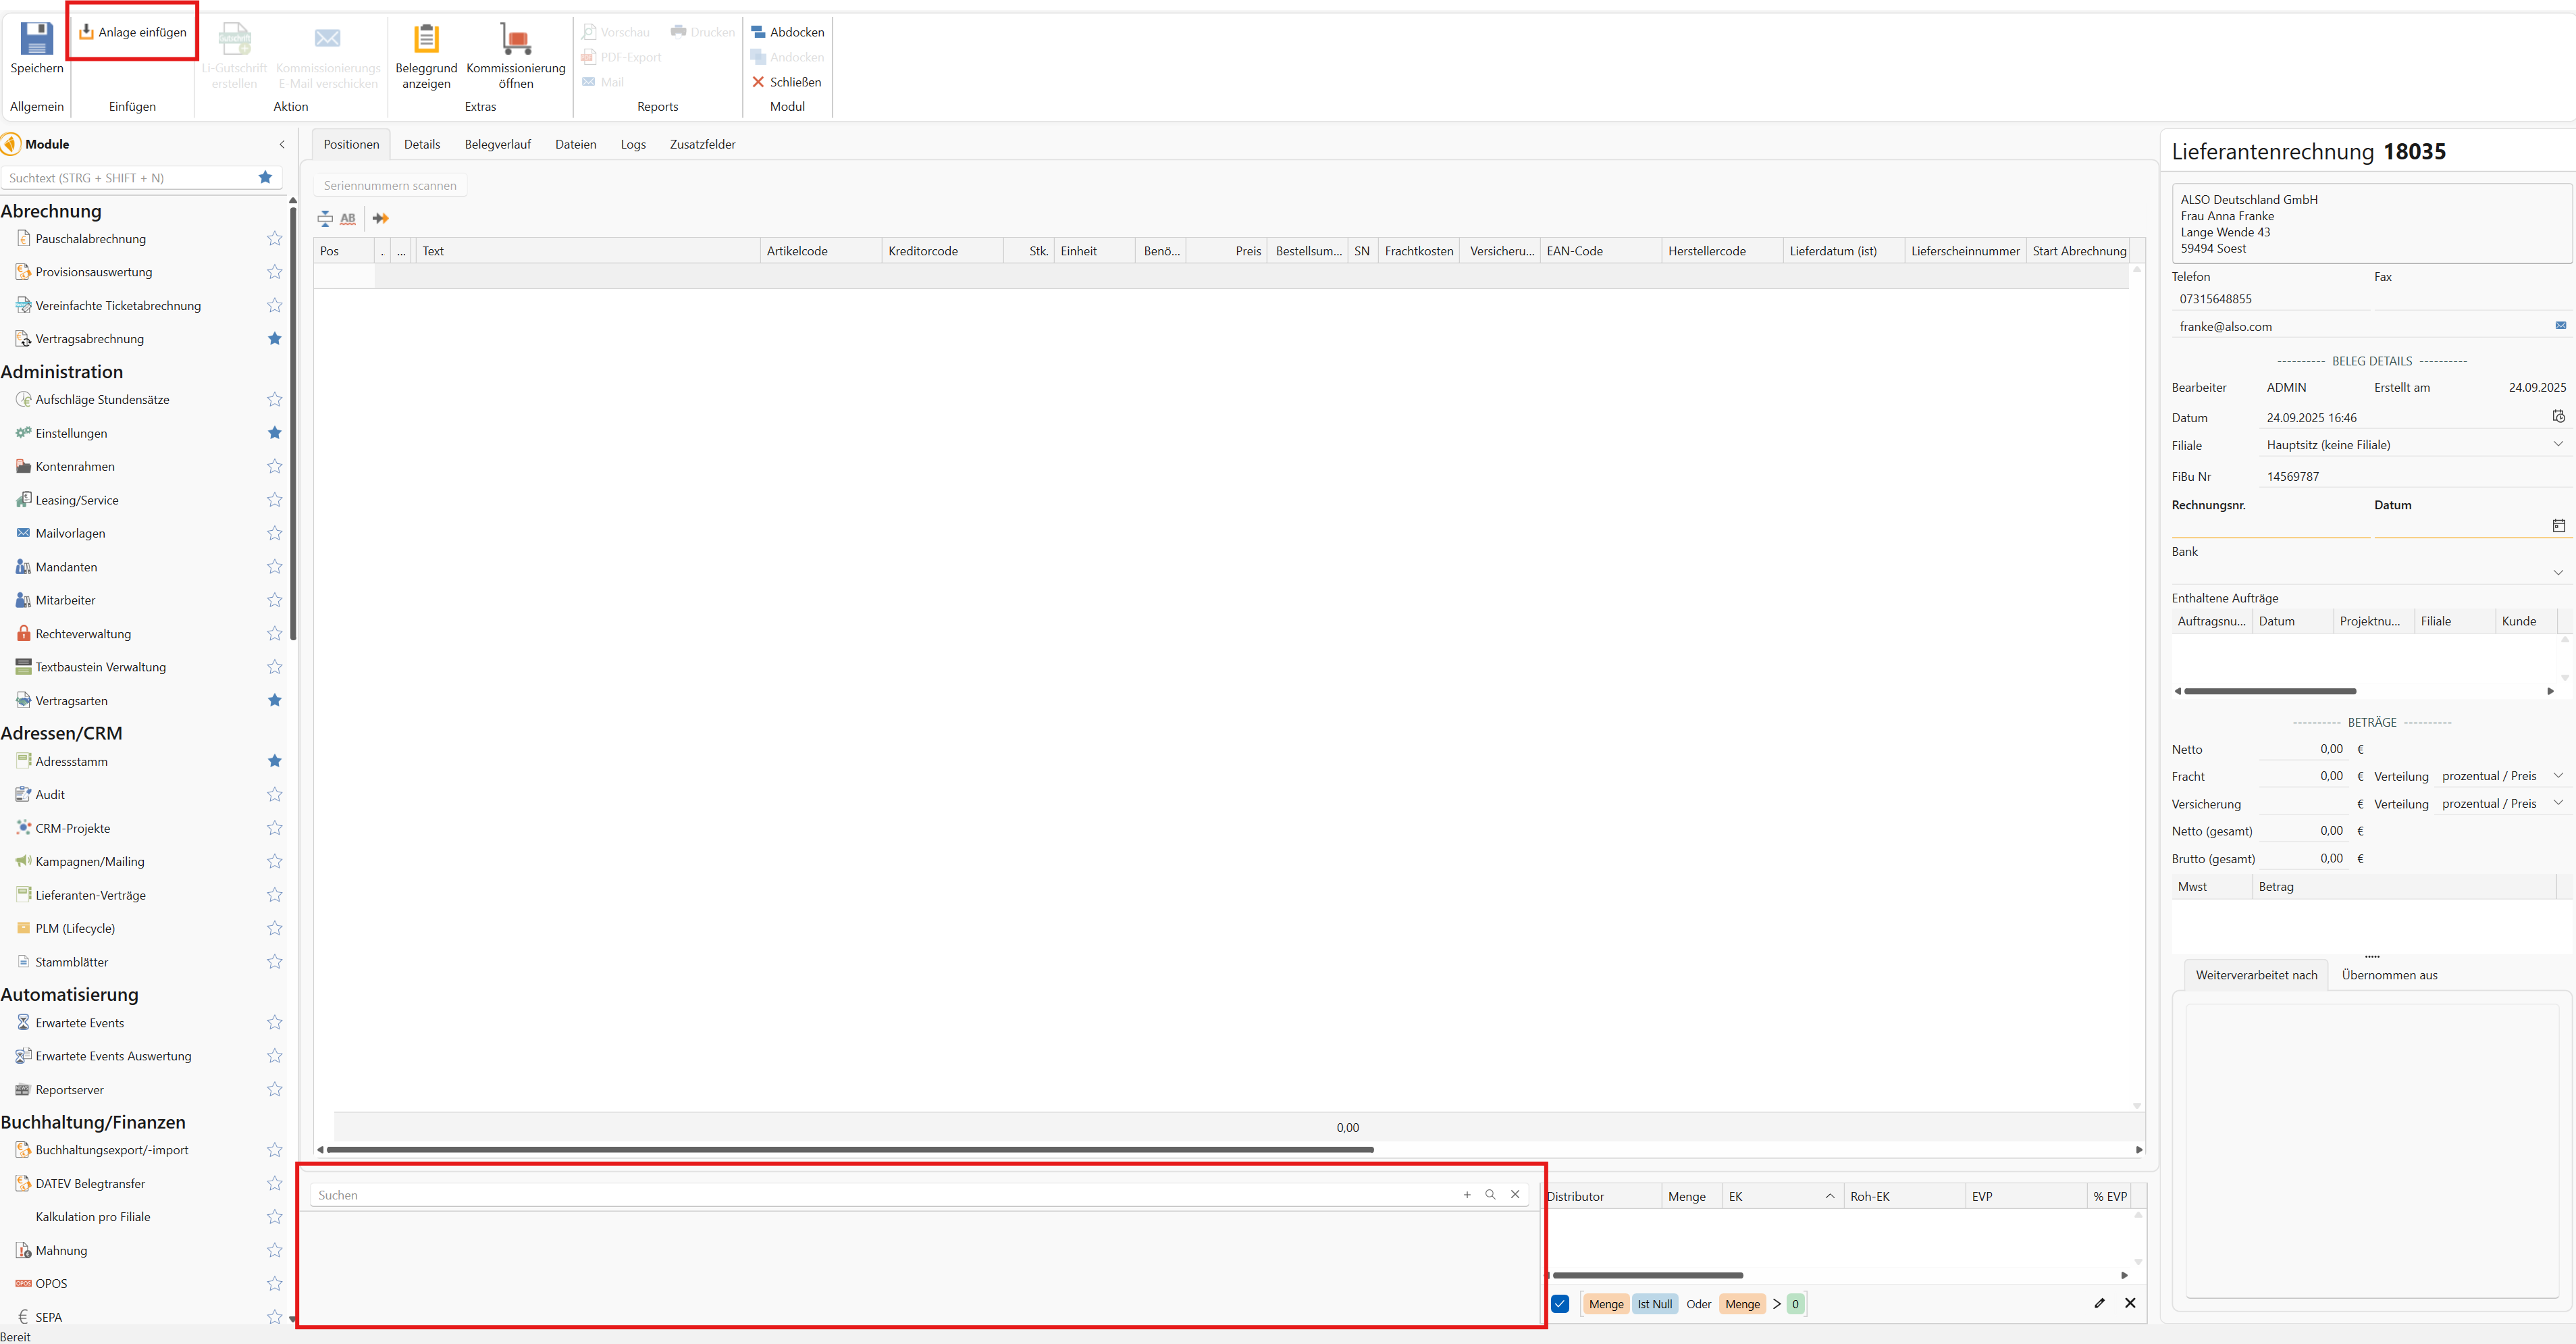
A new window will open where you can now create a new supplier invoice. As mentioned earlier, there are several ways to add items:
Have you reordered your own items and would now like to enter the supplier invoice?
Use the product search to find the relevant items and add them to the supplier invoice via the shopping cart. Please note that only your own products are displayed in the product search.
Is there a supplier invoice associated with an order or a purchase order?
Click "Insert Attachment" in the menu bar and, in the first step, select the appropriate order or purchase order. Finally, click "Apply." The items will be automatically added to the supplier invoice. After saving, you can find a link to the documents either on the right in the "Included Orders" section or in the "Document History" tab.
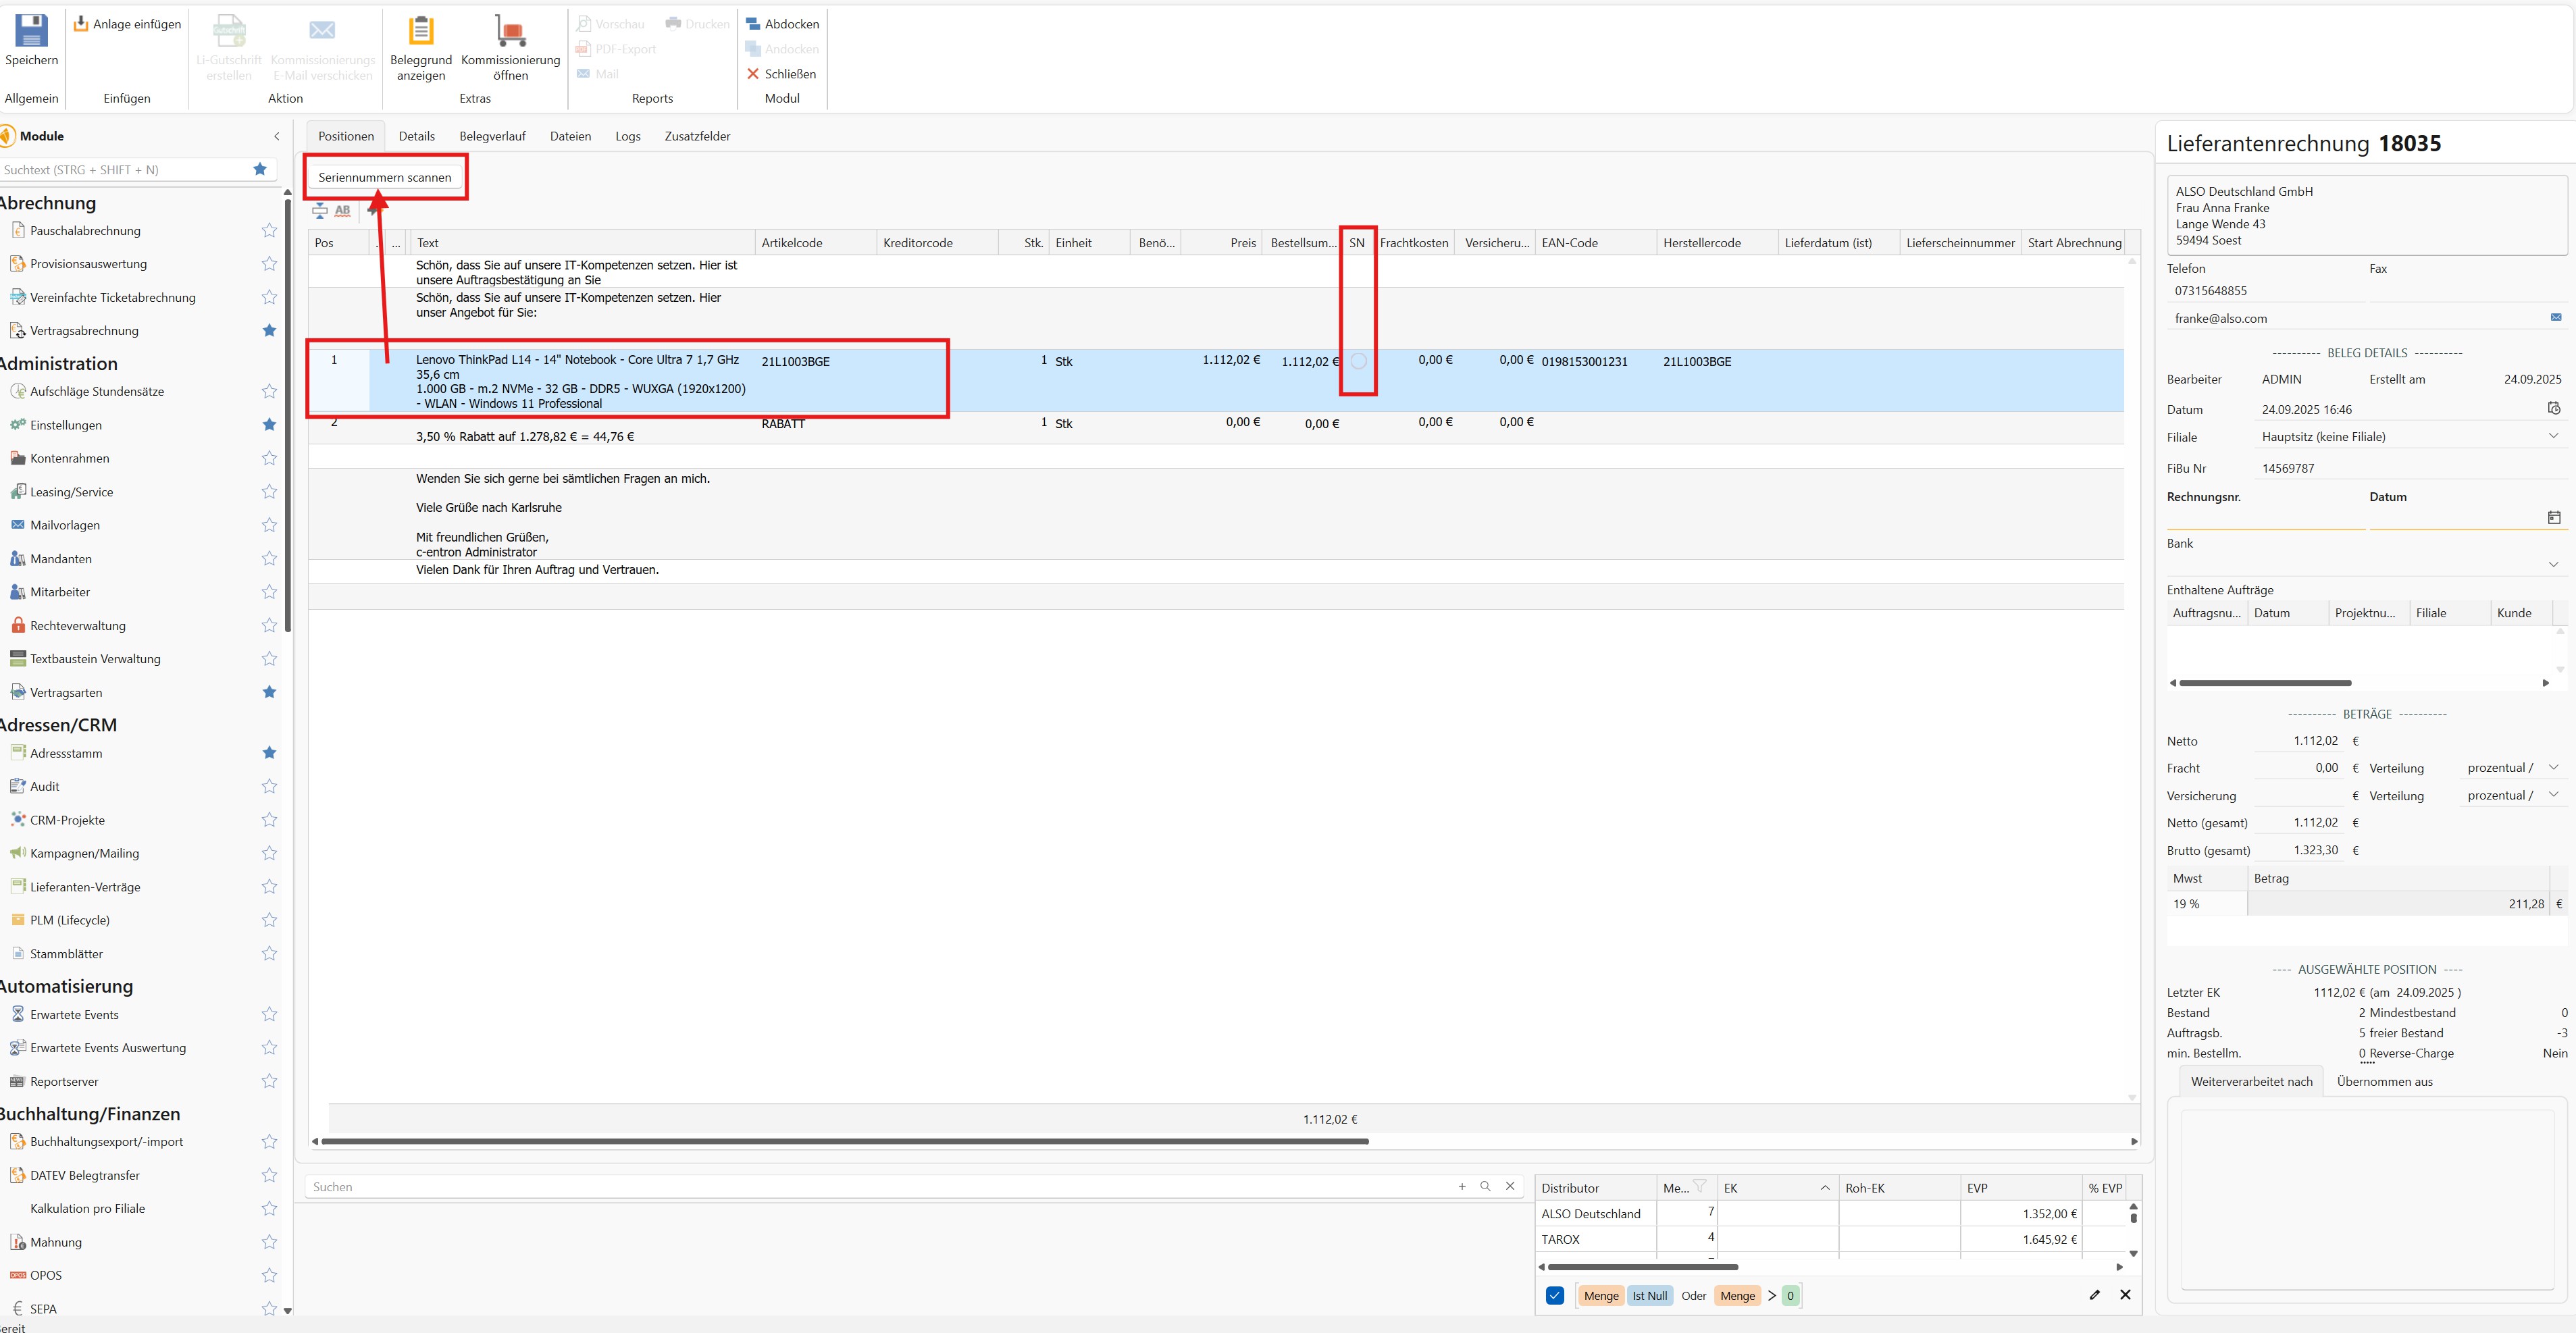
Once the items have been added to the supplier invoice, you can edit them—for example, by adjusting the quantity.
If the items require serial numbers, we still need to enter them. To do this, first select the item that requires a serial number and click "Scan Serial Numbers." In the "SN" column, you can identify items requiring serial numbers by a small empty circle. Now enter the serial numbers manually or import them from a file. Finally, click OK and the serial numbers will be saved. Please note that these serial numbers cannot be changed in the supplier invoice once they have been saved. If the circle in the "SN" column is green, you have entered all required serial numbers. If it is only half-filled, some serial numbers are still missing.
In the right-hand sidebar, enter the external invoice number and date as usual. In the "Details" tab, select the appropriate payment method. If you have already set up payment terms with your supplier, these will be automatically applied. Save the supplier invoice using the "Save" button in the menu bar. A message will appear asking if you want to close the supplier invoice (incoming goods calculation). Please note that the goods will not be posted to the selected warehouse until the supplier invoice is closed. Once the supplier invoice is closed, it can no longer be edited. If you need to
ZUGFeRD Import
If you have an incoming invoice in the form of an e-invoice (ZUGFeRD), you can import it directly into c-entron. The items it contains are automatically recognized or can be manually assigned if necessary, making it even faster and easier to create the supplier invoice.
To import the e-invoice, go to “Insert” in the menu bar and select “ZUGFeRD Import.”
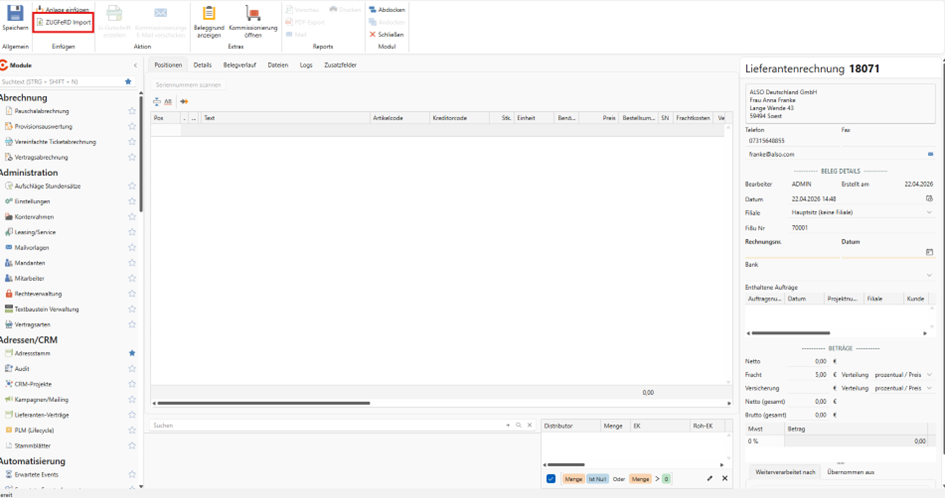
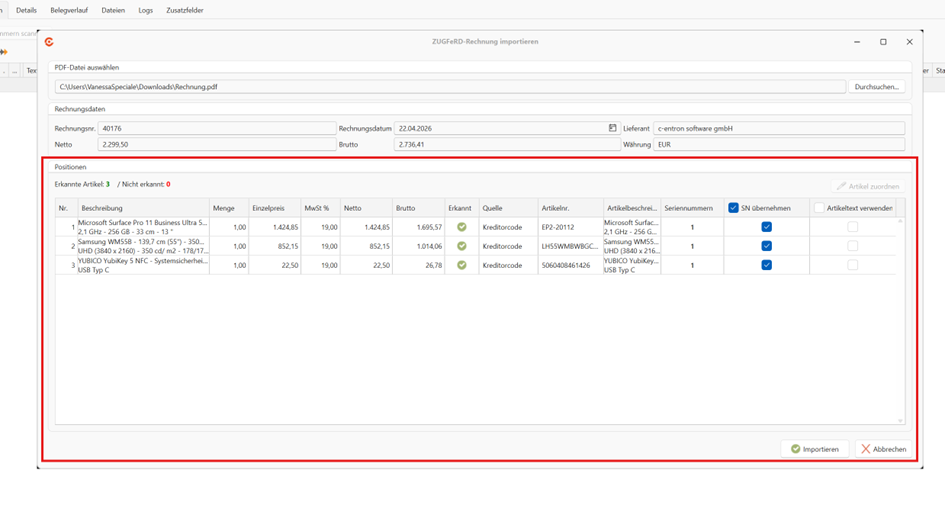
First, select the appropriate e-invoice. The import will then begin, and a new window will open where you can review the imported invoice data and compare it with the original invoice.
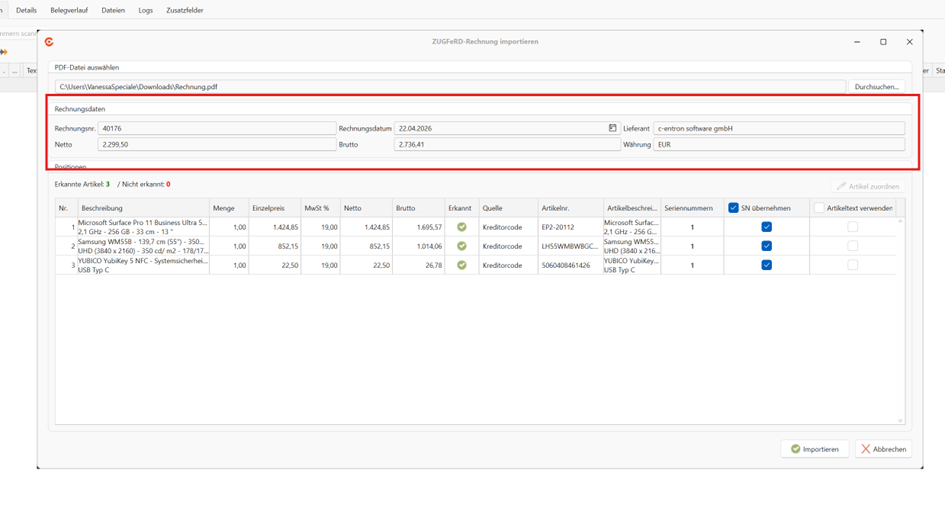
The "Items" section lists all recognized items. There you can see, among other things, the quantity, the unit price, and the net and gross prices based on the applicable VAT rate. In the “Source” column, you can see whether an item has already been automatically assigned to an item in your c-entron product master. This automatic assignment is based on the manufacturer code, EAN number, or vendor code. This requires that the corresponding items are present in your product master.
If an assignment is missing or incorrect, you can add it manually. To do so, select the relevant item and click "Assign item" in the upper-right corner.
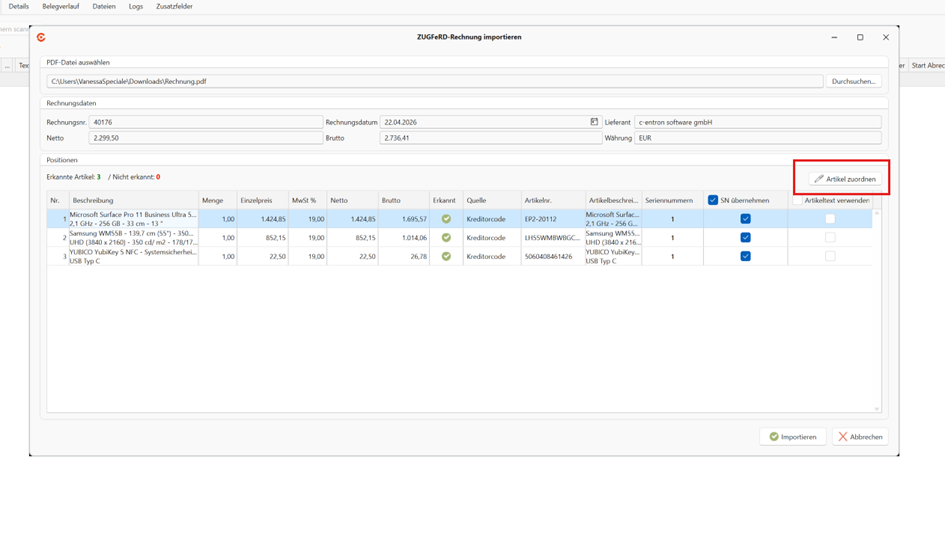
In the new window, you can use the search bar to find the correct item. Items that have already been assigned will be automatically recognized and assigned during future imports. Once all items have been correctly assigned, you can choose whether to use the item text from the c-entron item master or from the invoice. If you want to use the text from c-entron, check the box next to “Use item text.”

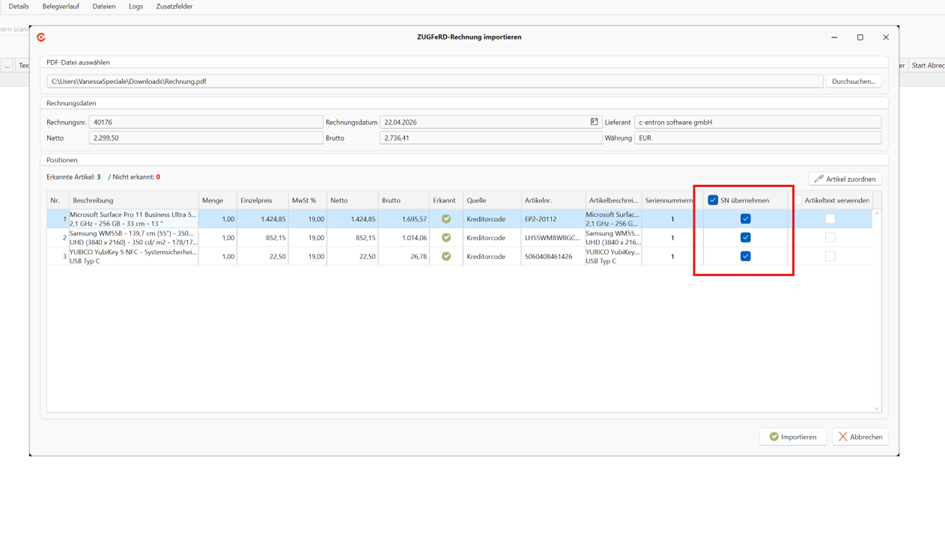
If items have serial numbers, these are also automatically imported. In the "Import SN" tab (where "SN" stands for serial number), you can choose whether to import them as well. Alternatively, you can always enter these serial numbers by clicking "Scan Serial Number."
Once all settings have been configured and all items have been assigned, you can proceed with the import.
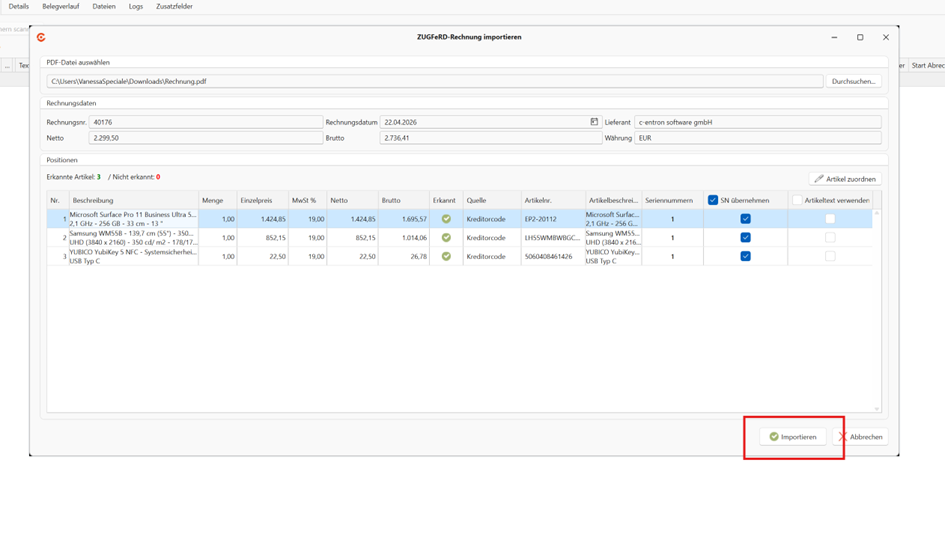
The import process can be repeated as many times as needed, allowing multiple ZUGFeRD invoices to be consolidated into a single supplier invoice. After saving the supplier invoice, the ZUGFeRD file is automatically saved in the "Files" tab.
What is the impact of this?
As soon as a supplier invoice is finalized, the goods are automatically posted to inventory, and the stored serial numbers appear in the product management system. This ensures accurate inventory movements even without a traditional goods receipt.
If you added the items using "Insert Attachment," the supplier invoice is also linked to the corresponding order or purchase order, which makes tracking much easier. The link applies only to the document history. The items can only be transferred as a “copy” (not as a reference). Therefore, no picking is performed for the linked order.
Additional notes
It is advisable to always review the supplier invoice carefully before finalizing it to ensure that all items and details (quantity, price, VAT, and expense account) are recorded correctly.
For example, if you have the invoice as a PDF, you can also attach it directly to the document in the "Files" tab so that the original file is always accessible. To do this, you’ll need to save the supplier invoice first so that you can add the documents by right-clicking.