%20(1).png)
Deployment/update of c-entron modules
Fundamentals:
Using the Riverbird agent, you can roll out the software provided via the Riverbird portal to selected computers within your domain or offer it for download to these computers. The following c-entron products in particular are provided via this portal:
-.NET
- Service board
- Web service
- Outlook Add-In
- Password Manager
The c-entron-delphi cannot be rolled out because the Riverbird console can only process msi packages, while for delphi and other older modules, only exe files can be created due to their age. However, it is possible to download the current files.
Even though Riverbird and c-entron access the same database, they are different systems with different tasks. Therefore, please keep RiverBird and centron products separate in your mind.
Since the Riverbird WebService accesses the c-entron database, it contains the version-corresponding scripts for the DB and also imports them. In individual cases, scripts can also be rolled out that result in backward incompatibility. An update (or initial installation) of the Riverbird WebService therefore necessitates an immediate or at least prompt update of the c-entron modules.
General preparatory work:
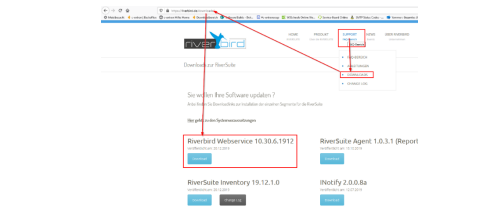
Ensure that you have a customer in your c-entron database—you may need to create one if necessary. Also ensure that WMI is active on the computers in your domain. First, download the latest version of Riverbird WebService. You can find it in the download area of the Riverbird website (https://riverbird.de/downloads/).
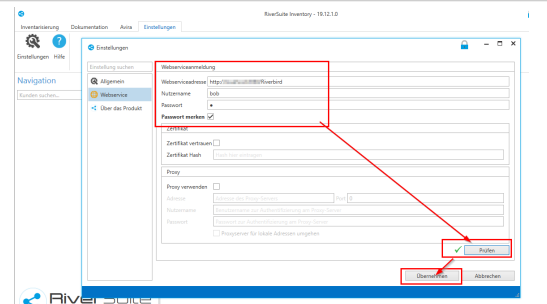
Proceed with the installation of the Riverbird WebService (in addition to the c-entron web service) and link the web service to your c-entron database:
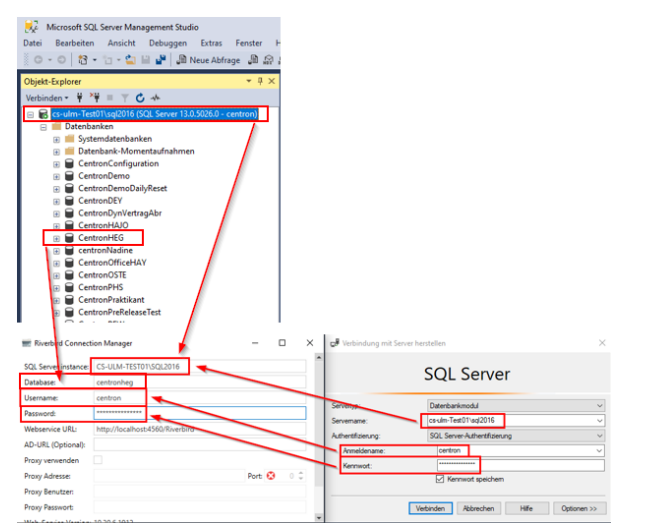
SQL Server instance:
Enter the name or IP address of the server here. If you are using instances, separate the server name and instance with a "/" ({server name}/{instance})
Database: Enter the name of the SQL database to which the web service should connect. The database is usually called "centron," but this may vary from environment to environment (see sample screenshot)
Username: Enter the login name of the SQL Management Studio user to establish the database connection. By default, we assign the user "bbo" when installing new systems for customers, but this may vary from environment to environment (see sample screenshot)
Password: Enter the password for the SQL Management Studio user here to establish the database connection. By default, we assign the password "1" for the user bbo during new installations for customers and advise our customers to change this in accordance with their company's password guidelines before using centron in a production environment.
NOTEwe have no way of decrypting or resetting the password assigned here!
URL: Enter the URL/URI under which the web service should be accessible internally and/or externally. Here you can also define a corresponding port through which the web service should be accessible. The use of proxies is not necessary.
The URI of your Riverbird WebService must, of course, be different from that of your centron WebService.
It is advisable to install the Riverbird WebService and the c-entron WebService on the same web server—this can sometimes help to avoid license synchronization problems and similar issues.
Please note that an https protocol requires a valid SSL certificate. If you only intend to use the Riverbird WebService for internal purposes, the URL can also be configured using the http protocol.
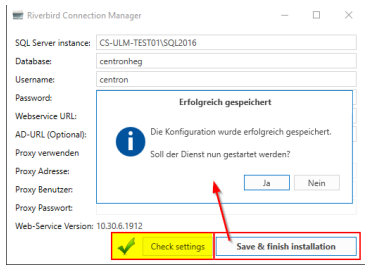
After successfully checking the settings, you can save the configuration and complete the installation. Confirm the subsequent message by clicking [Yes] to start the WebService.
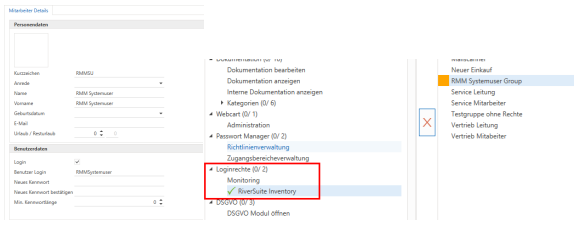
A dummy user is required to enable distribution later. In preparation for this, the user "RMM Systemuser" was added via an update script in a previous update and assigned the necessary rights. Ensure that the user exists and is active in your database and has the "RiverSuite Inventory" login right.
First-time procedure:
Then download RiverSuite Inventory, unzip it, and run it.
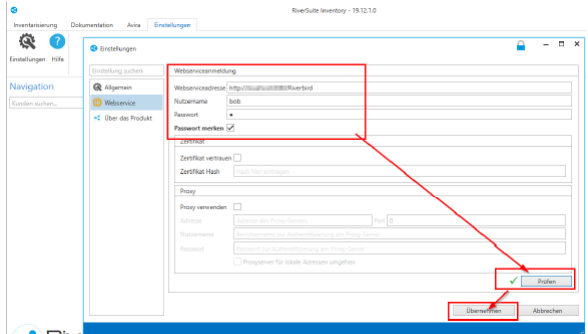
First, open the settings and link RiverSuite Inventory to the Riverbird WebService. To do this, enter the URI of the previously configured Riverbird WebService as the WebService address. The username and password must correspond to an active centron user. This user must have at least the "Customers General" and "Monitoring" rights. You can create a dummy user in c-entron for this purpose; however, you should refrain from using system users such as RMM users or admins, as this could lead to conflicts in the process.
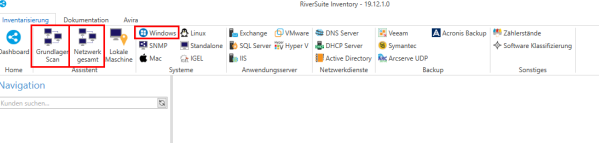
This completes the basic configuration of RiverSuite Inventory. Next, perform an inventory of your domain on your own customers. Select your own customers using the search mask and perform the basic scan. It is sufficient to inventory the Windows systems; more experienced users can also inventory the entire network.
At the end of this white paper, we describe how you can deploy software without performing an inventory. Then switch to patch management and roll out the RiverSuite Agent to your employees' selected devices. From here, our webinar will guide you through the process
(https://cloud.riverbird.eu/s/NshHLJPu6i4KVIm)
This will guide you through the rest of the process: create a new template for rolling out software to the computers equipped with the agent. From this template, you can then create a new job that allows you to roll out the latest version of .NET to the previously selected computers in your domain at regular intervals. Details are provided below:
Rolling out the c-entron software packages
Fundamentals
Starting with version 20.2.1.0 of RiverBird Agent, the provided software packages are resynchronized each time RiverBird WebService is restarted and then every 24 hours; in older versions, this had to be done manually. Of course, you can still update the software packages manually regardless of the interval
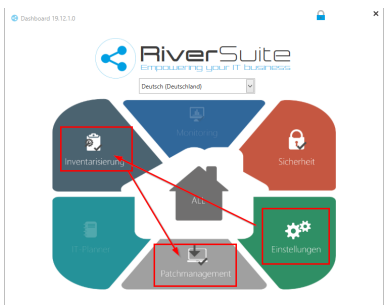
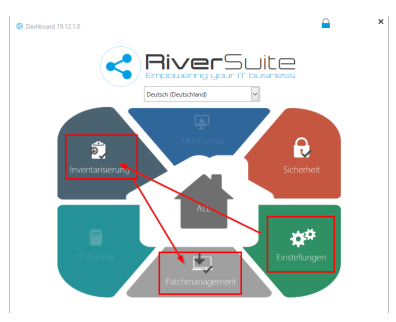
Selecting [Patch Management] in the dashboard takes you to the patch management/software distribution/deployment area.
download and export c-entron software packages
For historical reasons, there is not yet an MSI installer for all c-entron products, but you can also download them via the "Package Manager," unzip them, and then manually exchange them on the devices/servers. To do this, open the "Package Manager" and select the "Export c-entron software packages" function
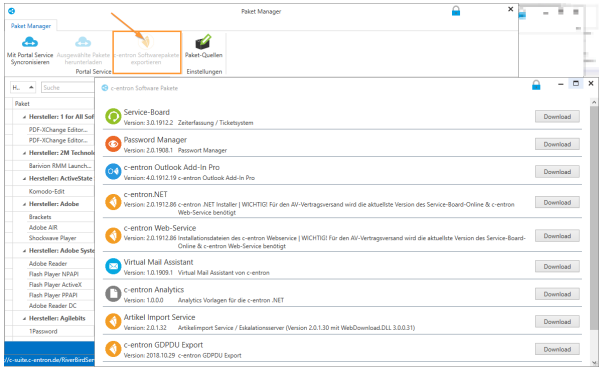
In this overview, you can now download the desired packages locally to the client using the [Download] button and then distribute the files manually from there.This can be done with all available software packages. Case study: You want to update Virtual Mail Assistant. Download the file using [Download], and a "Find Folder" dialog box will open in which you must specify the storage location for the download and confirm with [OK]

Once the download is complete, Windows Explorer will open directly in the directory you just created
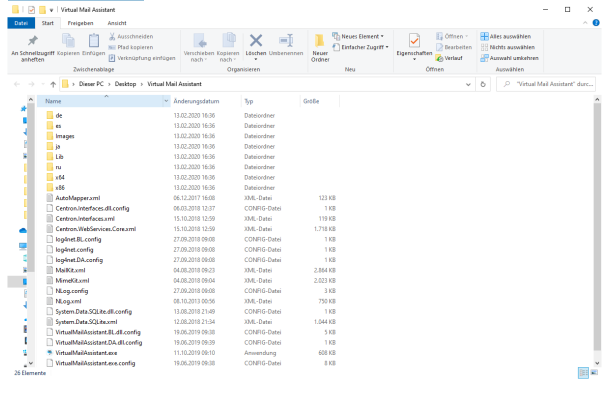
You can now copy this directory to the desired client(s)/server(s) and start the application from there.
Install MSI packages directly
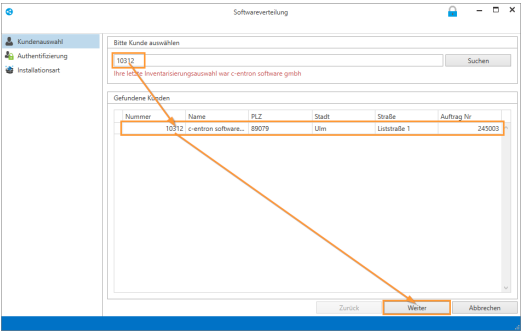
The "Deployment" menu item under [Install directly] allows you to compile software packages individually for devices and roll them out there once. In the "Software distribution" module, select your previously inventoried customers and confirm with [Next]..
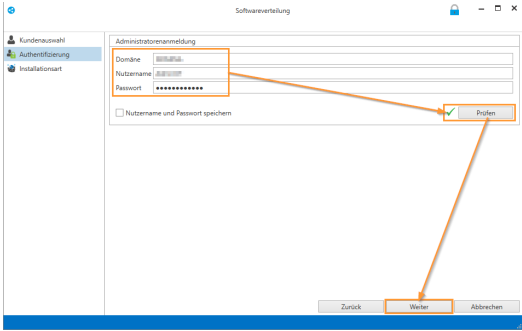
...under Authentication, enter your domain and a user with administrative privileges in the domain, confirm this with [Check], and if successful, click [Next]
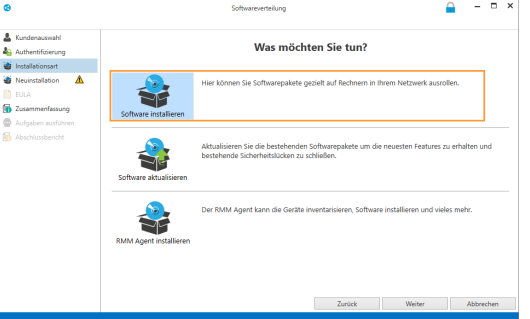
For the installation type, you now have the choice between [Install software], [Update software], or [Install RMM Agent]. In this case, continue with [Install software] and [Next]..
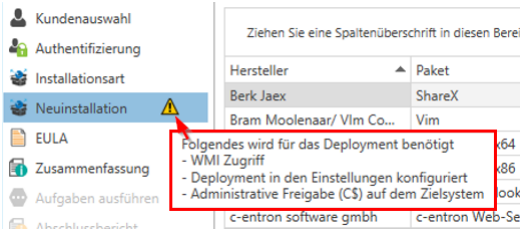
Under "New installation," select the desired software and add it to the desired devices by right-clicking in the "Software to be installed" field

Note: If a device already has the provided software installed, it will not be listed as an option for that device. Please also note 32/64-bit applications. Please only select devices that are marked as "accessible" with a green dot.
Please also note that WMI access and the corresponding administrative access rights are required for deployment on the respective devices.
In the next step, you must accept the EULA and continue by clicking [Next]
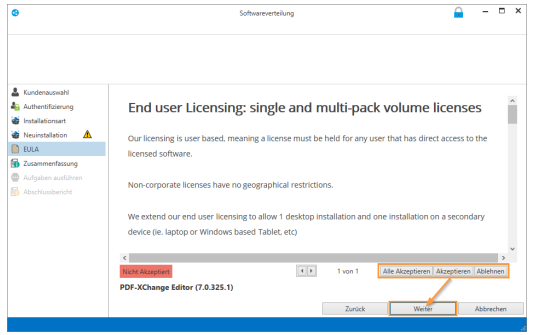
If you do not accept the EULA, the corresponding packages will not be installed
In the summary, you can now get an overview of which packages have been selected for which devices before they are rolled out.
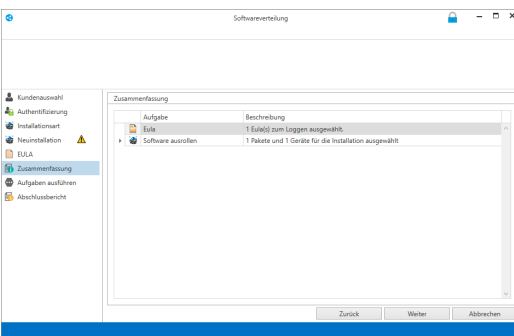
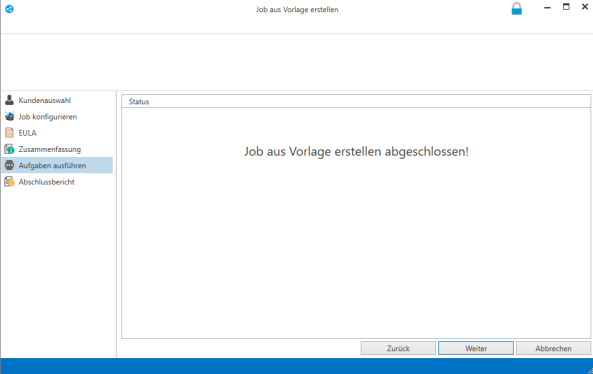
Click [Next] to execute the task.
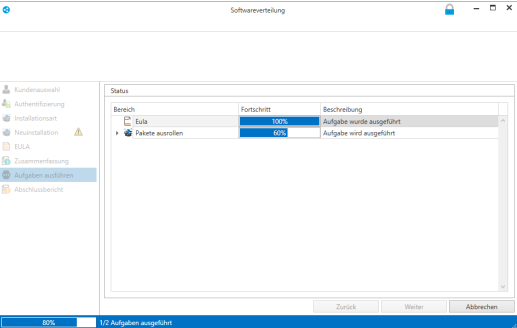
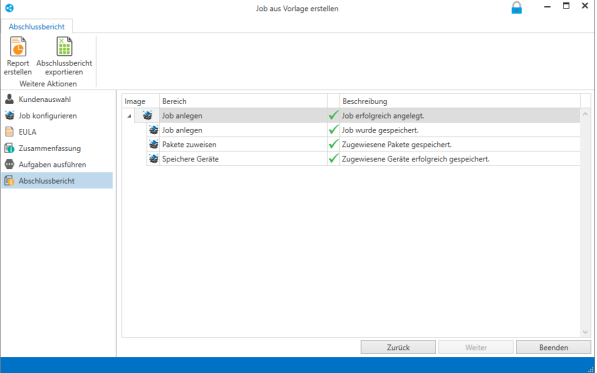
The final report provides you with an overview of the tasks that were performed and whether they were successful.
Install via the RMM "Kiosk"
If an RMM agent is installed on each client (which could, for example, be distributed to the clients in the domain as described above), you can also compile and provide your own software packages for the clients so that each user can install the desired software themselves.
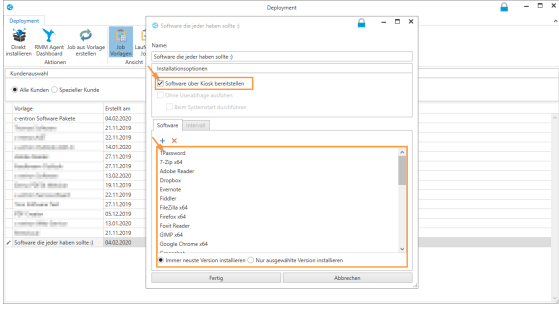
To do this, create a new "Job Template" via [Create New Template], activate the "Deploy software via kiosk" property, and select the software packages to be deployed:
The user can now use the "RiverBird Deployment"..
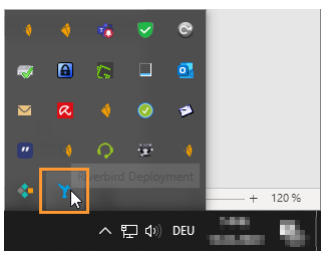
...open the "RiverSuite Control Center" and install or update the desired software yourself from the packages provided via the "Kiosk":

Please note that when using the RMM kiosk, users must actively retrieve and install the updates on the client.
Setting up recurring jobs For the automatic update or installation process, you must first create a new template in "Deployment."

In the "Interval" tab, you can define a cyclical interval for installing the packages. Alternatively, you can specify in the "Installation options" that the installation should also be "Executed without user prompt" and optionally "Executed at system startup." In this case, the time settings in the "Interval" tab are inactive:
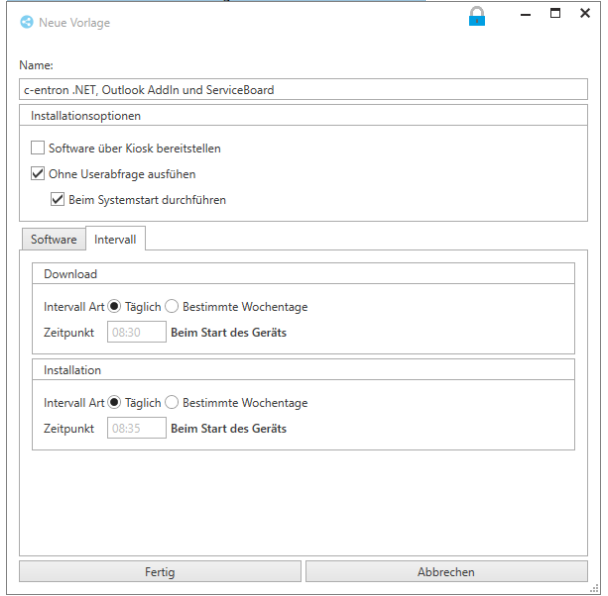
Note: The download should take place before installation and allow for a small time buffer, otherwise the downloaded files cannot be installed until the next scheduled date.
From this newly created "job template," you can now assign this job to a customer via [Create job from template]..
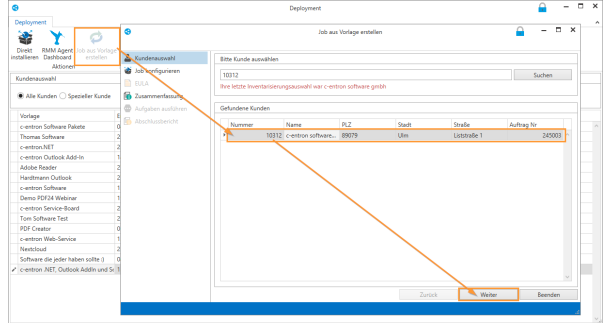
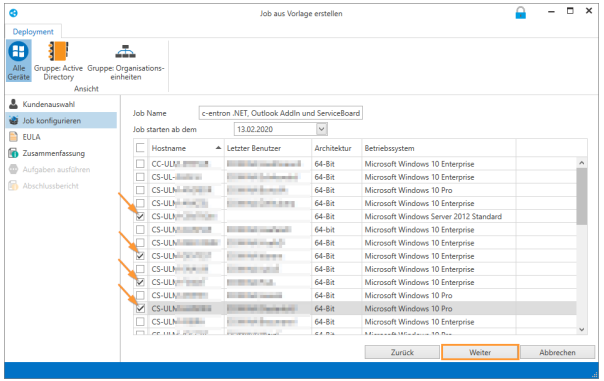
and for this customer, the inventoried devices:
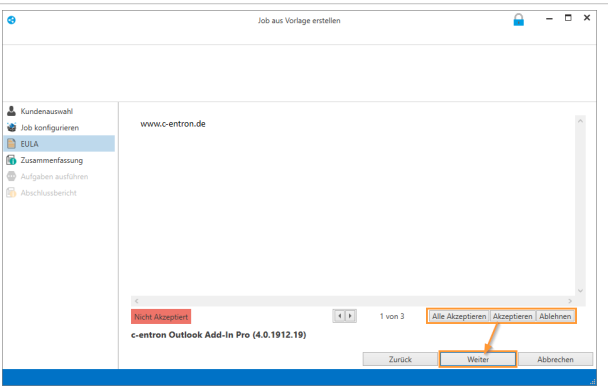
The EULAs must also be accepted in order to roll out the software packages on the defined devices
The summary provides an overview of the devices that have been declared for the job: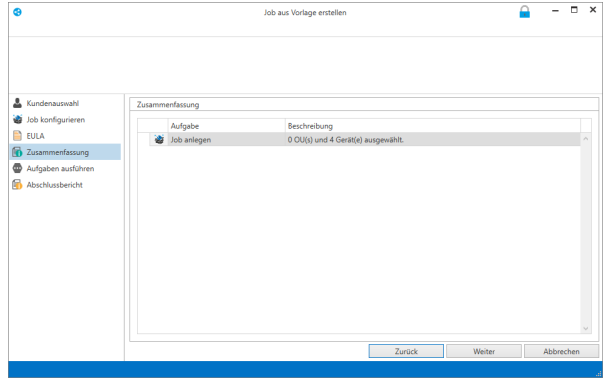
These jobs are then transferred via RiverSuite Inventory to the respective "RMM agents" and processed there as defined.
Appendix: Alternative provision of software without prior inventory
You can generally skip the inventory process (see p. 7) if you install the Riverbird Agent manually on the clients you are using. Then connect the agent to your Riverbird WebService (p. 3ff) and set up a suitable RMM kiosk as described on p. 15f.
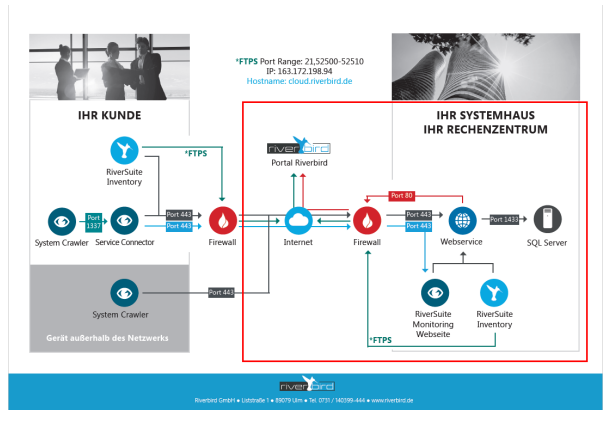
Appendix: Security settings Communication channels / Ports / Firewall
The graphic illustration shows how the communication paths of the individual components run, which standard ports are used, and where firewalls may need to be configured to allow traffic through
FAQ / Troubleshooting
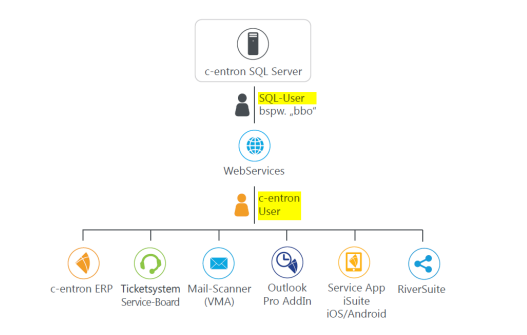
A common mistake when setting up the Riverbird WebService is using incorrect login details. To clarify: when you "set up" the WebService, you connect it directly to the c-entron database. To do this, you must use the login details for SQL Management. The database user "bbo" was most commonly used for this purpose, and in some cases the user "sa" was also used. In order to then be able to use Riversuite via the WebService, a c-entron user must log in as a user, as on a c-entron module
Q: My license has expired—but apparently I don't need one?
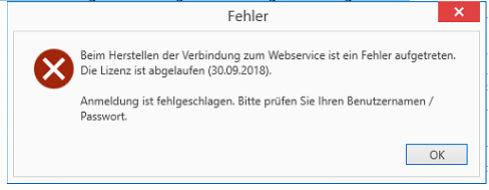
A: The web service checks the existing licenses and finds an existing but expired license for you. Please inform Riverbird Sales (vertrieb@riverbird.de) about this issue. The expiration date will then be adjusted for you.
Q: I am receiving an error message stating that I do not have a valid license.
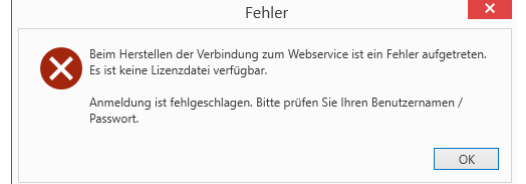
A: The most common reason for this is that the web service can't connect to the license server to get the licenses. Check whether the web service can reach the c-entron license server (https://office.c-entron.de/) (firewalls and similar may block this) and also check whether the web service can connect to the CodeMeter dongle to identify itself to the c-entron license server.If you want to run the Riverbird WebService on a different web server than the c-entron WebService and you do not have CodeMeter installed there, you can also copy the license file of the c-entron WebService from "C:\ProgramData\c-entron software gmbh\centron Web-Service" to the corresponding directory with the same name on the Riverbird WebServer. Please note that a license file is only valid for 10 days.
Q: I am receiving an error message regarding the server certificate
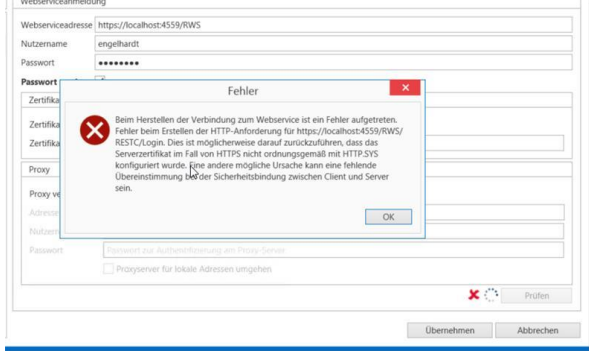
A: In this case, the stored SSL certificates do not meet the requirements of the https protocol, or TLS 1.2 is not available. If you only intend to use the Riverbird WebService for internal purposes, the URL can also be configured using the http protocol.
Q: The "Deployment" button is missing when I call up the inventory.
A: Check whether a web service is entered and saved in the settings.
Also check whether your license file has been downloaded recently—if necessary, shut down the service manually and restart it, which will reconnect it to the license server and retrieve the current licenses.
Q: I can't find my own customers
a: Make sure that:
- The customer is created and not blocked
- the user logged into the Riverbird WebService can also find their own customers (test this in c-entron, paying particular attention to customer search rights and sales territory control)
- If you have accidentally marked the wrong customer as your own customer in the configuration and can no longer change this, please contact c-entron support with this information
Q: After installing Riverbird WebService, I receive the message "The service cannot be started. The handle is invalid." The service then fails to start.
A: In most cases, the problem is that the Riverbird WebService is not connected to the CodeMeter dongle. Check whether the CodeMeter software on the computer is up to date and has a connection to the dongle (update the server search list). If necessary, the USB-to-LAN hub to which the dongle is connected must also be completely disconnected from the network for a few minutes and restarted. In rare cases, the WebService may have been installed incorrectly. Uninstall the WebService, download the WebService again, and restart the installation. If this does not improve the situation, send the WebServices log directly to support in a helpdesk request. The logs can be found in the directory C:\ProgramData\c-entron software gmbh\c-entron Web-Service\Logs.
Q: The Riverbird WebService is already running c-entron scripts on my production system before I have had a chance to test the new version in a test environment. How can I prevent this?
A: You can set up the Riverbird WebService on the test database instead of on your production system. This will initially transfer the scripts to the test database. Please note that updating the productive c-entron WebService or logging on to the production system with an updated .NET client will transfer the scripts.