%20(1).png)
EDI in c-entron.NET
Configuration
There are three basic options for configuring this module:
Direct connection to suppliers via FTP or HTTPS•
Connection via EGIS
Connection via ITScope
1. Direct connection to suppliers via FTP or HTTPS (without EGIS or ITScope)
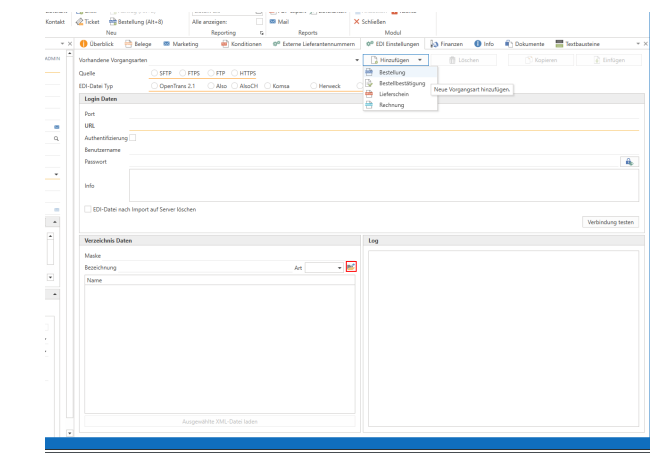
Navigate to a supplier in your address master and open the "EDI Settings" tab on the right-hand side.
Now that we have arrived here, we can begin to configure the EDI connection. The first step is to create the four processes displayed in the "Add" menu and set them up in sequence.
Source: Select the connection type specified by your supplier.
EDI file type: If your supplier is listed here, select it; otherwise, select OpenTrans 2.1 (please check with your supplier to see if they explicitly support this format)
Login details: Enter your login details here. In the case of an HTTPS connection without login, the URL and port are sufficient.
Now check your login details by clicking the "Test connection" button. You will see the results in the log window below.
In the case of HTTPS, the following step is obsolete. Now open your FTP connection using the button marked in red on the screenshot and the content will be displayed below it.
Here, double-click to select the FTP folder intended for the respective transaction at your supplier's site. The name of the folder appears in the Description line. You will often find clearly named folders such as "order" for orders or "invoice" for invoices. In some cases, however, your supplier may provide you with two folders named "in" and "out." In this case, "in" stands for orders and "out" for everything else. Since c-entron cannot know exactly which XML files in the "out" folder are for invoices, delivery notes, or order confirmations, you must help the system in the "Mask" field as follows: Determine the common denominator of the file names for the corresponding process and enter it under "Mask." For example, invoices could always be named "invoice-.xml." Then enter "invoice" in the mask for the invoice process, and so on.
Finally, save everything as usual with the blue disk icon and you're done
2. Connection via EGIS
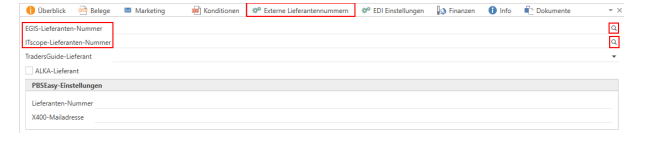
If you have an EGIS connection, you do not need to follow the steps in point 1. Navigate to a supplier in your address master and open the "External supplier numbers" tab on the right-hand side. Click on the small magnifying glass in the "EGIS supplier number" line on the right and search for the supplier. The number will be transferred to the line. Save your settings with the blue diskette icon
3. Connection via ITScope
If you have an ITScope connection, you do not need to follow the steps in point 1. Navigate to a supplier in your address master and open the "External supplier numbers" tab on the right-hand side. Click on the small magnifying glass in the "ITScope supplier number" line on the right and search for the supplier. The number will be transferred to the line. Save your settings with the blue disk icon
Triggering an order via EDI
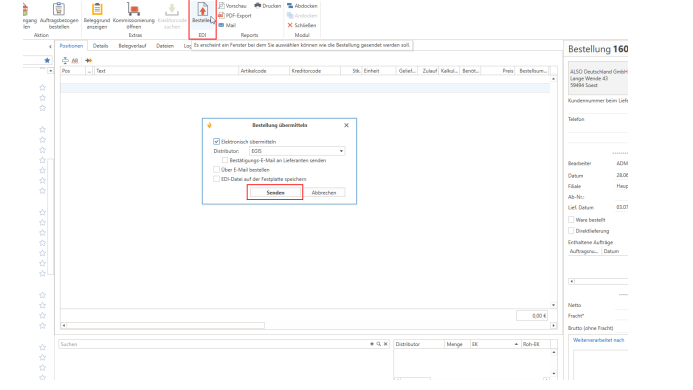
Placing an order via EDI is basically the same as placing a c-entron order as you are used to doing. The difference lies at the end of the process, after you have saved the order. Select the "Order" button in the order menu bar and send it to your supplier via EDI using the "Send" button. If you have configured your supplier via direct connection, the "Distributor" line will not be displayed in the small window.
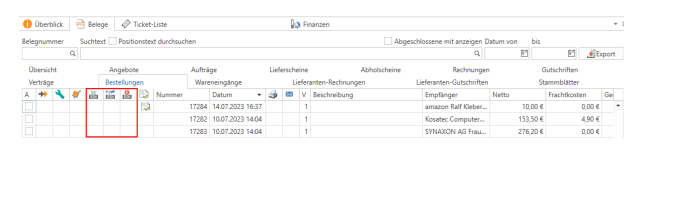
In the overview of all orders, there are three new columns that show you whether an order is an EDI order. From left to right:
If an order was placed via EDI
Did an order confirmation arrive via EDI?
Did an invoice arrive via EDI?
EDI administration
1. Overview
The "EDI Management" module is required for further processing of your supplier transactions. Here you can process order confirmations, delivery notes, and invoices that your supplier sends you via EDI.
In the upper section, you will find filters for sorting your lists. Below that, you can switch between the different transaction types. The "History" tab shows you a summary of your orders placed via EDI under "Orders," along with the corresponding supplier documents. The History section shows a log of the EDI system. Finally, under "EDI Distributors," you will find a list of all suppliers that already have an EDI configuration.
Starting with release version 2.0.2501.x, the manual upload of xInvoices (XML or PDF/A ZUGFeRD) about the "Load ZUGFeRD invoice" button possible.
2. Order confirmation
Under the "Confirmation" tab, you will find a list of all order confirmations (OC) that have been sent to you by EDI from your suppliers in the upper area.The lower section is divided as follows: On the left under "EDI," you will see the data sent by the supplier. On the right under "c-entron," you will see the data for your sent c-entron order. Your task here is to compare the AB with your order. There are three possible scenarios for the individual items.
Green linec-entron was able to match the position from the AB with the corresponding position in your order, and all data such as quantity and price are correct
White line: Here, the system was unable to find a corresponding item for this position on the other side. This may be because, for example, the supplier confirmed this position to you without an EAN or manufacturer code, meaning that no match could be found. In this case, drag and drop the corresponding line from the supplier side to the corresponding line in your c-entron order. The color of the line will now change automatically.
Red line: The item could be identified on both sides, but at least one value such as price, quantity, or delivery date differs. You can see the difference very quickly, as the respective value is clearly highlighted on both sides. In most cases, the supplier has confirmed the goods to you at a different price. Check this data and then proceed as described below
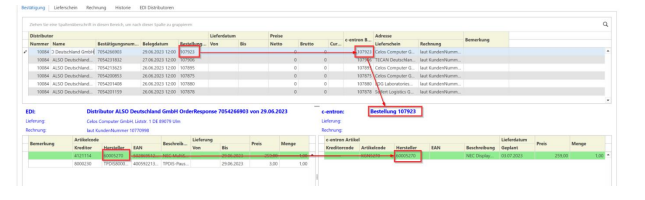
Once you have ensured that none of the item lines are white, all you have to do is process the AB using the "Accept" button in the menu bar. If there are red lines in the AB, you will be asked whether the deviation should be transferred to the c-entron order, so that, for example, the purchase price is overwritten.
The "Reject" button closes the purchase order without processing. No communication with the supplier takes place here.
3. Delivery note
This area works in the same way as processing an AB. At this point, after the AB has been processed, every line should be green. If this is not the case, proceed as described in point 2. In addition, if a tracking URL has been sent in the supplier's position, you can open this link by double-clicking on it.
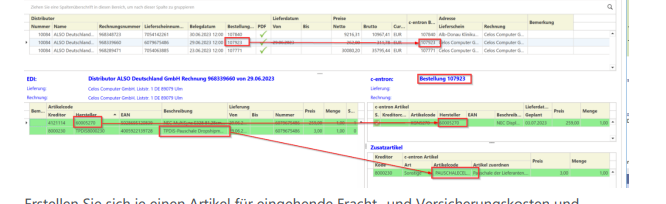
4. Invoice
Here you can now process your supplier's invoice. The lower section works in the same way as before, and items that are not marked in green should only appear in rare cases. However, the lines that appear in a different color at the beginning are freight and insurance costs. For these items, there is a section on the right-hand side called "Additional items." If this has not already been done by c-entron, please drag such items into this area. Now you can select whether it is freight or insurance in the "Type" column. If no item appears here under "Item code" after selection, it still needs to be configured:
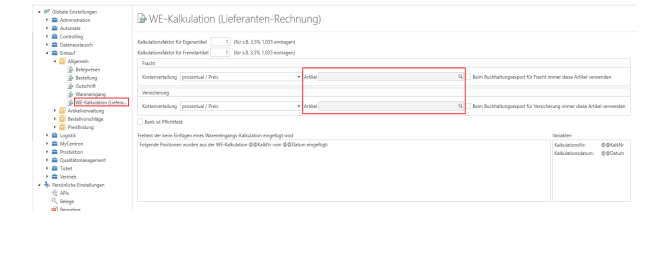
Create one item each for incoming freight and insurance costs and link them in the settings as shown in the screenshot.
Now that you have checked and, if necessary, edited the items, your task is to decide how the goods should be processed further

You can either create a goods receipt with or without a preview to post the goods. In this case, you must create the GR calculation, i.e., the supplier invoice, from the goods receipt as usual. Otherwise, you can create a GR calculation with or without a preview. In this case, the goods receipt is created and saved without a preview. We also offer the supplier the option of sending the serial numbers via EDI. If any have been sent, the serial numbers are automatically posted in the goods receipt
ITscope – Ordering via EDI
(Available from release version 2.0.2207.x)
It is now possible to place EDI orders with ITscope from within c-entron.NET. (If you require this license, please contact sales@c-entron.de)
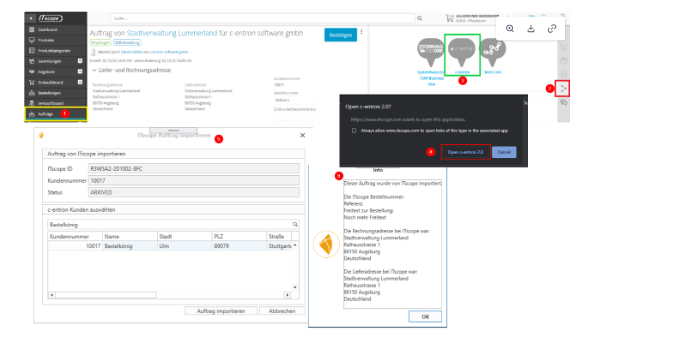
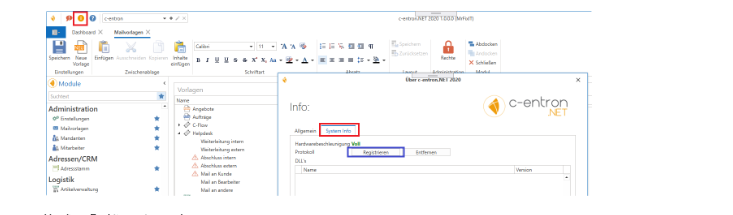
To use this function, click the [Register] button in the System Info section of c-entron.NET. This will create a protocol for communication with the ITscope portal.
To use this feature, you must
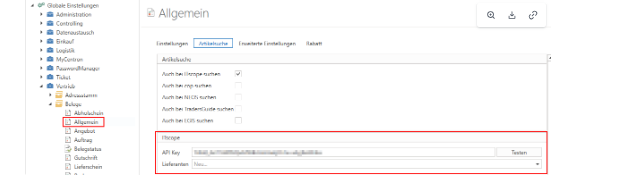
In Settings – Sales – Documents – General, under the "Item Search" tab, an API key must be stored for "ITscope."
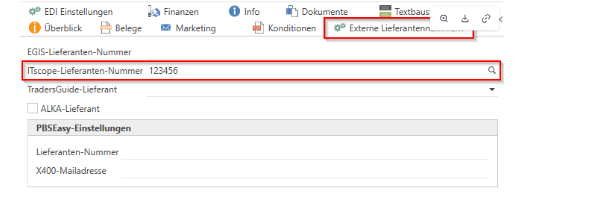
In the address master for suppliers, in the "External supplier numbers" tab, enter your "ITscope supplier number" and save it.
EDI orders can now be placed with ITscope from within c-entron.NET.
Quick guide:
Open order
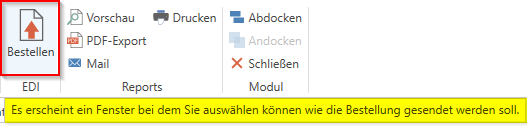
Click the [Order] button under EDI in the menu bar/ribbon
Submit order
If ONLY the "ITscope supplier number" is stored in the address master for suppliers in the "External supplier numbers" tab, then "ITscope" must be selected under Distributor using the drop-down button.
If several supplier numbers are stored in the address master for suppliers in the "External supplier numbers" tab, then "ITscope" must be selected under Distributor using the drop-down button.
The EDI order is triggered via [Send]
In this window/dialog box, you also have the option of selecting the following actions:
Send confirmation email to suppliers
Order by email
Save EDI file to hard drive
[Cancel] cancels this action