%20(1).png)
Item management
I. General information
C-entron distinguishes between items processed in the system with regard to items that you have already permanently stored ("own items") and items that are only required as auxiliary items ("dummy items"), or which are imported in the form of price lists from manufacturers and suppliers ("third-party items").
Peculiaritiesl: Own items are items that have been created manually in the system or have been entered into the system via an external or new item and its conversion.
Foreign articlel: This term is used by default for data imported from distribution and manufacturer lists. The item code "FREMD" is entered into the system independently for such items. If the item already exists in the system, its own item code, price, and description are inserted
Dummy articleall items that have not been created in the system and cannot be entered into the system via a price list are entered manually into the system using the item code "ARTIKNEU". Other dummy items are created for functions such as quota balancing, but can also be created by you for specific purposes
Attention: The item types FREMD and ARTIKNEU cannot be delivered, invoiced, or ordered. These must always first be converted into a corresponding item of their own.
II. Main screen: Item management
The main screen is primarily used for searching for articles and providing a quick overview. Double-click on an article to open it in a separate window.
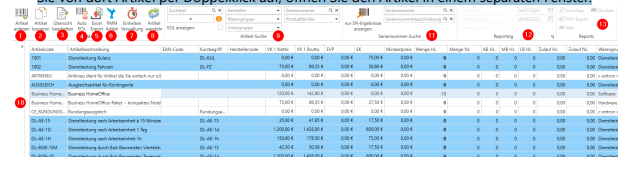
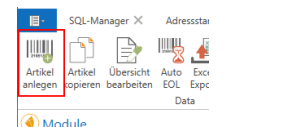
1) Create item: Here you can create a new item. Use this function if you cannot or do not want to use references from other items or import lists.
➔ See "IV. Create new article"
2) Copy item: Here you can create a copy of an item that already exists in the database. Apart from the item code, all item properties can be copied 1:1.
➔ See "V. Copy article."
3) Edit overview: a way to quickly change selected item properties from this overview. Activate or deactivate overview editing with this switch
4) Auto-EOL: Calls up the Auto-EOL function. If this is configured, items are set to end-of-life according to a specified scheme; they are then no longer available in standard searches, especially in documents
5) Excel export: creates an Excel table of the items contained in the hit list (10). Column arrangement and grouping are transferred as configured in the hit list.
6) RMM items: manage the RMM items for Riverbird here. You can find out more in our white paper on billing RRM items
7) Unit management: allows you to store new item units and modify existing ones
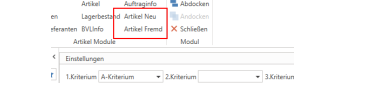
8) Convert items: Here you can convert FREMD items and ARTIKNEU items into your own items if necessary, so that you can add them to your own portfolio and order them from suppliers if required.
9) Item search: To search for one or more items, enter a search term here and/or narrow down the search to specific parameters such as product groups, manufacturers, etc. The search is triggered by pressing [Enter] or [F3] or by clicking on the search icon or in the middle of the overview page. If the search returns exactly one result, c-entron will open it directly in a new tab. If there are multiple results, c-entron will list them in the results list (10).
➔ See "III. Article editing."
10) The hit list shows you the results of the previously configured search (9). By default, EOL items are hidden, and service items and flat rates are highlighted in blue. By default, the hit list only shows the first 200 items found. To load more items into the mask, scroll all the way down. Double-click to call up the desired item.
➔ See "III. Article editing."
11) Serial number search: Search for a specific device using its serial number. The hit list (10) will then show you all devices that match the specified search parameters. Double-clicking will take you to the serial number details rather than the item management screen.
12) Reporting: Compile parameters for evaluations here.
13) Create an evaluation, if necessary, across the parameters configured in (12)
III. Article editing
Required fields: As usual, required fields are marked in orange with a border or underline.
The menu bar offers the save function and the copy function (see main screen). This is followed by the "item modules." These are opened in modular windows within the item screen. These windows can also be docked within the item screen, and the resulting item view can be saved in the profile. The item data already displayed is also loaded in such modular windows; these windows can also be detached, moved, or closed.
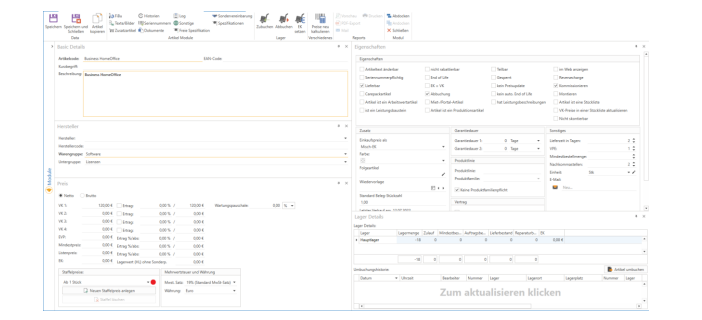
When a modular window is closed, the corresponding icon is inserted at the end of the list of article modules.

1) Basic Details1. The short term can be used as a search keyword. In addition, the customer asset hybrid report has the option of printing this as well.
2. The item description is used as the item description in the documents
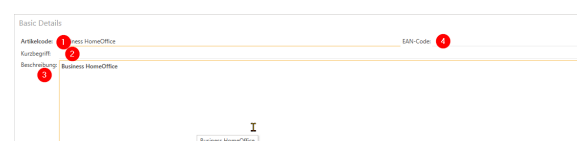
3. The EAN code is used in particular on supplier documents to uniquely identify an item. The EAN code can also be used to search for items.
2) Manufacturer

1. A supplier can be selected as a manufacturer if they have been assigned the "Manufacturer" flag in the address master (see Address Master Manual).
2. The manufacturer code usually comes from the manufacturer data, which is transferred via item lists or API connections.
3. Each item must be assigned to a product group. This is used to make default entries when the item is created. Numerous processing and evaluation logics are based on the product group assignment.
4. A subgroup can be assigned. This refines evaluation options or logical processing filters, if necessary, e.g., the differentiated assignment of special prices.
3) Properties
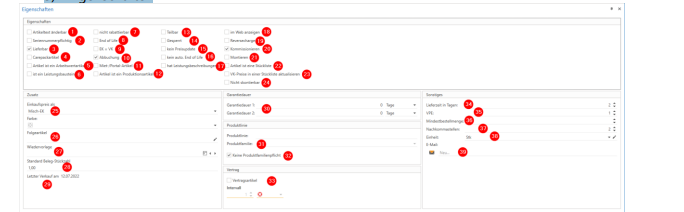
1. Article text can be changed: This is related to whether you are generally allowed to change article texts or not. If you generally have the authorization to do so, this check mark has no effect. However, if you do not generally have the right to change article texts, you may still change the descriptions of articles for which this check mark is set
2. Serial number required: A serial number must be specified when posting incoming and outgoing goods. Inventory calculation for items requiring serial numbers is based solely on the number of serial numbers recorded. Items requiring serial numbers cannot be split (see below)
3. Available: Ensures that the item can be included in delivery notes and invoices.
4. Carepack items: This checkbox must be selected for all Carepack items that you wish to order from Actebis via EDI.
5. Item is a work value item: Items that are to be used for performance recording and are assigned to an employee require this flag. Activating this flag makes the "Work values" (10) item module visible.
6. Is a performance module: If you can see this property, please ignore it.
7. Not discountable: No discount can be applied to this item
8. End of Life: If this checkbox is selected, the item will no longer appear in normal searches unless you explicitly allow EOL items to be displayed in the search parameters. This represents the deactivation of an item.
9. Cost price = selling price: Can be used for service items, for example. No matter how you change the selling price, the cost price always adjusts to the selling price and vice versa. However, this also means that you will not generate any revenue in the evaluations with this item
10. Debit: This check mark activates inventory management. By default, only items with the "Debit" check mark appear in the order proposal list (BVL). Inventory items can also be added or debited manually.
11. Rental portal items: Items that you order and bill via a portal are marked with this flag. These are processed separately in the BVL.
12. Item is a production item: If you can see this property, please ignore it
13. Divisible: If items are sold not only in whole units but also proportionally (e.g., by the meter, by the hour, etc.), this setting allows you to specify decimal places for the quantity.
14. Locked: If this checkbox is selected, the article can never be accessed again and will no longer appear in any evaluations
15. No price update: Item is not included in automatic price updates
16. No car end of life: Item is not taken into account when setting automatic EOL
17. Has service descriptionsThis property allows service descriptions and service modules to be added to the item.
18. Display on the web: This setting allows external programs to select items for transferring data to a web system, for example. By selecting this option, the item can be automatically uploaded to the trading portal or web shops.
19. Reverse charge: If an item is subject to reverse charge, it requires this flag.
20. Picking: Item appears in the picking module and can (but does not have to!) be picked.
21. Assemble: Once an item is included in an order with this setting, it is not sufficient to have enough stock available to generate a delivery note or invoice. You must also manually check the "Assembled" box in the order
22. Item is a bill of materials: here you can change the item to a bill of materials or a bill of materials header. Activates the "Bill of Materials" item module (12), which can be used to predefine the items contained in the bill of materials. The bill of materials is a list of items related to a main item. A bill of materials item cannot be ordered; only the items entered under it are added to an order. This means that the bill of materials item does not have a debit indicator. In addition, this item is not divisible, which means that it can only occur as a whole number.If an item has the property "Item is a bill of materials," another option is available: "Bill of materials with fixed retail prices." This means that the bill of materials header is given its own fixed price. If there is a difference between this price and the sum of the prices of the items contained, it is closed by c-entron inserting a discount item.
23. Update retail prices in a bill of materials: Controls the behavior of the items contained in the bill of materials with regard to individual prices. If the retail price of the bill of materials header is adjusted, this change can be applied to the items contained therein by means of a retail price adjustment.
24. Not eligible for discount: Items with this property are excluded from discount calculation.
25. Purchase price as...: Select the basis on which the inventory valuation for this item should be carried out if additional inventory greater than zero is posted to inventory via goods receipt posting. The options available are "Mixed purchase price" (average method), "Last purchase price" (current procurement costs), and "Fixed purchase price" (fixed price)
26. Follow-up article: The follow-up article is automatically inserted when the main article is selected, e.g., printer as main article, printer cable as follow-up article.
27. Resubmission: An article with a resubmission date entered will appear in the to-do list on that date.
28. Standard document quantity: When an item is added to a document, the quantity specified here is used directly.
29. Last sale: c-entron sets this date for you as the day on which the item was last used in an invoice.
30. The information on the warranty period is for informational purposes only
31. Product families: Use the PLM (Product Lifecycle Management) add-on module to select the product family to which an item belongs
32. If the product family requirement is mandatory for the product group of the item, this mandatory information can be overridden by selecting the "No product family requirement" checkbox.
33. Contract items: These settings control the extent to which the item quantity is adjusted when the item is transferred from an order to a contract using the "Contract items" function.
34. This information specifies the expected delivery date of goods from your supplier.
35. VPE stands for packaging unit. This function can also be used for services, for example, to determine the number of hours in a daily rate.
36. Minimum order quantity: The minimum quantity that must be ordered. Smaller quantities cannot be included in orders.
37. Decimal places: Number of decimal places/decimal digits that the price of the item should have.
38. Unit: The units can be displayed in the documents based on the information set here. You can access unit management using the button to the right of the drop-down menu.
39. Email: When an item is added to an order, the email recipients entered here automatically receive a preconfigured message
4) Price
in this window, you can access and control relevant price settings.
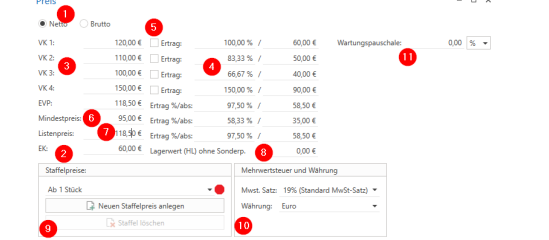
1. Choose between net and gross display
2. The cost price forms the basis for calculation and inventory valuation (see above)
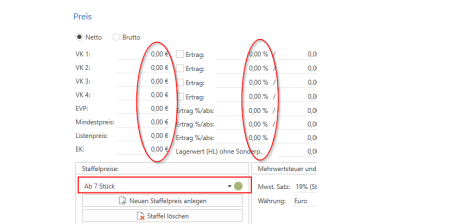
3. It is possible to maintain 4 different sales price scales. These can be configured independently of each other. A price scale can be assigned to the customer in the customer conditions.
4. The markup rates are taken from the product group when the item is created, but can be reconfigured manually.
5. You can use the checkbox to control the behavior of price calculation during manual price adjustment. If the checkbox is deactivated when you adjust the purchase price, your calculation rate changes while the respective sales price remains the same. If the checkbox is activated when you adjust the purchase price, the sales price is adjusted based on the markup
6. The minimum price can be used via group authorizations to ensure that this item cannot be delivered or invoiced if the price is below this level.
7. The list price serves as a reference for external price information
8. The inventory value is calculated by c-entron based on the number of items in stock and the purchase price.
9. Volume discounts: If the traffic light is red, this means that no volume discounts have been created. Green means that at least one volume discount has been created. The volume discounts can be viewed and adjusted using the drop-down menu. Create a new volume discount if necessary. If the item is added to a customer document with at least this specified quantity, the volume discount applies.
10. If necessary, control the VAT rate and currency that should apply to this item.
11. The maintenance fee is an informative area
5) Storage details
Here you will find information about your holdings
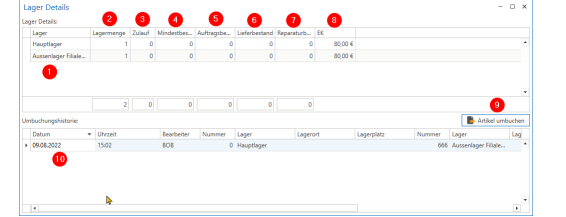
1. Inventory is managed separately for each sub-warehouse. However, the entry for the sub-warehouse is only generated if the item has passed through this warehouse at least once.
2. The stock quantity indicates how many items of this product are freely available in the respective warehouse.
3. The inflow indicates how many items have been ordered with reference to the respective warehouse. This value is reduced by a goods receipt posting, while the warehouse quantity is increased.
4. You can define a minimum stock level for each warehouse by entering the desired quantity in this field. If the stock level falls below this value, the BVL will suggest that you order the item, specifying the quantity required to reach the minimum stock level
5. The order backlog shows you how many items are in open orders
6. If items have been added to a delivery note, you can see this in the delivery stock. The goods have left c-entron's premises, but are still your property as the invoice has not yet been issued.
7. RMA cases are displayed via the repair inventory.
8. Each sub-warehouse can maintain its own cost price per item. The current cost price for the respective warehouse is displayed here.
9. Use the "Transfer items" function to manually transfer items from one warehouse to another. The source for the transfer is the previously selected warehouse; you select the destination warehouse and the quantity to be transferred in the following dialog box.
10. The history of manual transfers allows you to track the transfers that have been made in this way.
6) Financial accounting
Manage the financial accounting details of the item here
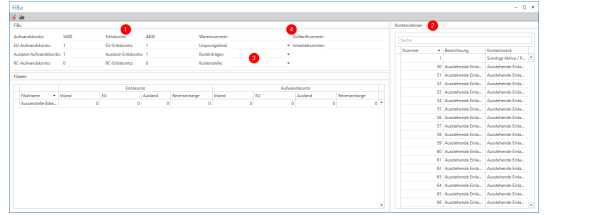
1. Expense and revenue accounts are transferred from the merchandise category when the article is created, but can be changed for specific articles. If you have entered a chart of accounts, you can use it to determine the required accounts (2). When the invoices are transferred to accounting, the revenue and expense accounts are transferred from the document. When an article is inserted into the document, the revenue account is automatically determined according to the following hierarchy: Article setting -> Sub-product group setting -> Product group setting -> VAT rate setting -> Country management setting. The account stored at the highest hierarchy level appears in the document and can be changed manually there. If no accounts are stored in the item itself, c-entron goes down the hierarchy until it finds an entry and uses it.
2. The chart of accounts is displayed for support purposes, provided it is stored in the corresponding module.
3. Cost units and cost centers can be stored for evaluation purposes, provided they have been created in the corresponding module.
4. If desired or required for export declarations, also maintain information on the commodity code, country of origin, customs tariff, and Intrastat
7) Specifications
In this item module, you specify the physical specifications of the item—this is useful if weight and dimensions need to be taken into account for packaging and shipping costs. You will also find special functions here, such as the "counter item" property
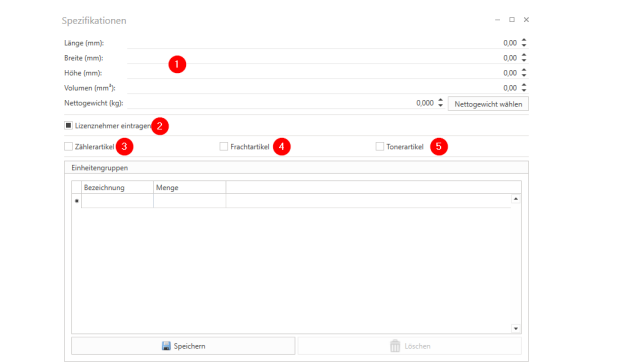
1. If applicable, specify the dimensions and weight of a single item
.2. Enter licensee: if this property is active, the licensee can be displayed in the order and in the customer documents in conjunction with the rental/portal article property.
3. If it is a consumption measuring device (e.g., click counter for printers and copiers) and the consumption figures documented with it are to be billed with a click contract, your item requires the "counter item" property. This also displays the button for counter type management in the item itself.
4. The "Freight Item" property allows the item to be used as a dummy for freight costs, and the item can be evaluated separately. It should then be linked to a carrier (supplier property) and assigned a maximum weight.
5. Toner cartridges can be supplemented with information on how many pages the item will yield at a given coverage level. This can then be used for external fleet management
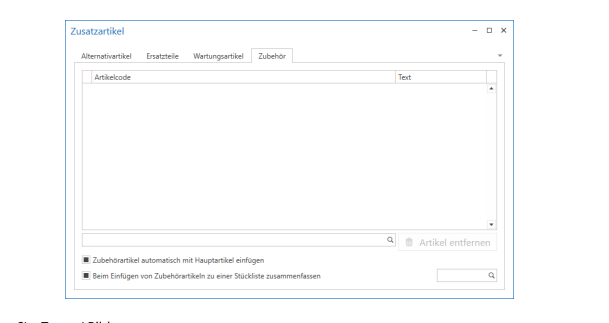
8) Additional article
Here you can manage links to other items that can be called up on the customer document page. To do this, right-click on the item in the customer document to open the context menu and select the "Insert additional info" function. Here you have the option of inserting the spare parts, maintenance items, accessories, and alternative items maintained in the item. Accessories can also be inserted automatically into a document if the corresponding checkbox is activated
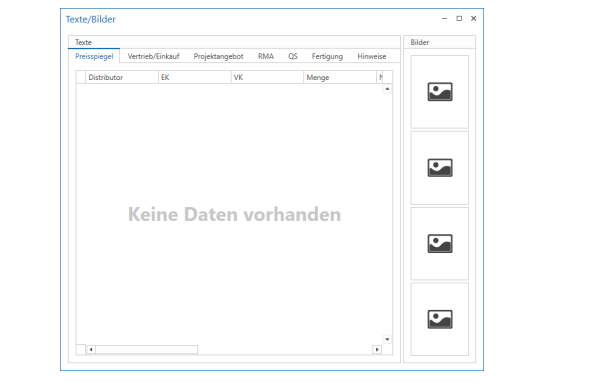
9) Texts / Images
Here you can maintain images, additional information, and notes, some of which can also be displayed automatically in documents. A maximum of 4 images can be stored per item. These images can be downloaded, for example, via the item price lists (which are imported daily from suppliers), using Internet links, or they can be integrated directly into the system. Manual addition is also possible.
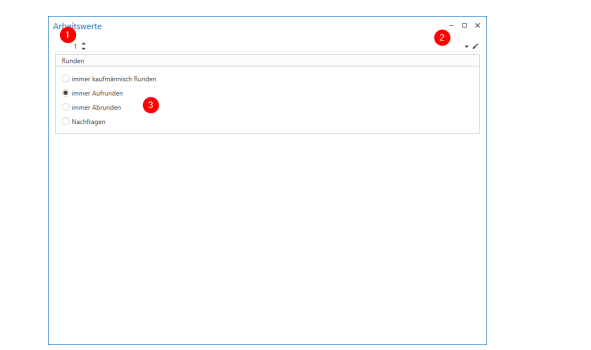
10) Labor value articles
This particularly affects rounding behavior when calculating times.
Please also note the interaction with the "Divisible" setting
.1. The number of properties in connection with the unit (2)
2. The item unit. In combination, 1 item can therefore result in 3 units.
3. Rounding behavior: If an item is divisible, it is rounded to two decimal places. Here, you can choose between commercial rounding and basic rounding up or down. If an item is not divisible, the rounding setting is applied to whole units
11) Other
1. Define preferred suppliers for this item, who will then be preselected in the BVL, provided that the item can be ordered from these suppliers.
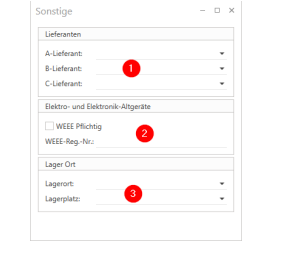
2. Activate the WEEE obligation for this item and enter your WEEE registration number. This data will be transferred to all customer and supplier systems and maintained there.
3. If you have defined storage locations and/or storage bins, you can store this information in the article.
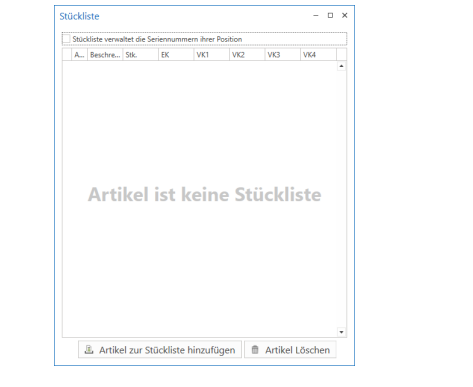
12) Parts list
If you frequently work with pre-made bundles in sales, these bundle items can be predefined. Use the "Bill of Materials" property to define an item that acts as the bill of materials header. Define the items included in this bundle using this menu. When the bill of materials header is then inserted into the document, it is inserted as a finished bill of materials with the defined items as bill of materials items. Note the setting for the behavior of the bill of materials price.
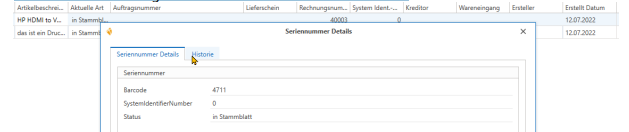
13) Serial numbers
Serial numbers can be managed for each item, but automatic calls and inventory changes only take place when using a serial number if the serial number requirement is active for the item.
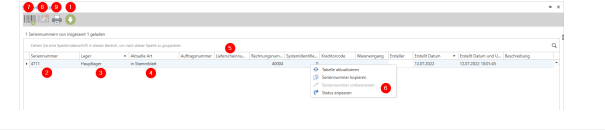
1. Load all serial numbers: By default, the overview displays the first 300 serial numbers recorded for this item; scroll to the end of the list to load 200 more. You can load all serial numbers directly by clicking the "Load all serial numbers" button.
2. You will then receive a line with the current information for each serial number:
3. Which warehouse processed the serial number
4. The current status of the serial number
5. Various documents linked to the serial number and additional information.
6. Several functions are available via the context menu, including: • "Rename serial number": allows you to correct a serial number that has already been entered (e.g., due to a typo). This is only possible as long as the status of the serial number is "open." • "Adjust status": this function allows you to reset the status of the serial number to "open." This is an emergency function that should only be used if there is no other option.
7. Add serial number: This function can be used to enter a serial number for the item. For items that require a serial number, this increases the stock by 1 for each serial number entered. The new serial number is given the status "open." The serial number can either be entered manually, scanned in, or generated according to a definable scheme.
8. Write off serial number: A serial number can also be written off manually as long as its status is "open." This reduces the inventory of items requiring serial numbers by 1 for each serial number written off.
9. Print serial number: If a corresponding report is stored, a label can be printed for each serial number.
14) Histories
This item module allows you to display all attachments in which the item you have called up appears. For example, to display all orders that contain the item, switch to the "Order" tab in the history. Double-clicking on the entry opens the corresponding attachment
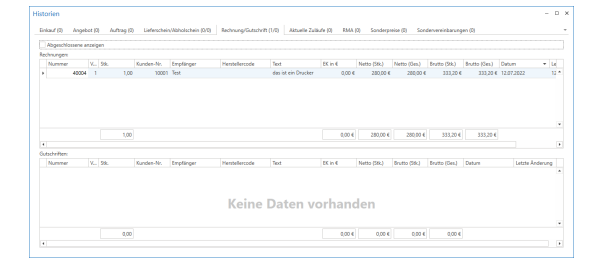
The item history acquires special significance in connection with the items FREMD and ARTIKNEU during item conversion.
15) Documents: Various files and documents that are to be added to the article can be stored here. These files can also be edited here.
16) LogDem Article log shows changes that have been made to the article.
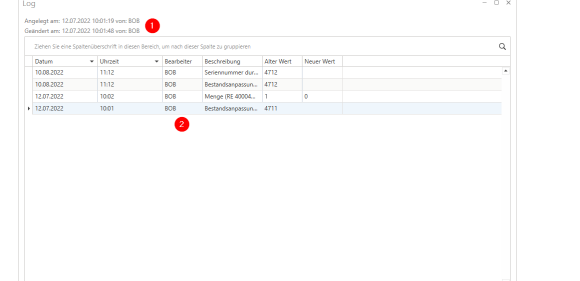
1. The creation date and the date of the last change are highlighted
.2. The description and other entries make it possible to trace which employee made the changes
17) Special agreement
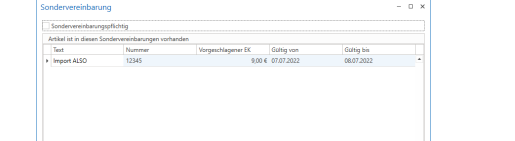
This is where items appear for which you have imported project prices or stored the item in the customer master under special agreements. You can also use the Special agreement required checkbox to ensure that a special agreement/project price must always be stored for this item in attachments.
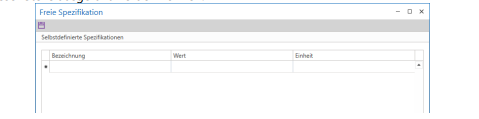
18) Free specification: Additional specifications can be created in the settings and filled in here.
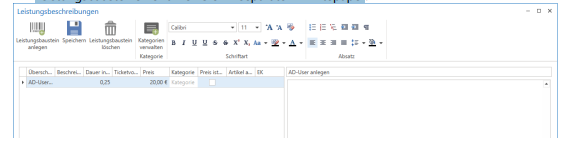
19) Service descriptions If an item has the property "Has service descriptions," you can manage these service modules here. For more information on creating and handling service modules, please refer to the separate white paper
IV. Create new articles
You can create a new item by clicking on the "Create item" button in the menu bar of the item management section.
A blank item editing screen is displayed; depending on the settings, an item number from the item number range is already suggested, but this can be overwritten. Fill in the mandatory fields; by selecting the product group and, if applicable, the sub-product group, the item settings are pre-filled as stored in the product group. If a purchase price has already been entered when you select the product group, the sales price calculations will also be performed based on the calculation rates stored in the product group. It is therefore advisable to enter the purchase price before selecting the product group. Then, if necessary, set item settings that differ from the product group and maintain any additional settings and information required, such as texts, images, and additional items. Once you save the item for the first time, the assigned item code can no longer be changed.
V. Copying articles
If you already have an item in your database that you want to use as a template for another item, you can copy this item. This function is available in the item management section once you have successfully performed a search and selected the desired item, or in the item editing mask.

In both cases, you will be redirected to the "Copy item" menu. Here you must specify a new item code for the new item (1). Now you need to decide which item properties should be set as in the original. The obvious approach would be to check the desired properties individually. However, you can also select "Select all" (2) and then uncheck them individually (3). Then click on "Apply item" (4) to create the new item and open it in the editing mask. If you want to apply the item settings 1:1, you can also use the "Select all and apply item" button (5).Item management19Creator: HEG Valid from: 10.09.2022Approval: VLVersion: 001www.c-entron.deNun, the aim is to set the item properties as they are in the original. The obvious approach would be to check the desired properties individually. However, you can also select "Select all" (2) and then deselect them individually (3). If you then click on "Apply item" (4), the new item will be created and called up in the editing mask. If you want to apply the item settings 1:1, you can also use the "Select all and apply item" button (5).
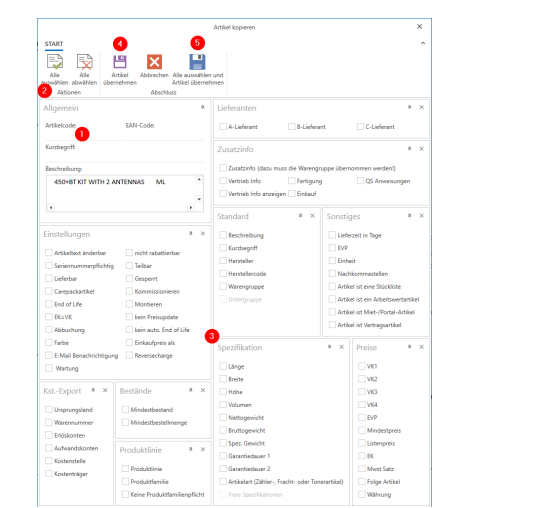
Now it is a matter of determining which item properties should be set as in the original. The obvious approach would be to check the desired properties individually. However, you can also select "Select all" (2) and then uncheck them individually (3). If you then click on "Apply item" (4), the new item will be created and displayed in the editing mask
if you want to apply the item settings 1 to 1, you can also use the "Select all and apply items" button (5).
VI. Article conversion
If you have quotes and orders that contain third-party items or the ARTIKNEU, this item data can be used to create new items. This is necessary if the items are to be ordered, delivered, and invoiced. Since this is mainly applied to the process of converting third-party item data to proprietary items, this is referred to as item conversion. There are three possible ways to do this
can be used; all three have in common that new items are created based on the data stored in FREMD and ARTIKNEU. The conversion replaces the items in the documents with the newly created items.
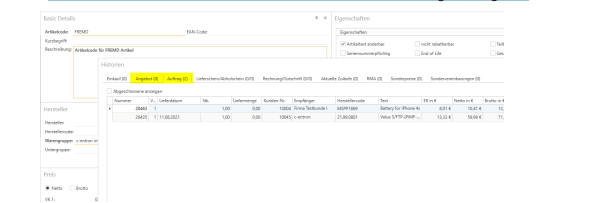
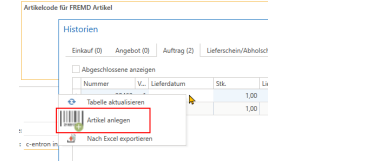
1. From the history of the FREMD article or ARTIKNEU: To do this, call up the FREMD or ARTIKNEU article via article management and open the history of the article. The Offer and Order tabs show you the documents in which the article is currently included and which article data is stored in the document
Right-clicking on the desired line opens the context menu and allows you to create a new item with the item data stored in the document
When you select this menu item, an item mask opens in which the known item data is already filled in. Now proceed as you would when creating a new item. 2. Via the BVL (order proposal list): If ARTIKNEU or FREMD are in orders and you call up the BVL, a pop-up window will appear:
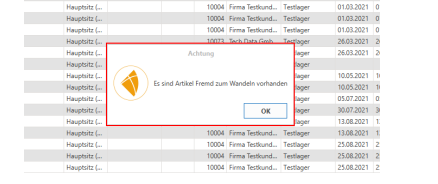
Confirm the dialog box and select "New Item" or "External Item" from the menu bar. This opens the history of the respective item, and you can then proceed as described above.
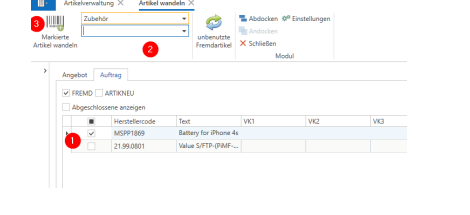
3. About article management: Select the "Convert article" function from the menu bar

A window opens for this function. Here you can display which data ARTIKNEU and FREMD are stored in which active documents.
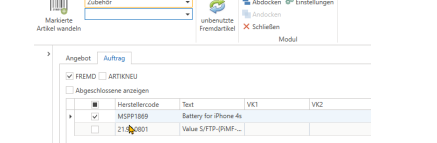
Now select the items to be converted (1) and specify the product group and, if applicable, the sub-product group (2) in which the items are to be created. Before you click on "Convert selected items" (3), please note that all items selected in this way will be created in the specified (sub-)product group. If necessary, repeat the process several times to address different product groups
VII. Additional settings
Unit management To manage existing units and create new ones, open the unit management screen. When displaying in the report, you can choose between short and long text (name) (report switch); the short text appears in the drop-down menus. A new unit can be added via "New unit" (1)
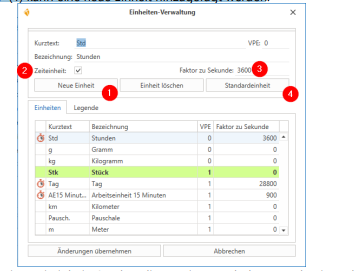
If it is a time unit (2) that is used to debit quotas and settle times, the unit requires a factor per second; you therefore define how many seconds make up one item. (Example: 1 item with the unit "hour" contains 3600 seconds). This factor is then used when settling times using standard time items.
New items are always initially created using the default unit (4). [Back to item management or item editing]
Create a new graduated price: A new graduated price can be stored using the "Create new graduated price" button.
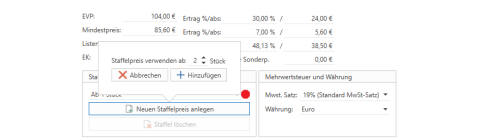
First, specify the quantity at which this price scale takes effect. The price mask is then cleared, and you enter the desired price information for the price scale to be created.
Then save the item. [Back to item editing
Manually posting and unposting items: In the item master, you have the option of adjusting the stock level for individual items.

It is possible to debit and credit items, with separate rights assigned to each of these two options. When you click on the Credit button (1) or the Debit button (2), the corresponding window opens, allowing you to make the desired entries for the main warehouse or for each secondary warehouse
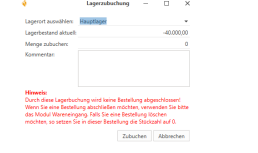
The Current Stock field displays the stock level of the selected warehouse
in the Debit quantity or Credit quantity field, you can then enter the quantity to be credited or debited.
You also have the option of entering a comment for the booking. This comment is then displayed in the item log. On the Log tab, you can see the date, the person who processed the item,
the description, the old and new values. This data is automatically written to the item log. However, it should be noted that a stock posting does not complete an order.
If you want to complete an order, you should use the Goods Receipt module. If you want to delete an order, set the quantity for this item to 0 in this order. [Back to item properties