%20(1).png)
OPOS/Reminder
Reminder in c-entron.NET
It is essential to remind your customers of late payments for services or products rendered if an invoice has not been paid for various reasons, which may include:
• The invoice was lost
• The invoice was forgotten or the payment date
• The customer is experiencing (serious) financial difficulties themselves
• there is fraudulent intent behind it
For this reason, the reminder module in c-entron.NET has been revised and is now available in the form of a wizard, making it easier for you to click through
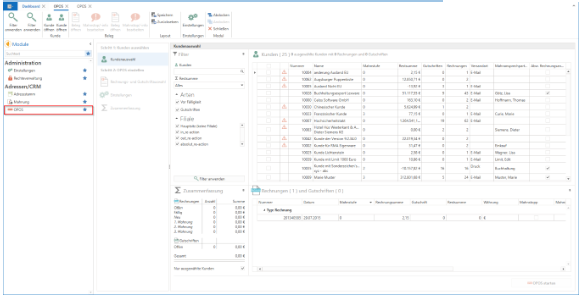
The Reminder module can be found on the left under Modules under Addresses/CRM.
However, some settings need to be configured in advance.
1.Settings
Cross-customer settings
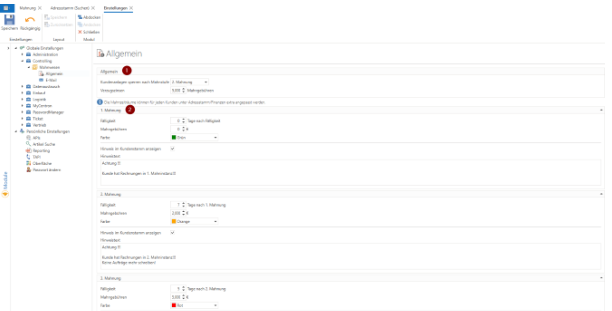
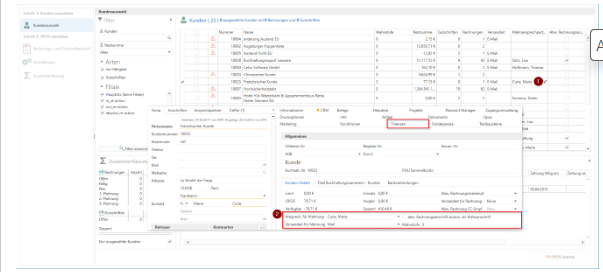
Use the [Settings] button in Reminders or go directly to Administration – Settings – Global Settings – Controlling – Reminders to specify under General whether and at which reminder level customer accounts should be blocked and whether reminder fees should be charged for this (1).
Under (2), you can set reminder periods for the individual reminder levels with reminder fees, if desired, assigned colors (for a better overview), and a note that is then displayed in the customer master as soon as the customer is called up and has reached this reminder level.
NOTE: The reminder periods can be customized for each customer under Address Master/Finances.
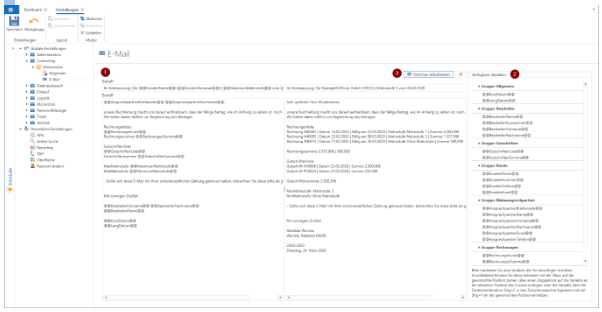
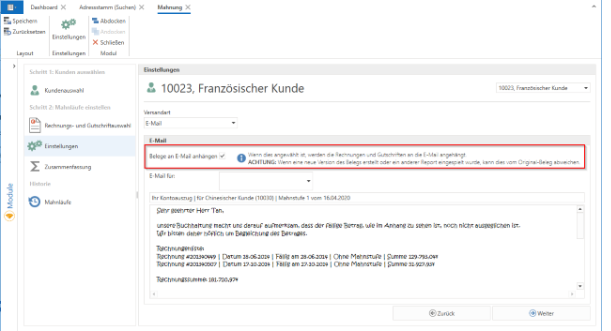
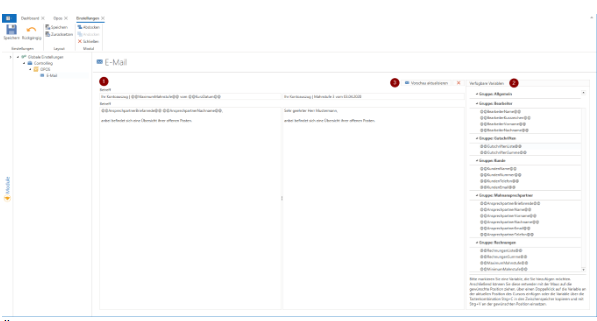
An email template can be created under Email. (1) The variables listed (2) are available for this purpose and can be easily inserted into the desired location using drag & drop, double-click, or CTRL+C and CTRL+V. If you hover the mouse over a variable, it will be explained in more detail for clarification.
Furthermore, you can use [Show preview] to preview the email (3) with the variables, use [Update preview] to update it after changes have been made, and use [X] to close it again.
Custom settings
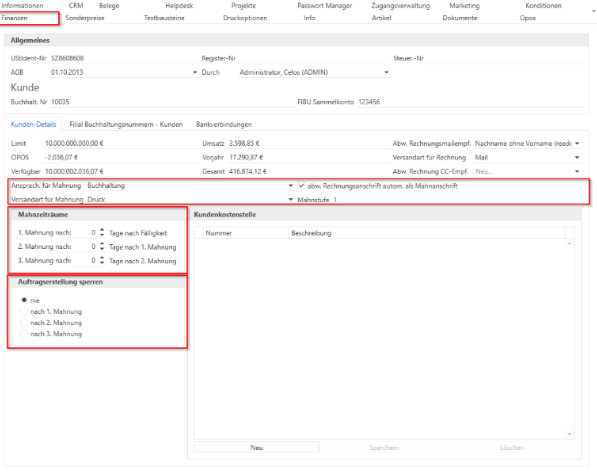
In the address master under the "Finances" tab, you can set the "contact person for reminders," the "shipping method for reminders," reminder periods that deviate from the standard, and order blocking after the reminder run for each customer individually. If no contact person for reminders is stored, a message appears stating that the selected customer will not be included in the reminder run.
2.Report management
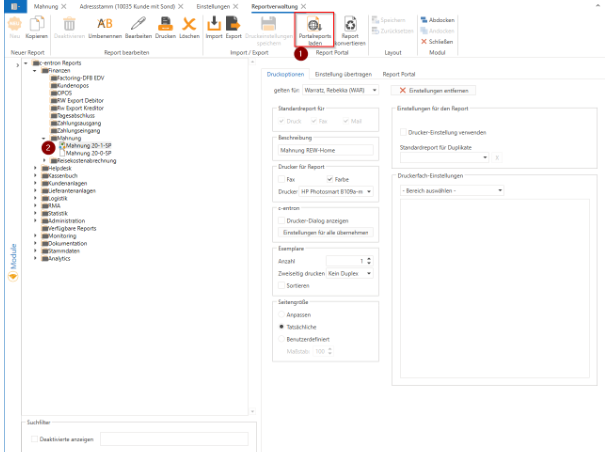
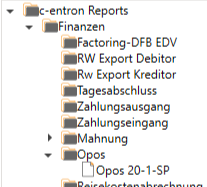
For the dunning module, there is a new report called "Dunning 20-1-SP," which can be downloaded in report management by clicking the [Load portal reports] button and is stored under Finance – Dunning (2). If no standard report has been stored, a message appears when the dunning module is opened.
The Reminder module can be found on the left under Modules under Addresses/CRM.
After opening, a navigation bar is visible on the left and the main window on the right.
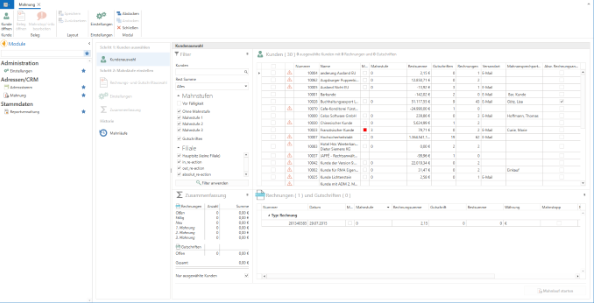
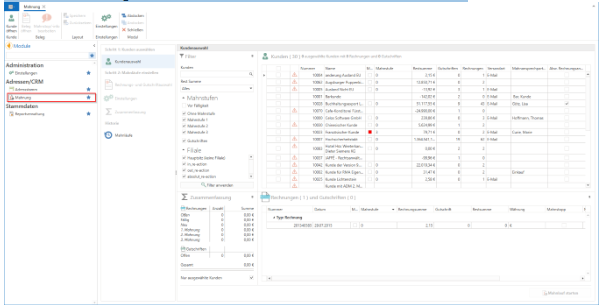
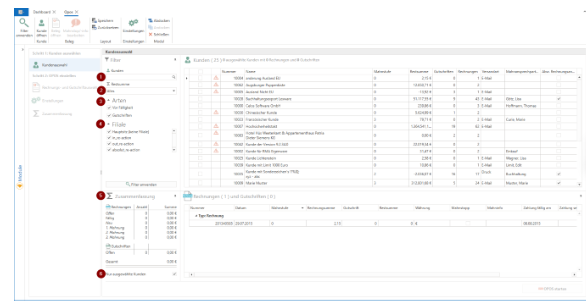
Step 1: Select customers
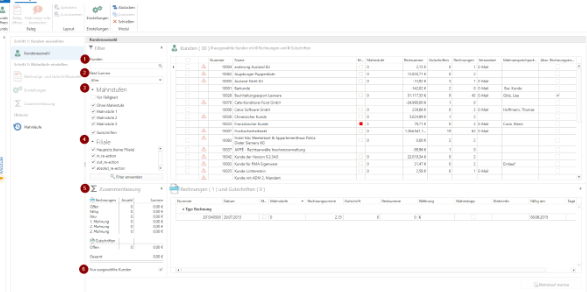
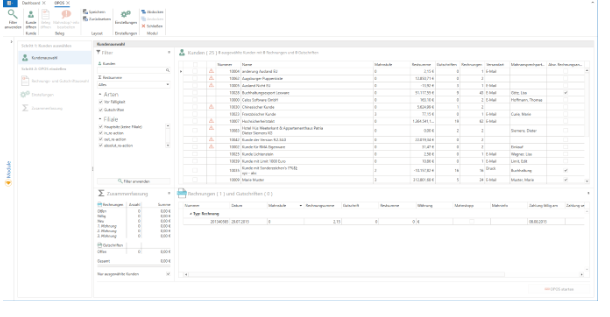
The main window in the "Select customers" menu item offers various filter functions divided into customers (1), remaining total (from all outstanding amounts) (2), reminder levels (3), and branch (4). In the lower section, you will see a summary (5) divided into invoices and credit notes, showing the total number and total amount of all invoices and credit notes that are still outstanding and due. If the check mark next to "Selected customers only" (6) is removed, a summary of all customers is displayed; otherwise, only the customers selected on the right are displayed. Of course, it is also possible to
In the overview, you can add and move columns using the column editor by right-clicking on a column header and saving them in your own profile (not in the c-entron standard profile) under Layout.
When a customer is selected, the corresponding receipts are displayed directly in the lower field.
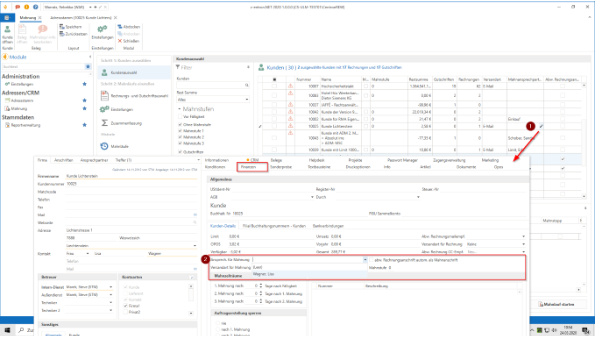
Since the customer requires a designated contact person for reminders, the overview provides the option of assigning one via the pencil icon (1) in the Reminder Contact column if one is missing (this opens the customer's address master, where the reminder contact can be stored) (2). In addition, it is also possible to store the dunning contact for the customer globally.
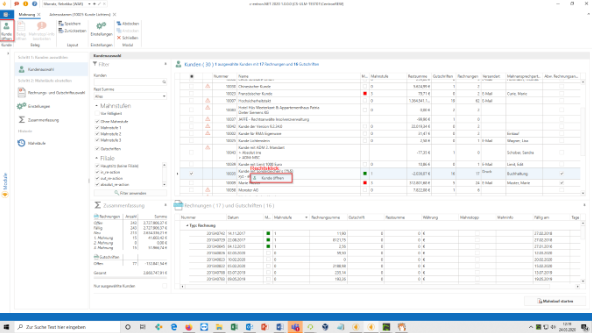
Furthermore, a selected customer can be opened by right-clicking and selecting "Open customer" or by clicking the "Open customer" button at the top left of the menu bar.
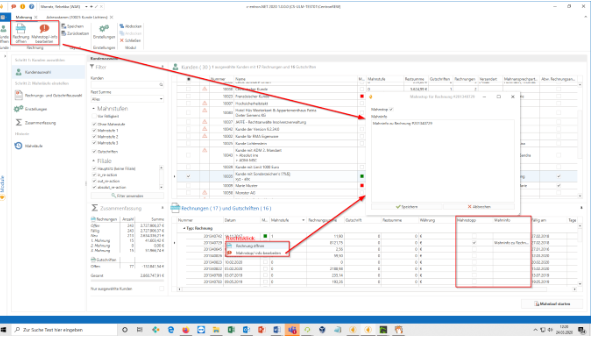
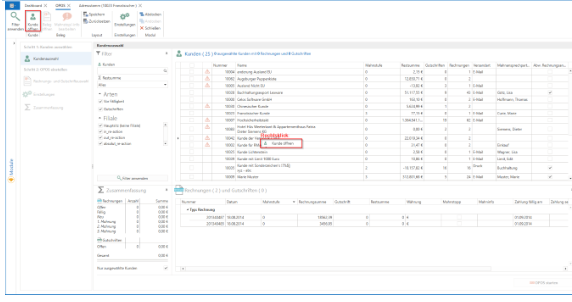
By right-clicking on a selected document, you can open the document or edit the reminder stop/info (1). This can also be done using the [Open invoice] or [Open credit note] buttons and [Edit reminder stop/info] in the menu bar (2).
Clicking on [Edit reminder stop/info] opens a window (3) in which you can activate the reminder stop and/or enter reminder info. This is then stored in the "Reminder stop" and "Reminder info" columns in the document overview below.
Once the desired customers and/or documents to be reminded have been selected, the reminder process can be started by clicking the [Start reminder process] button, which automatically switches to step 2: "Set up reminder processes."
Step 2: "Set up dunning runs"
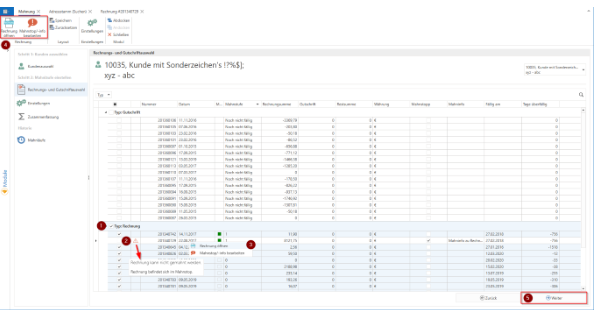
In this "Invoice and Credit Note Selection" window, you can now select the documents to be reminded for each customer (1). Documents for which a reminder stop has been set are also displayed here and are marked with an exclamation mark (2). These can also be opened and edited here by right-clicking (3) or using the [Open invoice] or [Open credit note] buttons and [Edit reminder stop/info] in the menu bar (4).
After selecting the relevant documents, click on [Next] (5) in the bottom right-hand corner to proceed to the "Settings" window.
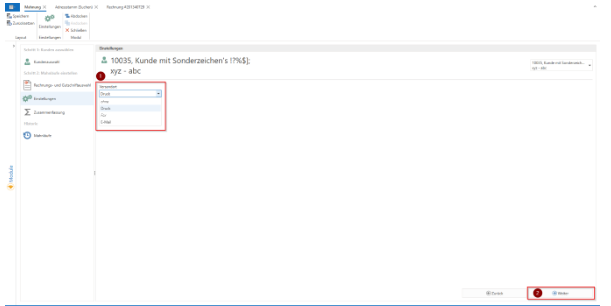
In the "Settings" window, you can select the delivery method, i.e., print or email, for the reminder that is sent to the company or branch (fax cannot be selected here, but as these options may be stored for the customer, they are listed here).
To ensure that the invoice(s) and credit note(s) are attached to the email when sending reminders, there is an option under "Settings" for each individual customer to activate or deactivate this via the "Attach documents to email" checkbox, which is set by default.
NOTE: If a large number (i.e., more than 5) of invoices/credit notes are attached, this may cause a slowdown, as each individual invoice must be regenerated.
ATTENTIONif a new version of the document has been created or a different report has been imported, this may differ from the original.
Click on [Next] (2) in the bottom right corner to proceed to the "Summary" window.
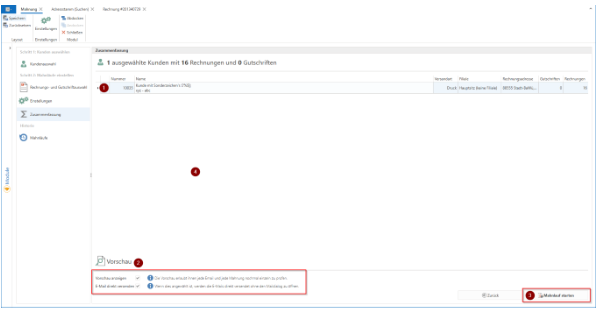
As the name suggests, the "Summary" window shows a summary of the upcoming reminders (1). By checking the "Show preview" box (2), you can preview each email and reminder individually. Clicking "Send email directly" sends the email without opening the mail dialog.
Click [Start dunning run] (3) to create the dunning notices and proceed to step 3, "Perform dunning runs."
Step 3 "Perform dunning runs"
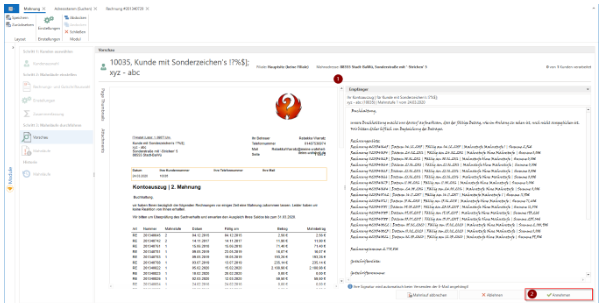
In the preview, each email and each reminder can now be checked individually.
Click [Accept] to send the reminder. The reminder amount is always the highest reminder level for a document and is not cumulative (added together/summed up).
History
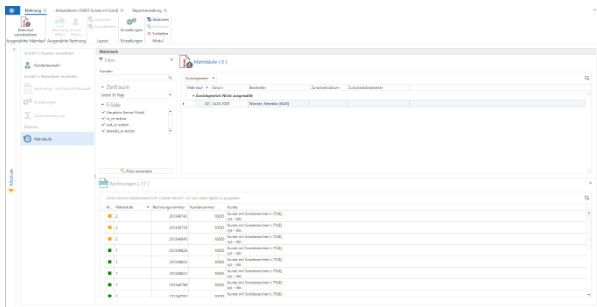
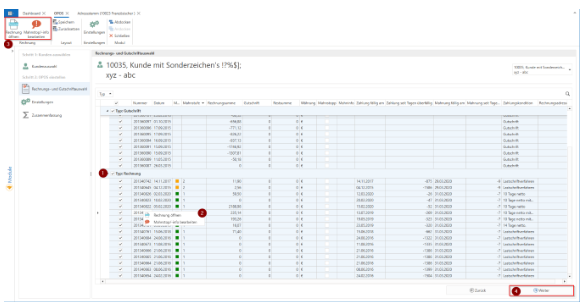
In the history section, you can review past reminder cycles filtered by customer, time period, and branch.
Reset dunning runs
Under "Reminder runs" (1), the individual runs (with the set filters) can be viewed after clicking the [Apply filter] button (2), and reminder runs can also be reset there by right-clicking (3) on the selected reminder run (or the [Reset reminder run] button in the menu bar).

This means that by selecting the appropriate runs, the reminder level (4) can be reset to the previous level. For example, from reminder 3 back to reminder 2, or from reminder 2 back to reminder 1.
OPOS in c-entron.NET
In OPOS, this is the list of all outgoing invoices to your customers that have not yet been posted as fully paid.
The same criteria apply to OPOS shipping as to reminders. However, no status is set in this case. This means that an OPOS run can be performed as often as desired. The OPOS list merely reflects the current status of the customer account.
You can find the OPOS module on the left under Modules at Addresses/CRM.
However, some settings need to be made in advance.
Settings
An email template can be created using the [Settings] button in OPOS or directly via Administration – Settings – Global Settings – Controlling – OPOS – Email. (1) The variables listed (2) are available for this purpose and can be easily inserted into the desired location using drag & drop, double-click, or CTRL+C and CTRL+V. If you hover the mouse over a variable, it will be explained in more detail for clarification.
Furthermore, you can use [Show preview] to preview the email (3) with the variables, use [Refresh preview] to update it after changes have been made, and use [X] to close it again.
Report management
The OPOS uses the same new report "Reminder 20-1-SP" from the reminder module, which can be downloaded in the report management section by clicking the [Load portal reports] button. It is stored under Finance – Reminder (2) and can be copied to OPOS. If no standard report has been stored, a message appears when the OPOS module is opened.
You can find the OPOS module on the left under Modules under Addresses/CRM.
After opening, you will see a navigation bar on the left and the main window on the right.
Step 1: Select customers
The main window in the "Customer selection" menu item offers various filter functions divided into Customers (1), Remaining total (from all outstanding amounts) (2), Types (3), and Branch (4). In the lower section, you will see a summary (5) divided into invoices and credit notes, showing the total number and total amount of all invoices and credit notes that are still outstanding and due. If the check mark next to "Selected customers only" (6) is removed, a summary of all customers is displayed; otherwise, only the customers selected on the right are displayed. Of course, it is also possible to
In the overview, you can add and move columns using the column editor by right-clicking on a column header and saving them in your own profile (not in the c-entron standard profile) under Layout.
When a customer is selected, the corresponding documents are displayed directly in the lower field.
Since the customer requires a designated contact person for reminders, the overview provides the option of assigning one via the pencil icon (1) in the Reminder Contact column if one is missing (this opens the customer's address master, where the reminder contact can be stored) (2). In addition, it is also possible to store the dunning contact person for the customer globally.
Furthermore, a selected customer can be opened by right-clicking and selecting "Open customer" or by clicking the "Open customer" button at the top left of the menu bar.

By right-clicking on a selected document, you can open the document or edit the reminder stop/info (1). This can also be done using the [Open invoice] or [Open credit note] buttons and [Edit reminder stop/info] in the menu bar (2).
Clicking on [Edit reminder stop/info] opens a window (3) in which you can activate the reminder stop and/or enter reminder info. This is then stored in the "Reminder stop" and "Reminder info" columns in the document overview below.
Once the desired customers and/or documents to be reminded have been selected, the reminder run can be started by clicking the [Start reminder run] button, which automatically switches to step 2: "Set up reminder runs."
Step 2: "Set up OPOS"
In this "Invoice and Credit Note Selection" window, you can now select the documents to be reminded for each customer (1). Here you can see the documents that can also be opened and edited by right-clicking (2) or using the [Open invoice] or [Open credit note] buttons and [Edit reminder stop/info] in the menu bar (3).
After selecting the relevant documents, click on [Next] (4) in the bottom right-hand corner to proceed to the "Settings" window.
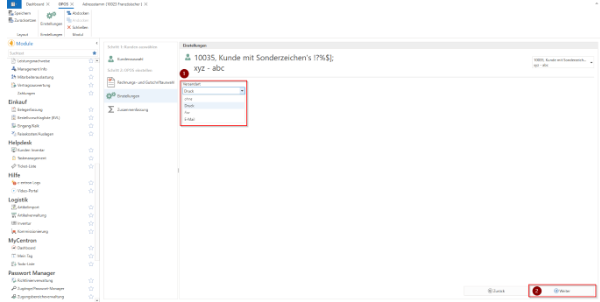
In the "Settings" window, you can select the delivery method, i.e., print or email, for the reminder that will be sent to the company or branch (fax cannot be selected here—however, as these options may be stored for the customer, they are listed here). Clicking on [Next] (2) in the lower right corner takes you to the "Summary" window.
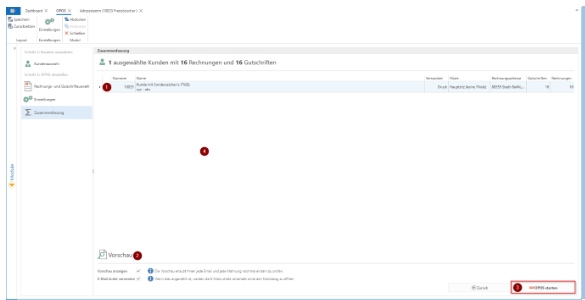
As the name suggests, the "Summary" window shows a summary of the upcoming reminders (1). By checking the "Show preview" box (2), you can preview each email and reminder individually. Clicking "Send email directly" sends the email without opening the mail dialog.
Click [Start OPOS] (3) to create the OPOS and proceed to step 3, "Send OPOS."
Step 3 "Send OPOS"
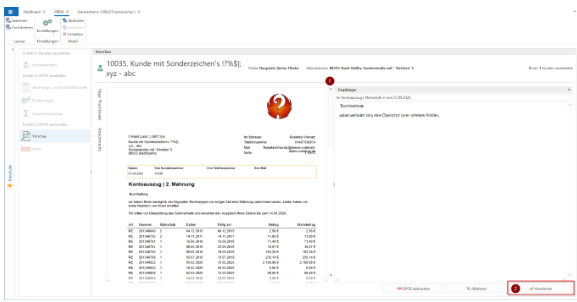
In the preview, each email and each reminder can now be checked individually.
Click [Accept] to send the OPOS.
History
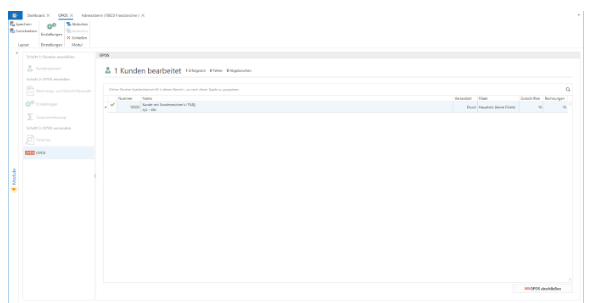
In the history section, you can review past OPOS runs filtered by customer, time period, and branch.