%20(1).png)
Purchasing Manual
1. Article types
One of the biggest advantages of c-entron is the effective way in which item descriptions are integrated into the system. There are basically three different types of items:
Own articles
Articles from foreign imports (foreign)
Items that are not yet integrated into the item master (new item)
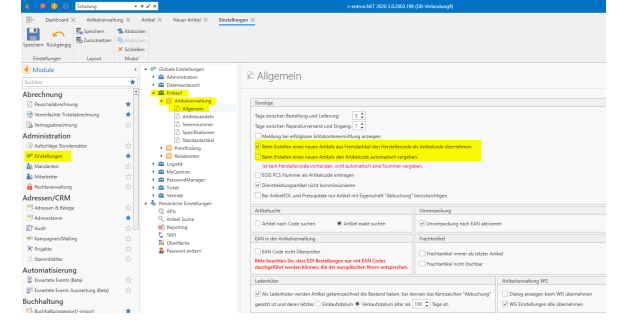
This means that it is very important for you as a purchaser that all external and new items contained in orders must be transferred to your own item master. This transfer is also referred to as item conversion. Without conversion, these items cannot be ordered. This means that items that have not been created will not be displayed in the order proposal list or in an order! Properties of "external" and "new item"
Are generally not available for delivery—cannot be included in a delivery note or invoice or further processed. Cannot be procured in the ordering system. Have the purchase price of the selected distributor in the attachments.
Third-party items are items that are offered for download by distributors in their price lists and are only integrated into your database as temporary items.
New items are items that are neither offered by distributors nor stored in your database. They are used to "quickly insert an item into a document, for example, to offer it to a customer."
2. Article conversion
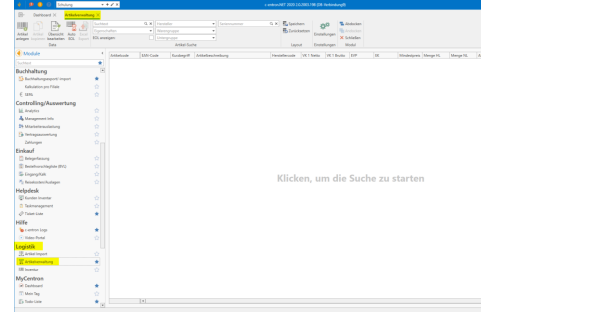
To convert items, open the item master in the Purchasing menu.
Convert foreign articles
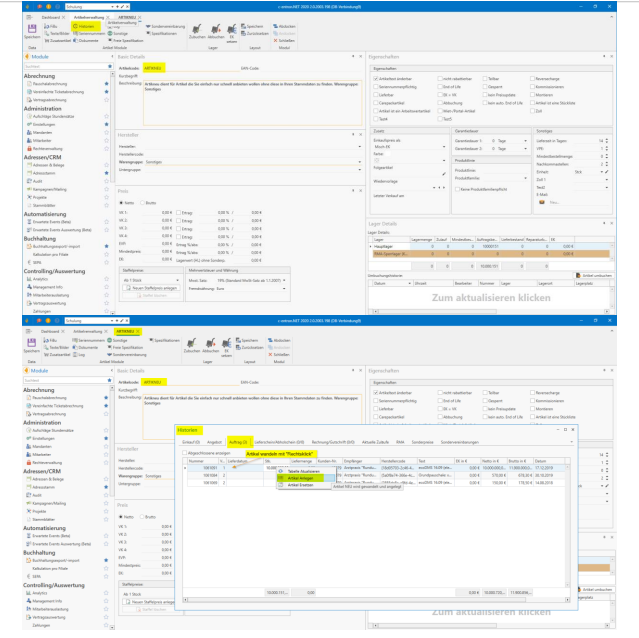
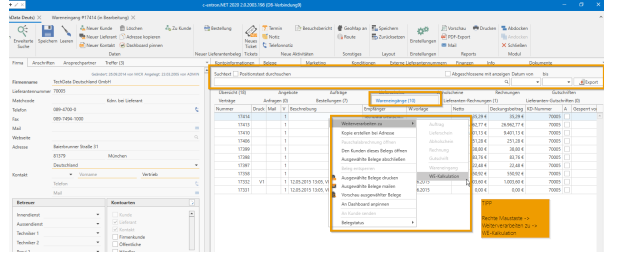
In the article master, call up the article code "External" and then switch to the History tab.

All third-party items in the orders will be displayed automatically. Recommendation: Please only convert items that are included in orders


Right-click on the item you want to convert. You can only convert one item at a time. Then left-click on the "Create item" button.
Convert settings items
If you have checked the box for "Transfer weight when converting items" in the administration settings, the following window will appear, in which you can select the weight and the manufacturer's EAN code.
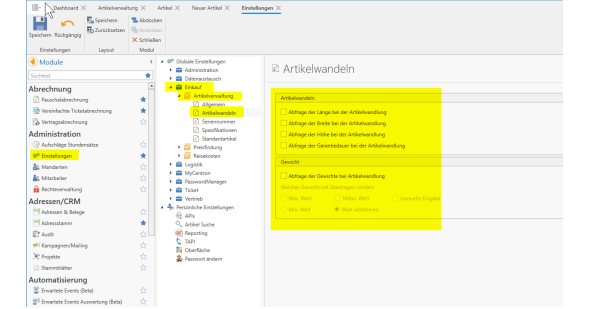
If this setting is not selected, this query will not appear. After clicking the "Apply" button, the following window will appear.
Assign item code
The first step is to assign the item code.
There are several options available to you for this.
you can set the manufacturer code = item code
You can also have the item code generated automatically.
Alternatively, you can assign an item code manually.
The settings for this can be found under "Administration" - "Settings" - "Purchasing" - "Items" - "Settings" tab.
Now you must select a main product group. Optionally, you can also select a sub-group.
All settings are configured based on these groups.
The purchaser should ensure that the relevant properties are set here.
(However, it should not be the buyer's job to make the settings for each item. This task should already have been completed by the software administrator in the master data for the product groups.)
Now that you have made all the settings for the item, ideally the buyer only needs to assign the product groups. Now click on the Save button or F2.
3. New article
Converting Artikneu items is the same as converting third-party items, with one difference. You can also replace Artikneu items. For example, if you have already created a 5m blue patch cable, you do not need to create the same cable again—you can replace the item with the existing item code.
Procedure:
You can open the article master under the Purchasing menu item.
Enter "Artikneu" in the item code field and start the search.
Then click on the History tab.
You will automatically see the new items in the orders.
Now right-click on the items you want to convert. You will then see the following options:
Info: When converting Artikneu items, please proceed as you would with third-party items.
New items are dummy items, which means they do not have a manufacturer code. You must either assign an item code manually or choose to have the item code generated automatically. (Under Administration/Settings/Items) Otherwise, this item type should be treated in the same way as third-party items. This means you must assign a product group, check the settings to see if they are set, and save.
Here, too, you will be asked whether you want to create additional new items. Over time, you will need to convert fewer and fewer external and new items, as you only need to create the items once. For example: You sell a Laserjet 9500: This item must be converted the first time. Two weeks later, you sell this Laserjet 9500 again: Now it no longer needs to be created. Here, only the quantity and SN are checked. This means that this item must be ordered, a goods receipt must be carried out, the quantity and SN are then scanned in the goods receipt, and a delivery note and invoice can be created from the order
Once all foreign and new items have been converted, these items can also be ordered.
4. Order
There are several ways to place an order with c-entron:
Order-related purchase order
Item-specific order
Order directly from the supplier master
Order-related purchase order
You must open the order proposals in the Purchasing menu. Order-related ordering is mainly of interest to system houses that have "zero stock," meaning that goods are always ordered fresh for the customer. You will always be shown all items that are available in orders, regardless of whether you have these items in stock or not. However, there are certain settings that take stock levels into account even for order-related orders. This will be explained in more detail later.
Click on "Order-related."
Trigger the article search with F3 or click on the magnifying glass
Filtering the items is crucial later on. You can filter or group by all columns.
-> A full-text search can also be used
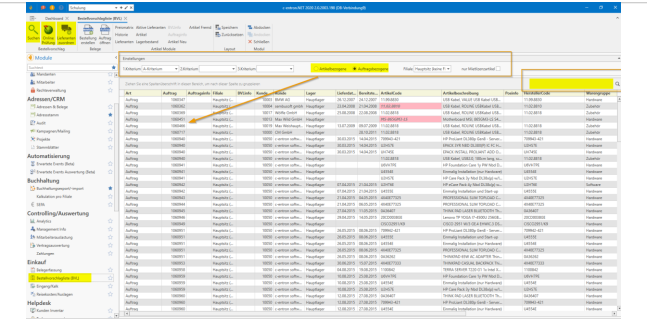
You will see a complete overview of the items included in your orders.
You can rearrange the individual columns by simply dragging them to where you want them to be and then saving them in your personal layout.
Now you can select individual items or perform an online check via the overview to obtain current stock levels and purchase prices.
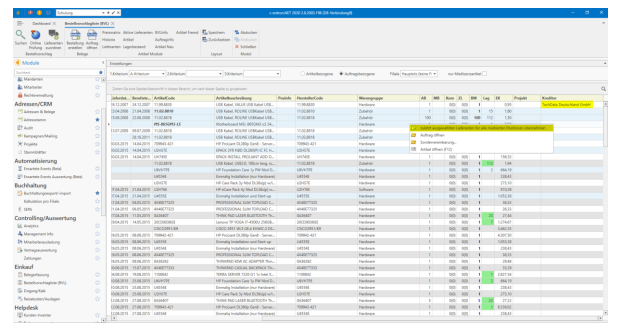
Stock inquiry (inventory) in the order-related purchase order
In the BVL, items that can be ordered are marked in green if there is sufficient stock, meaning you do not need to order these items. Items marked in yellow in the BVL do not have sufficient stock, meaning you need to order the difference in quantity.
At the top of the BVL menu, you also have the option of opening further information windows.
New items A list of new items in orders. These order items still need to be converted. Please refer to the chapter "Converting items" for more information.
History History of the article from article management
Article Article information such as additional article texts and special agreements
Order information General data such as document conditions and document date Order items Files stored with the order (emails, etc.)
BVL Info
Stock level The stock level per warehouse from the article master
Suppliers Overview of all suppliers with imported or currently queried stocks and prices.
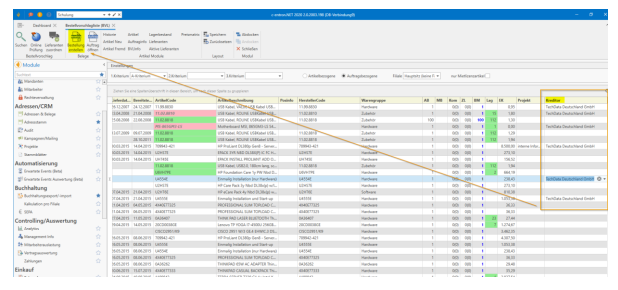
Active suppliers
All relevant information about the selected vendor, such as freight or minimum order value, is displayed here
Price matrix A detailed overview of all imported prices is displayed here.
You will find additional filters directly above the displayed item list.
Branch (Chapter Branch Management)
Rental/portal items (chapter Rental/portal items)
Please refer to the relevant chapters.
Create order
Once you have assigned a supplier to all the items you want, you can click on the "Create order" button on the right.
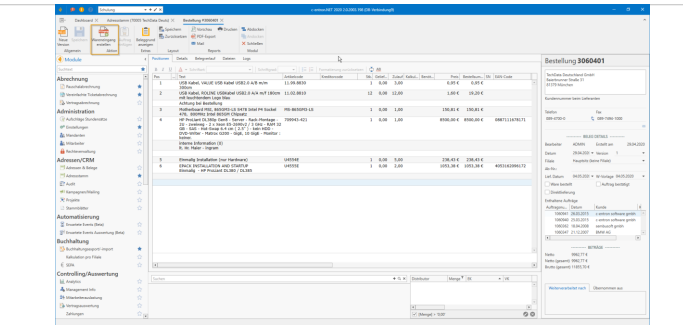
you have the following options in the order. Almost all columns can be edited in the order. However, most adjustments in the order relate to the following points:
Positions
Number of items
If additional goods are ordered, the quantity can be adjusted
Price
Prices are subject to change and are based on the quantity and import stocks (further explanation of prices under 7.)
Delivery date
The delivery date can be taken either from the supplier's delivery terms or from the order.
If the delivery date cannot be determined from either the terms and conditions or the order, an administrative setting is used. This can be found under Administration -> Settings -> Sales -> Documents -> Order
Order (right-hand side)
4. Details and information fields
Goods ordered This checkbox is selected when the goods have been ordered, e.g., by telephone. Direct delivery This checkbox is selected when the goods are not booked into your warehouse. There is no direct goods receipt. This checkbox can already be selected in the order. This will then be transferred to the purchase order.
Order confirmed o This check mark is set when, for example, the approval system is used. A supervisor or department manager can thus approve individual orders
Order confirmed
This checkbox is selected when, for example, the approval system is used. A supervisor or department manager can thus approve individual orders.
Logistics-related details
AB No
The supplier's order confirmation number is entered here.
Delivery date
The agreed and expected delivery date of the goods is noted here
Resubmission
The resubmission date is the date used for the to-do list. If this date is exceeded, you will receive a reminder in the to-do list
Pricing
Total document – order
Data from the article master (minimum distance, etc.)
Pricing per item and supplier
All price-related data for suppliers is displayed here
Available quantity
Prices (purchase price, retail price, recommended retail price, recommended retail price %, list price)
Product line

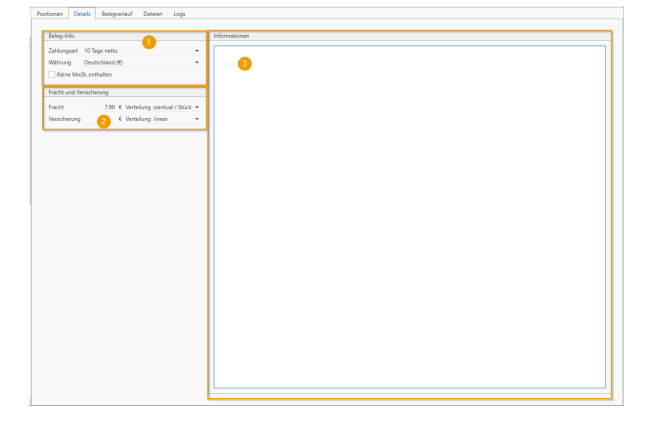
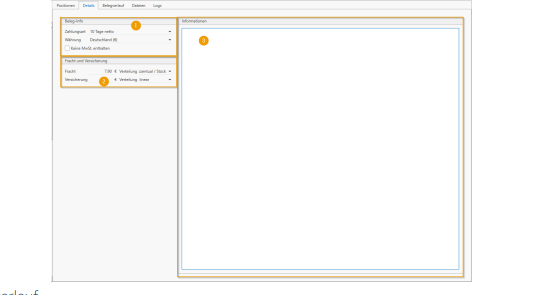
Details
1. Document information
If the terms and conditions are already known at the time of ordering, they can be entered here.
If the terms and conditions are stored in the supplier's system, they will be automatically stored here.
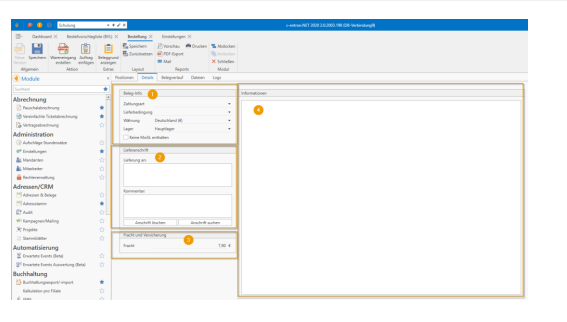
delivery address
If the delivery address is different, you can enter it here.
Freight and insurance
1If it is already known at the time of ordering that freight and/or insurance must be paid, this can be specified here. If the conditions for freight and/or insurance are specified by the supplier, these are already specified here atomistically.
Order information
Information about logistics can be stored here. Use CTRL+F11 to enter the c-entron-specific abbreviation.
Document history
the document history graphically shows how the various documents are related (quote -> order, etc.)
Files
Attached files (email, PDF) are displayed here. These can be stored manually or automatically in conjunction with the c-entron VMA.
Logs
Every change to the order is logged here. This allows you to track who made which changes and when at any time.
Pressing the save button triggers the order for c-entron. If you then want to post a goods receipt directly, click on the goods receipt button. If the goods are to be delivered first, please close the document after saving
5. Early/late booking
Early booking
With early booking, the goods are posted to the warehouse when the goods receipt is created. This means that the goods are available immediately. The advantage of early booking is that the goods can be shipped again immediately (delivery note) after the goods receipt has been posted.
Late posting With late posting, the goods are only posted to the warehouse once the GR calculation has been posted. This means once the incoming invoice has been entered in c-entron. The advantage of late posting is that it ensures that the prices are written back to the outgoing documents (quote + order) and to the article master as calculated by your distributor.
6. Goods receipt
You always trigger the goods receipt via the purchase order. (This means no goods receipts without a purchase order.)
You can now search for the supplier in the address master or click directly on the Order button to get an overview of all open orders.
At the top of the documents, you will find a full-text search function. By checking the box "Search item text," you can search all orders for specific keywords.
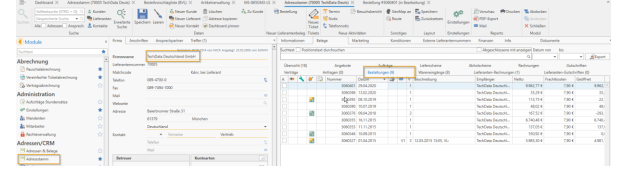
Now double-click on the order and then click on the Goods Receipt button
Transfer of order to goods receipt
Before the order is converted into a goods receipt, a window appears. This shows you all the items in the order. You can either accept all items if all items have been delivered or only individual items. To do this, select
Apply selected items -
Everyone takes over
Create goods receipt
You have many options in Goods Receipt. Almost all columns can be edited in the purchase order. However, most adjustments in Goods Receipt relate to the following points:
Positions
In the goods receipt, there are usually three important columns under the items: Ordered / Qty / SN.1. Qty: To post the goods to the warehouse, please enter the quantity delivered in the Qty field.
If a red smiley appears, this item requires an SN and an SN can be scanned (see chapter: Scanning the serial number)
2. Ordered: This column shows the quantity you have ordered
3. SN: The red or green dot indicates whether the item has an SN requirement and whether the SN has already been scanned
If there is no dot in the column, the item does not need to be recorded with an SN. Stock is booked without an SN
Red dot = SN must be scanned
The item cannot be booked into storage without an SN
Green dot = Number of scanned SNs matches the quantity ordered.
Yellow dot = Serial numbers have already been scanned, but not in the quantity ordered. The number of serial numbers is insufficient. If not all serial numbers have arrived as expected (yellow dot), the goods receipt can still be posted. The undelivered goods are returned to the order (see chapter: Goods underdelivery)
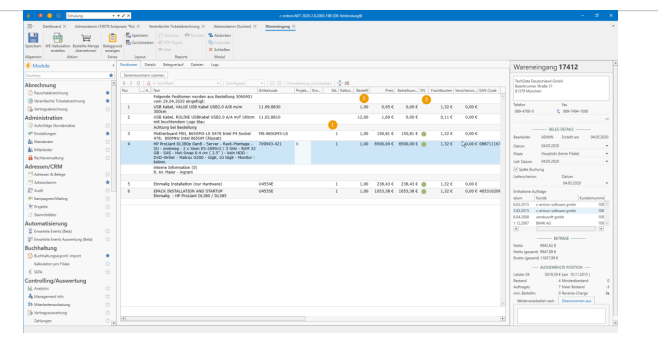
4. If you click "Balance," the difference will be written back to the order proposal list. You can only balance after you have saved the goods receipt.

5. Delivery date (is): The actual delivery date can be entered for each item in this column.

Scan serial number
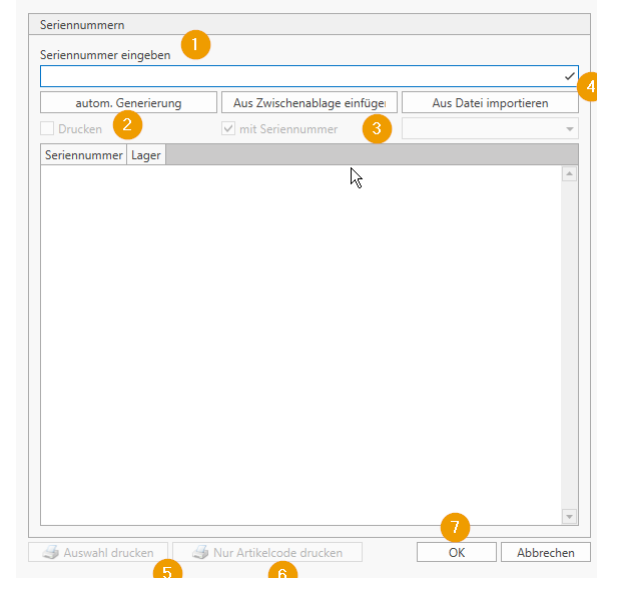
You can assign a serial number to each item. To do this, select the corresponding position and then click on the Serial Numbers button. Before scanning the serial number, the number of items delivered must be entered. Once you have entered the number of items for an item, the following window will also appear for you to enter the serial number.
Here you now have the following options for entering a serial number:
Scan the serial number with a USB handheld scanner or enter it using the keyboard
automatic generation The SN scheme stored in the settings generates an SN number
Paste from clipboard If you have copied the SN number from an email, you can use this to import the SN from the clipboard.
Import from file Here you can select a file (CSV, TXT, etc.)
Select print
Print only item code
Confirm your entry with OK
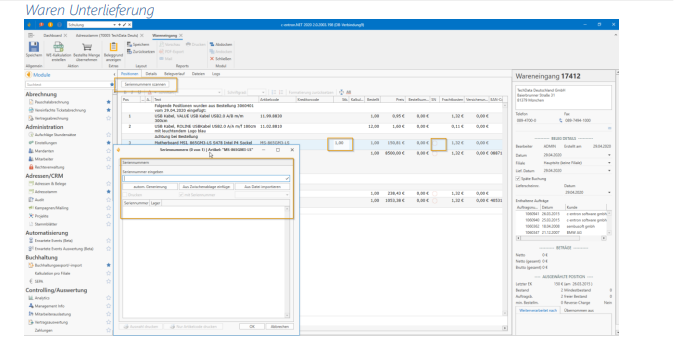
• Example: You ordered 5, but only 3 were delivered. Enter 3 in the "Qty" column and the remaining quantity of
2 is automatically rewritten into the order.•
If there is a backorder, simply do not enter a quantity in the "Units" column! Centron will then remove these items.
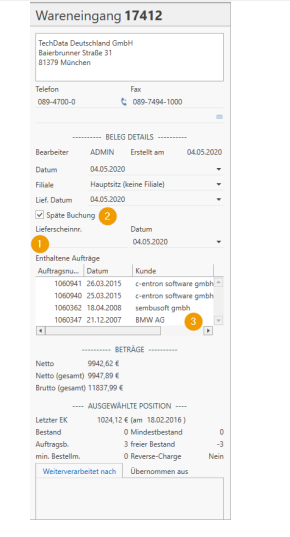
Goods receipt (right-hand side)
In the goods receipt header, you can enter the delivery date and also the delivery note date.
The supplier's delivery note number can be noted.
You can still make a late booking here on an individual basis.
If the order was placed on an order-related basis, the number, name, and date indicate the connection to the orders.
Details
Document information
If the terms and conditions are already known when the goods are received, they can be entered here.
If the terms and conditions are stored in the supplier's system, they will be automatically stored here.
Freight and insurance
If it is already known at the time of receipt of goods that freight and/or insurance must be paid, this can be noted here.
If the conditions for freight and/or insurance are stored in the supplier, they are already stored here atomistically.
Information
Information about logistics can be stored here. Use CTRL+F11 to use the c-entron shortcut.
Document history
The document history graphically shows how the various documents are connected (quote -> order -> purchase order -> tickets, etc.)
Files
Attached files (email, PDF) are displayed here. These can be stored manually or automatically in conjunction with the c-entron VMA.
Logs
Every change made to incoming goods is logged here. This allows you to track who made which changes and when at any time.
Save/post goods receipt
By clicking the Save button, the goods receipt (stock level) is posted for c-entron. If you then want to post a goods receipt calculation (GR calc) directly, click the GR calc button. If the goods receipt invoice is not yet available, please close the goods receipt after saving
7. WE calculation (goods receipt calculation)
You always trigger the goods receipt calculation via the goods receipt. (This means that there is no goods receipt calculation without a goods receipt.) You can now search for the supplier in the address master or click on the Goods Receipt button to get an overview of all open goods receipts. All goods receipt documents that have not yet been completed with the goods receipt calculation (posting the incoming invoice) are displayed here as open. You will find a full-text search in the upper area of the documents. By checking the "Search item text" box, you can search all goods receipts for specific keywords.
Transfer of goods receipt to GR calculation
To preview the selected document, please select the "Items" function in the lower section.
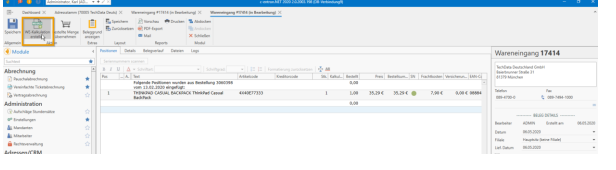
Now select one or more goods receipts and right-click to select Create GR calculation.
You can also open the goods receipt and use the "Create GR calculation" button directly in the document
A window appears before the goods receipt is converted into a goods receipt costing.
This shows you all items that are in the goods receipt.
You can either transfer all items once all items have been calculated, or only individual items. Select
You will need
Apply selected
I'll take care of everything
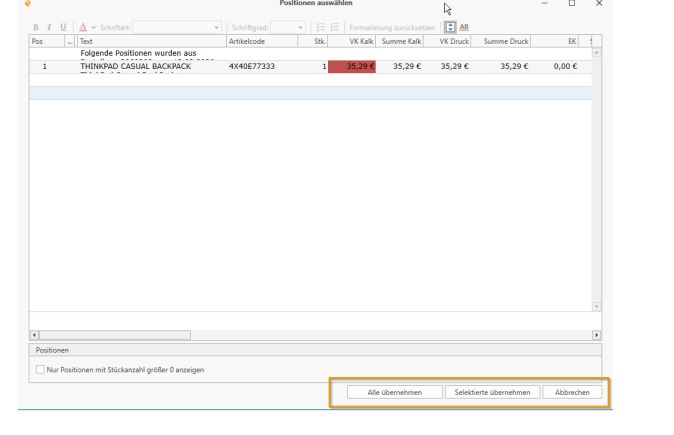
Create WE calculation
Almost all columns can also be edited in the WE calculation. However, most adjustments relate to the following points
Positions1.
Number of items
If you use late booking, the goods are now booked into the warehouse as soon as you enter the quantity (for items requiring a serial number, the SN must also be booked in at this stage. See chapter on serial numbers)
Prices
First, check the prices of the individual items and enter any discrepancies (EK). Depending on the settings, the purchase prices are written back to the documents (quote – order) and the article master.
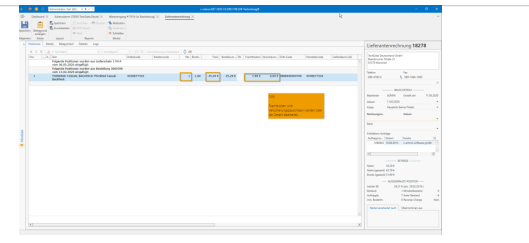
Supplier invoice (right-hand side)
There are two mandatory fields in the supplier invoice (invoice number and invoice date). Without these, the GR calculation cannot be posted and completed.
invoice no. Please enter the invoice number of the supplier invoice here. This is a mandatory field and must not be left blank.
Date The date of the supplier invoice is also a mandatory field and must therefore be transferred from the incoming invoice.

3 If the order was placed on an order-related basis, the number, name, and date indicate the connection to the orders.
4 The last purchase price entered is displayed here with the date. This is an information field and serves as a price guide.
Details
Document information
If the terms and conditions are already known when the goods are received, they can be entered here.
If the terms and conditions are stored in the supplier's system, they will be automatically stored here.
Freight and insurance
If it is already known at the time of receipt of goods that freight and/or insurance must be paid, this can be noted here.
If the conditions for freight and/or insurance are stored in the supplier, they are already stored here atomistically.
Information Information about logistics can be stored here. Use CTRL+F11 to use the c-entron-specific abbreviation here
Document history
The document history graphically shows how the various documents are linked (quote -> order -> purchase order -> tickets, etc. -> goods receipt)
Files
Attached files (email, PDF) are displayed here. These can be stored manually or automatically in conjunction with the c-entron VMA.
Logs
Every change to the WE calculation is logged here. This allows you to track who made which changes and when at any time
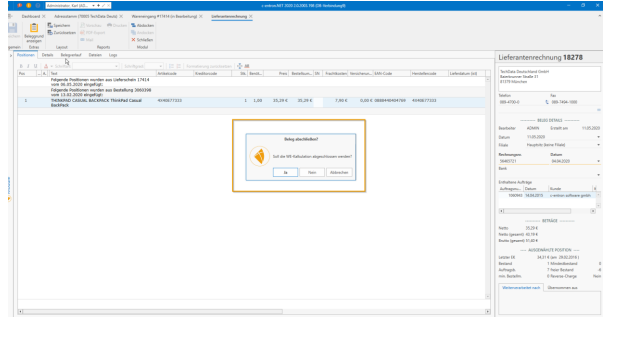
Save/post WE calculation
When saving, a message appears asking whether the WE calculation should be completed. Click
Click "Yes" if everything is correct and there are no obstacles to transferring the data to your accounting software.
Click "No" if you want to continue editing the WE calculation later. Once the WE calculation has been completed, it cannot be undone. The document is now stored in the Accounting Export module and can be exported. (See chapter Accounting Export)
8. Entrance/Lime
this new tool simplifies the further processing of goods receipts in GR calculations (entry of vendor invoices) and also speeds up the process considerably for experienced clerks. The aim is to bridge the gap between emails (invoices) from distributors and the manual and very time-consuming checking of existing orders/goods receipts.To this end, the emails are checked by the "VMA service," which both identifies the distributor and analyzes the email attachment. In the best case scenario, an exact assignment of "invoice email to order" can already be determined at this point. The email attachment is displayed via the "Incoming/Calculation" module and a "template," a "PDF scanner configuration," is superimposed on it.
This means that the values required for a goods receipt calculation can be read automatically and transferred in full with a single click, or modified directly before transfer
Manual PDF Scanner Configuration
Files can be easily stored via [Add Document] for the selected vendor or imported via the "Virtual Mail Assistant," or VMA for short (formerly MailScanner 2018), and then in "Incoming/Calc" tool process further
Creditor invoices stored in the creditor's main directory (database) can be analyzed using individual "scanner configuration templates" and, if possible, assigned to a corresponding purchase order. In the module "Entrance/Lime" select an invoice without an assigned configuration and click the [Create scanner configurationclick
in the new window, you can now search for and select the relevant terms on the left, i.e., the invoice number, invoice date, your order number, net and gross total, freight, and insurance in the document. There are two different search options here.
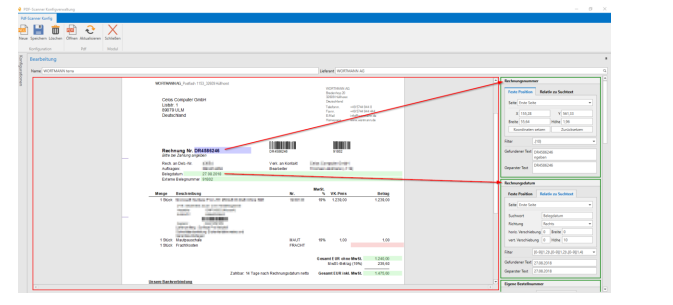
"Fixed position" can be used for the invoice number, as invoice numbers are often printed in the same way. Click on [Set coordinates], then move over the number and it will be displayed in the text found. It is important that the filter is set correctly. However, the correct configuration is always stored by default. If you want to adjust the coordinates, you can do so in the X, Y, Width, and Height fields.
At "Relative to search text" (in the example, the date) must also be specified first, and then a corresponding search term must be entered. It is important to note that this is case-sensitive. Next, specify which area should be scanned after the word (left, right, or below). (In the example, it is to the right.) The green bar on
the document can still be edited by moving it horizontally and vertically. It should now be at "Found text" the appropriate text (in the example, the date). Values for your own order number, the net and gross total, freight, and insurance can also be searched for.
Document entry or goods receipt costing
with a simple VMA workflow, you no longer need to add vendor invoice emails manually. Instead, you can import these documents into the database in a largely automated process using supplier recognition. We have provided a simple example VMA workflow in the download area for this purpose:
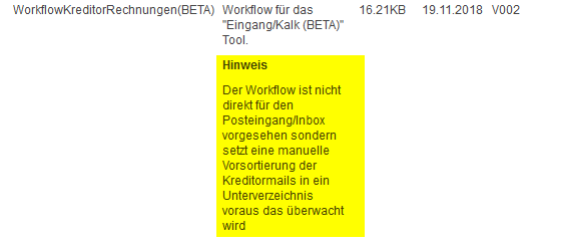
This workflow can, of course, be expanded as desired. The workflow provided is designed for manual pre-sorting of invoice emails into a subdirectory, so it should not be configured directly on the inbox. To do this, use the Entrance/lime Open module.
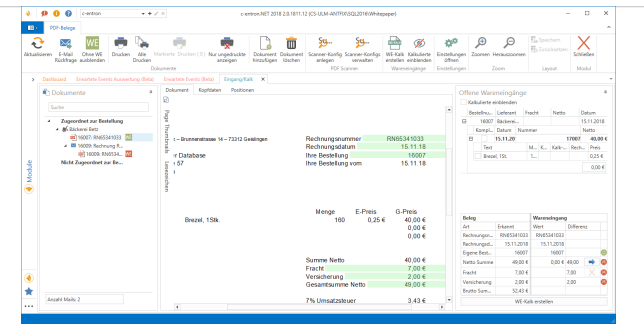
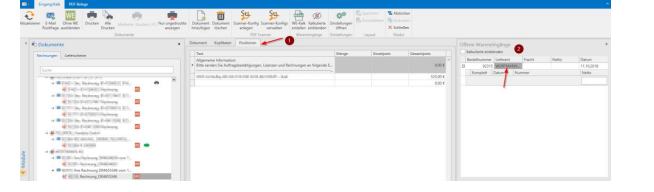
All assigned and unassigned invoices are displayed here. To check whether unassigned invoices can be assigned after all, click [Refresh] at the top.
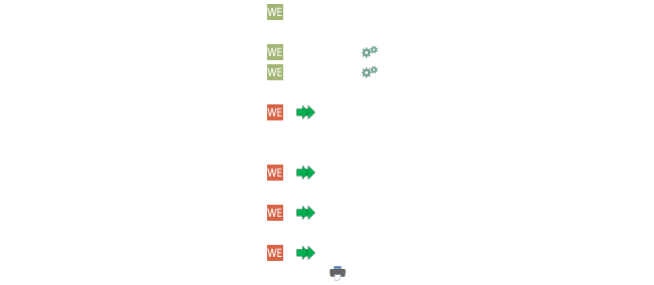
Behind the invoices are various icons to see. For example, there is a red WE, which means that there is no goods receipt for this. Furthermore, there is a green weekend, which means there is an incoming shipment. The Green Arrows show a direct booking, the Printer icon indicates that the invoice has been printed and that the Gear indicates that there is no configuration for this type of invoice.

To add an invoice manually, click [Add Document], select the document to be processed and the supplier, and add it. If it is not
if the file is a supplier invoice, it can also be deleted using [Delete document].
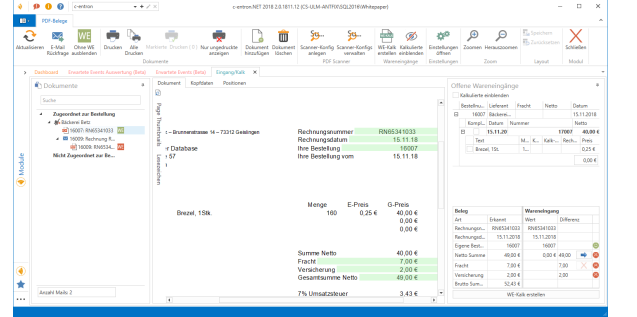
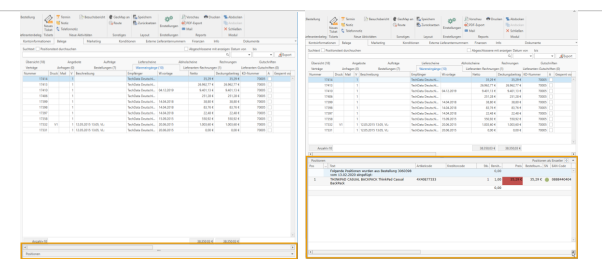
With an invoice that already contains a goods receipt, a goods receipt calculation can now be performed. The open goods receipts can be seen on the left. Further down, the selected document is compared with the goods receipt. Here you can now check whether the data matches. If 4 smileys appear immediately, the total is correct if configured correctly.
However, if red smileys appear, the amounts on the invoice differ from the amounts on the goods receipt. This is often due to an additional listing of freight or additional insurance. However, the total may also be related to the number of items being incorrect, which is why the invoice is always uploaded separately. To view the item data for the goods receipt, click on the "Items" tab and then on the goods receipt.
Adjustments can be made using the blue arrow.
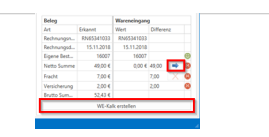
If everything is correct, the WE invoice can be created by clicking the [Create WE invoice] button, and the invoice will disappear from the module
9. Goods receipt – label printing
Print serial numbers (in goods receipt)
When entering serial numbers in goods receipt, it is now possible (as of version 2.0.1910.403) to print them
Report management:
The reports for printing are stored under "Barcode" in "c-entron Reports -> Supplier facilities." Here is an example label
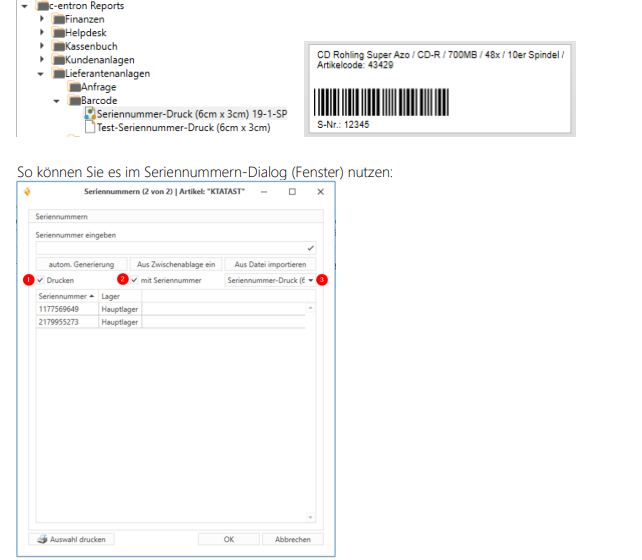
The "Print" property (1) activates automatic SN printing when a serial number is entered.
The "with serial number" property (2) specifies whether the serial number should also be sent to the printer for printing or not.
The selection box (3) allows you to select a report for serial number printing. The default report for printing is preselected.
We also support subsequent printing via the dialog box. To do this, select the desired serial numbers (multiple selection is supported) and click on "Print selection."
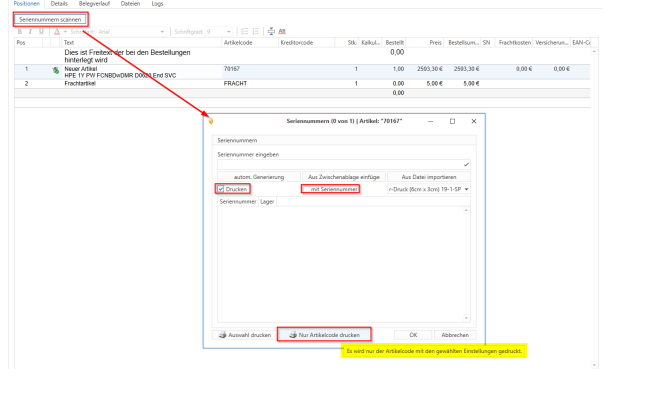
Print item code
The "Generate Serial Numbers" dialog in Goods Receipt has been expanded (as of version 2.0.1910.813) to include the new [Print Item Code Only] button, which allows you to print labels for items without mandatory serial numbers
10. Other
Item price - Update
Item price update in the item master
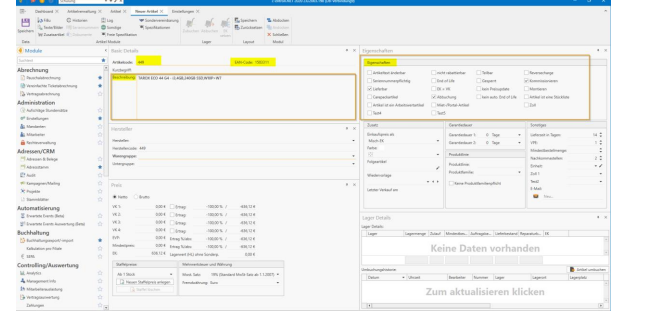
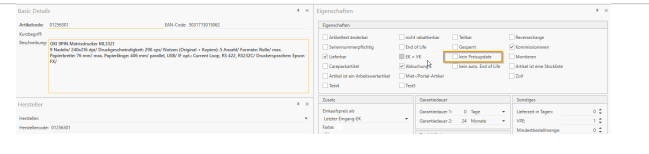
In c-entron, it is possible to perform an automatic price update in the article master.
The reason for this is that the price of items that have not been offered or sold for a long period of time may differ significantly from the current daily prices. The prerequisite for this is that the item is currently not in stock in c-entron, the corresponding check box in the item master is not selected (see screenshot), and the item is not set to "End of Life."
In addition, the item must be included in the third-party item list of the selected distributor and have a manufacturer code.
The calculation factor refers to the "calculation factor for own articles" stored in the settings for goods receipt costing.
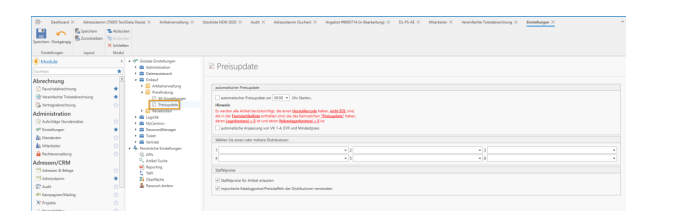
After selecting the desired distributors, click on the search button in the toolbar to display the relevant items
The grid now displays the details of the individual items, such as the old and new purchase price. At this point, it is now possible to exclude certain items from the update by checking the box next to "No price update."
The price update is started by clicking the corresponding button. It is then possible to save the process in a log file.
Working values
To turn an item into a work value item, you must check the box "Item is a work value item." The "Work values" tab will then become visible.
Then specify the value and unit in which intervals this item should be billed. Only time units can be selected as the work value unit. It is also possible here to specify how the item should be rounded if the time to be billed does not fit exactly into the billing interval.
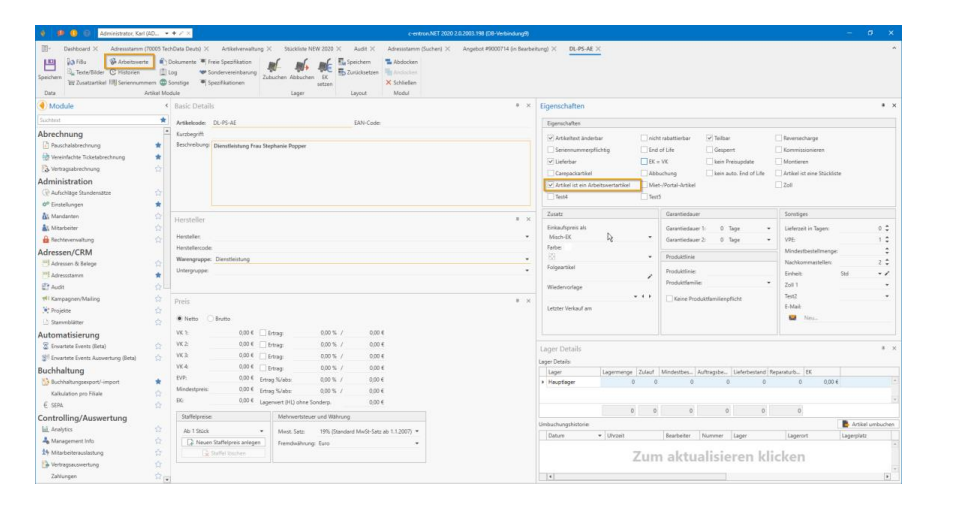
To ensure that quantities are calculated correctly, it is essential to configure the units correctly. To do this, click on the pencil icon in the item master.
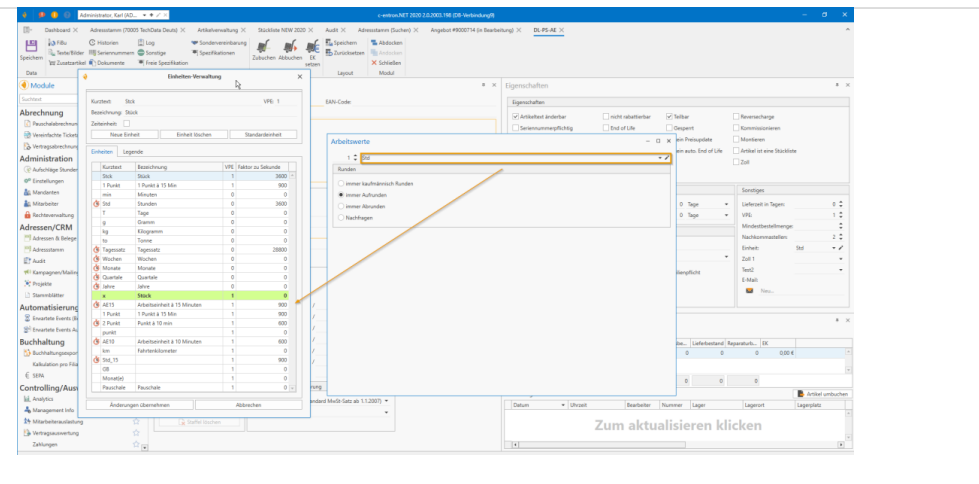
If, for example, you want to create a work value item with a work value of 15 minutes, you must create a unit "Min" in unit management, check the "Time unit" box, and enter the value 60 in the "Factor to second" field.
Further conversion factors are specified in the "Legend" tab.
11. Parts lists
This chapter contains the most important information about bills of materials. In the traditional sense, bills of materials are summaries of items that are taken from the warehouse during the manufacturing process, processed in steps, and then returned to the warehouse as new items
This is not the case with c-entron.
We have optimized this way of working for day-to-day business to accommodate the intricacies of the system house business. Parts lists are used more like templates in c-entron.
Creating fixed parts lists
Parts lists are created in the same way as normal items. To create one, first click on the "New" button and enter your data.
1. Check the box "Item is a bill of materials."
The "Split" checkbox is then automatically deactivated
Each bill of materials can manage a fixed retail price or recalculate prices based on the unit price of the bill of materials items
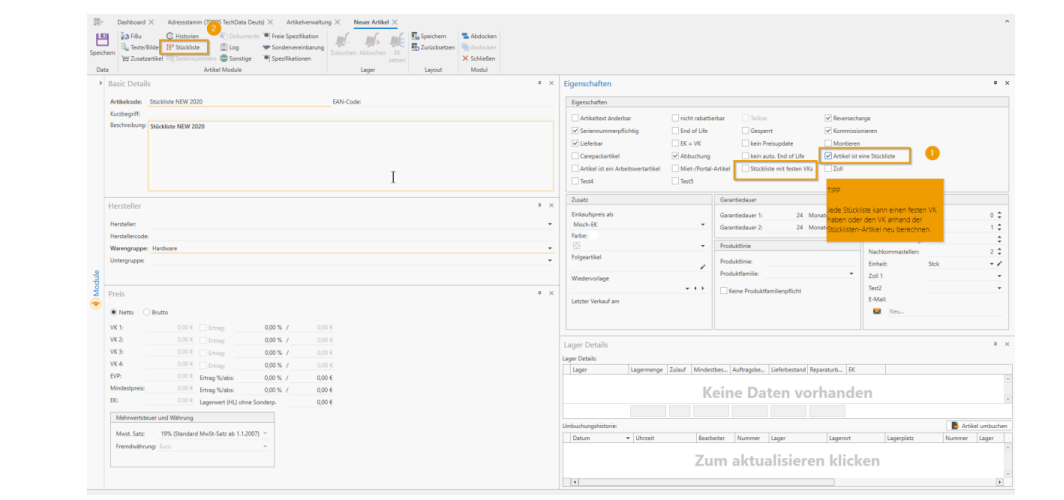
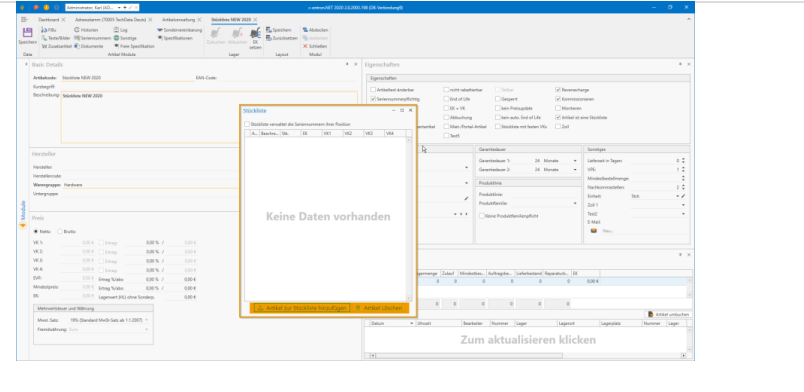
Once the basic properties have been set, you can enter the individual items in the parts list directly. To do this, switch to the "Parts list" tab and select the individual items to be entered.
2. Deposit the items
Dynamic bills of materials
Dynamic parts lists can already be created in customer systems as follows:
insert desired items into an attachment
select all
right-click and create a parts list
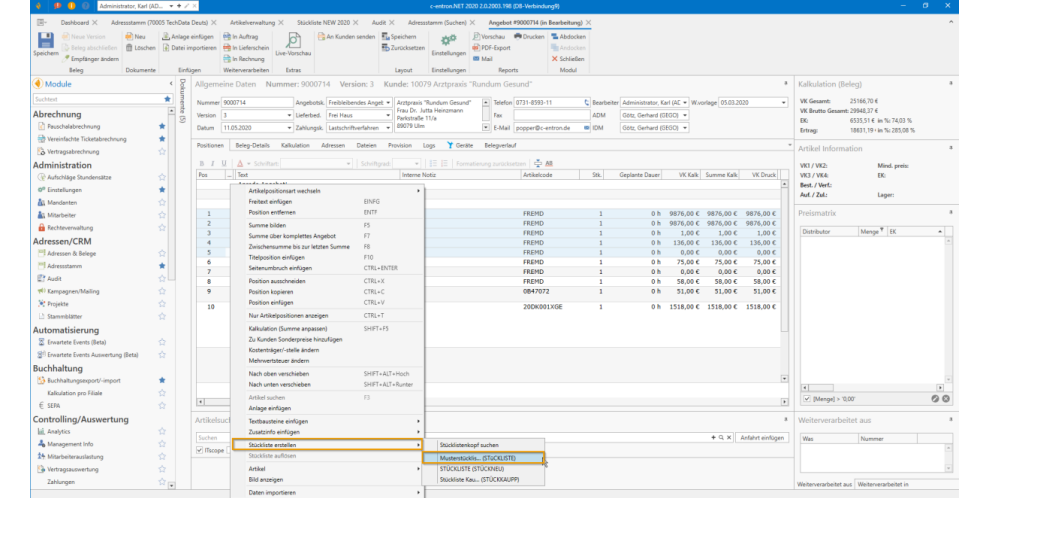
The following dialog box appears:
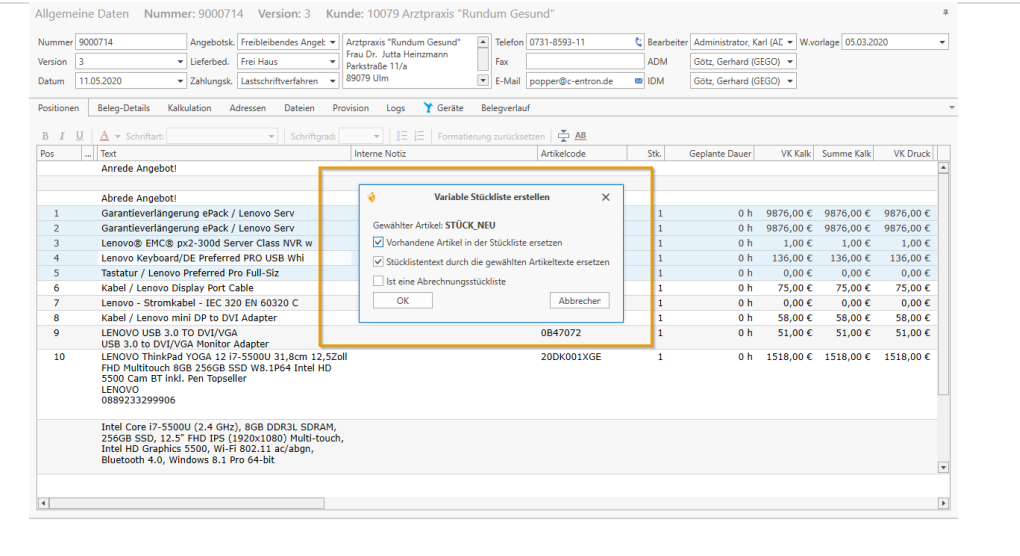
Here you can search for a parts list to be inserted. This parts list then "packages" the items it contains.
You can also set whether the existing items should be emptied and whether the text should be recreated.
Cutting and pasting parts lists
Cutting and pasting parts lists works in the same way as for other items. Please note that if you insert items directly below a parts list (using cut/copy + paste), these items will be added to the parts list. This does not happen if the item was inserted using the item search function