%20(1).png)
Rights Management
(As of: April 2026)
Available as a subscription: Core · Pro · Ultimate
Re:
⚙️ Administration
c-entron's access management system provides you with a centralized and intuitive way to precisely control employee access rights. Thanks to its clear structure, you can efficiently organize, customize, and monitor permissions so that each user has access only to the features necessary for their tasks.
Rights Management Module
To access the Permissions Management section, simply search for “Permissions Management” in the module list or go directly to Administration > Permissions Management call up.
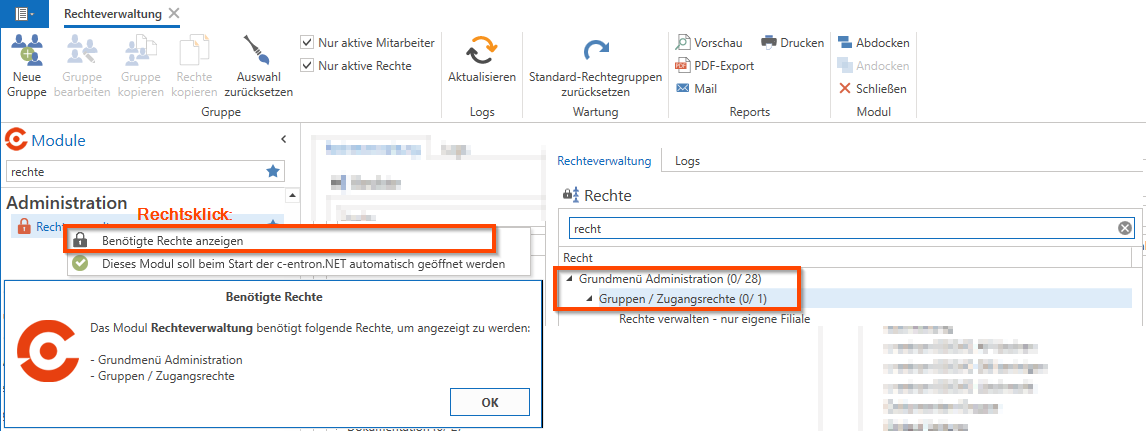
Requirements
The following permissions are required to view the module:
Main Menu: Administration
Groups / Access Rights
Tip - Branch Management:
When branch management is enabled, you can set the permission "Manage permissions – only for your own branch" use. When this option is enabled, only the permission groups for the user’s own branch can be viewed and edited. This ensures a clear separation of responsibilities and enhances security within permission management.
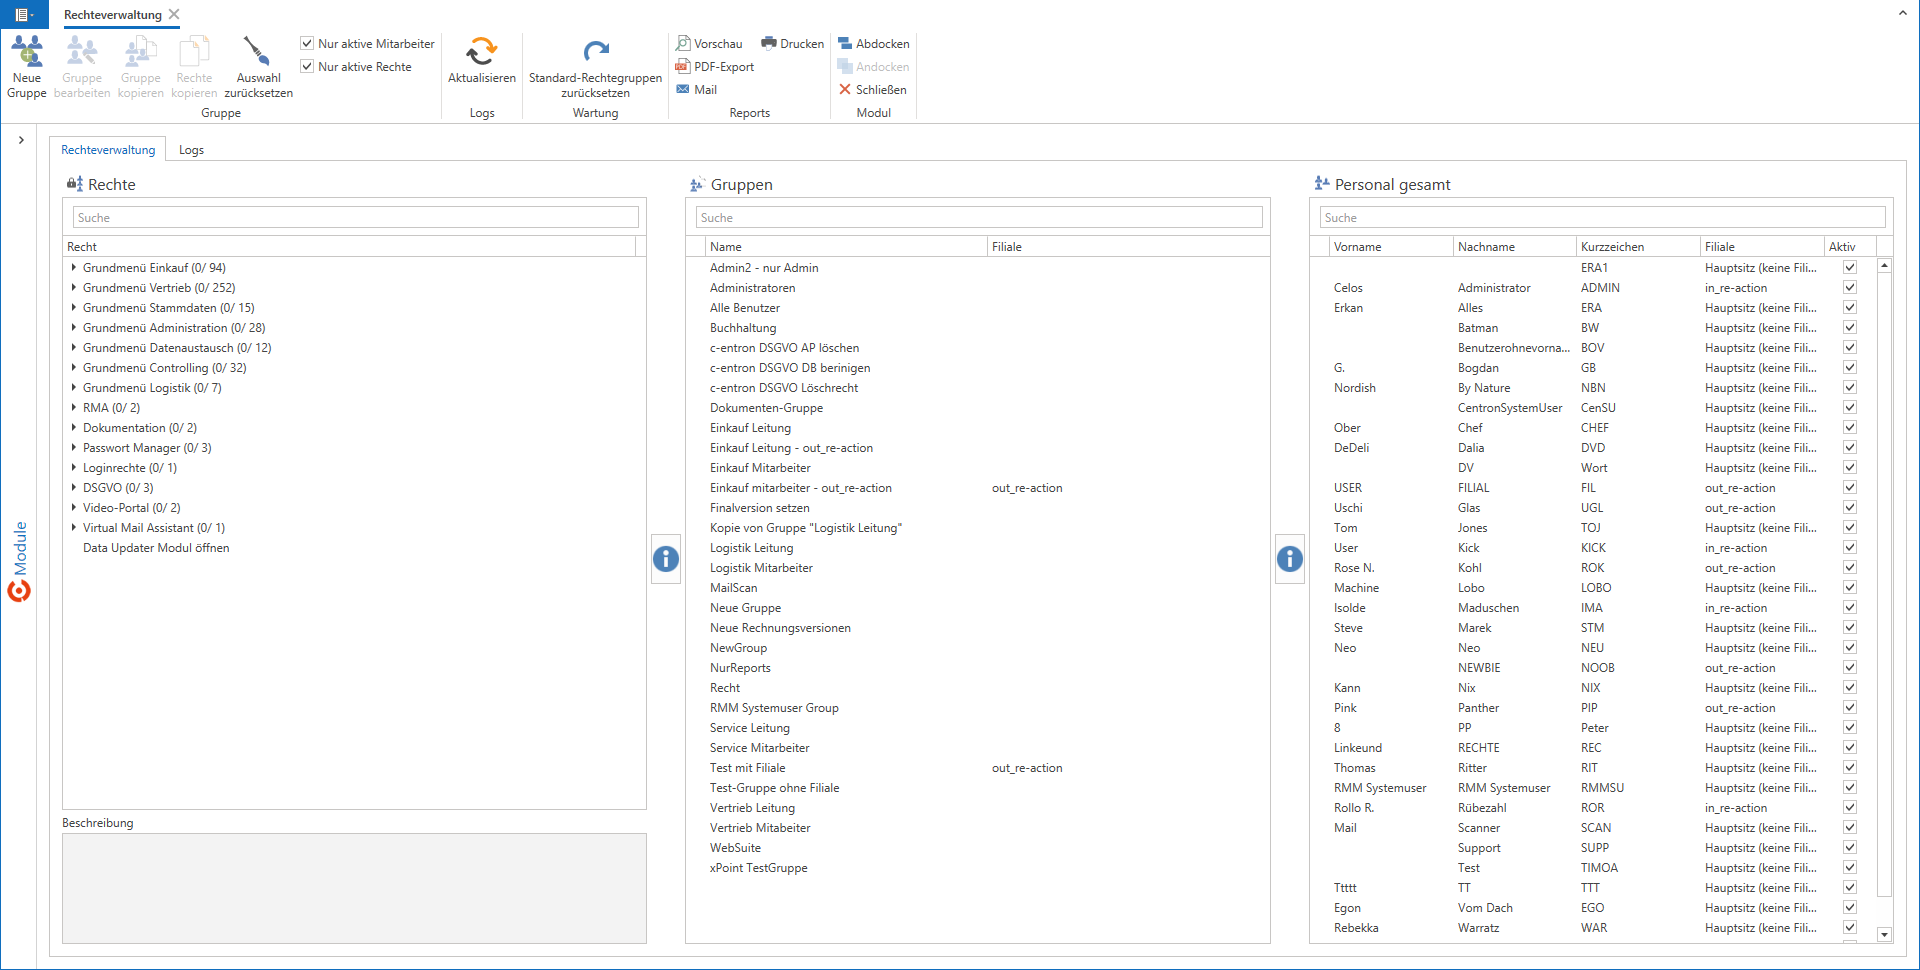
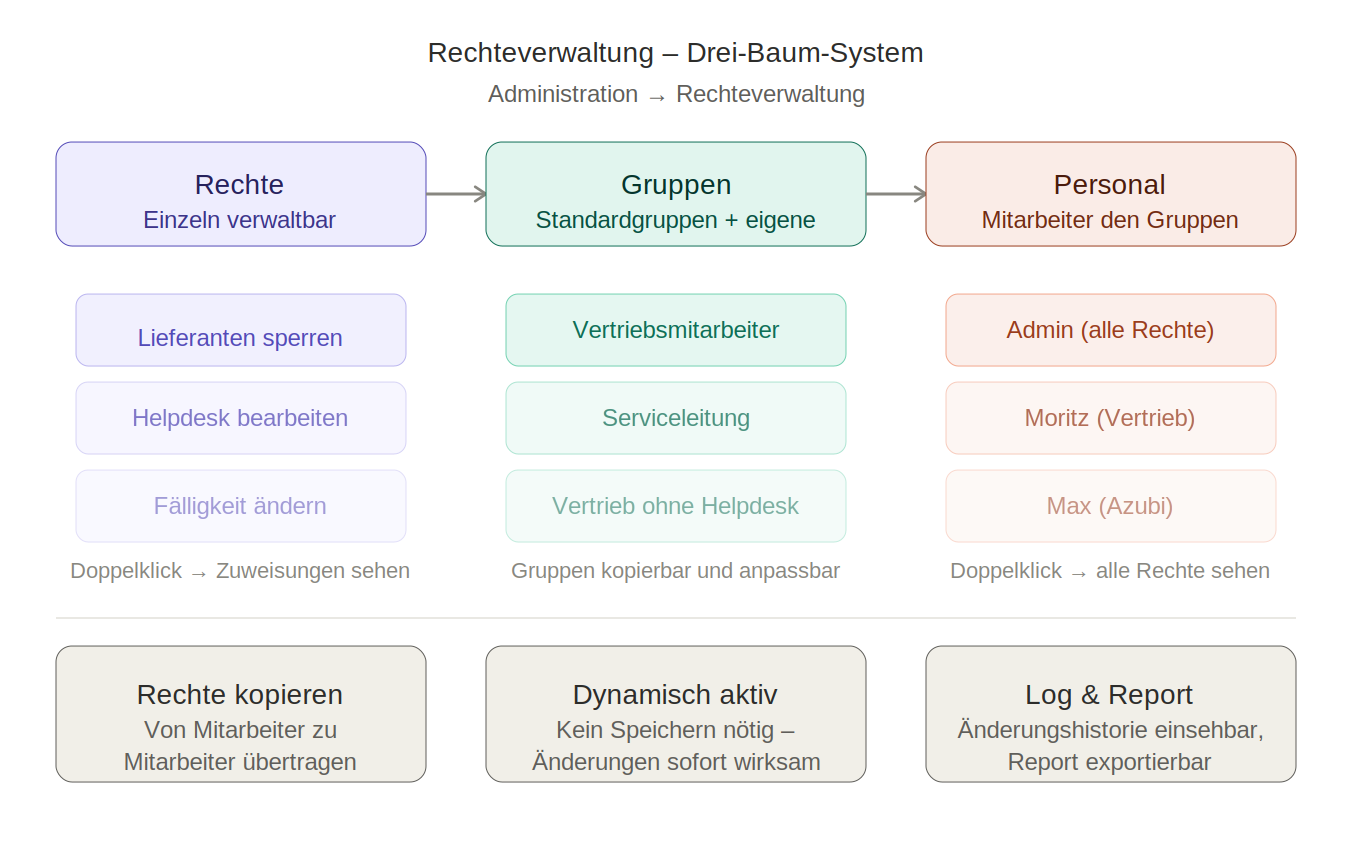
Structure: The Three-Tree System
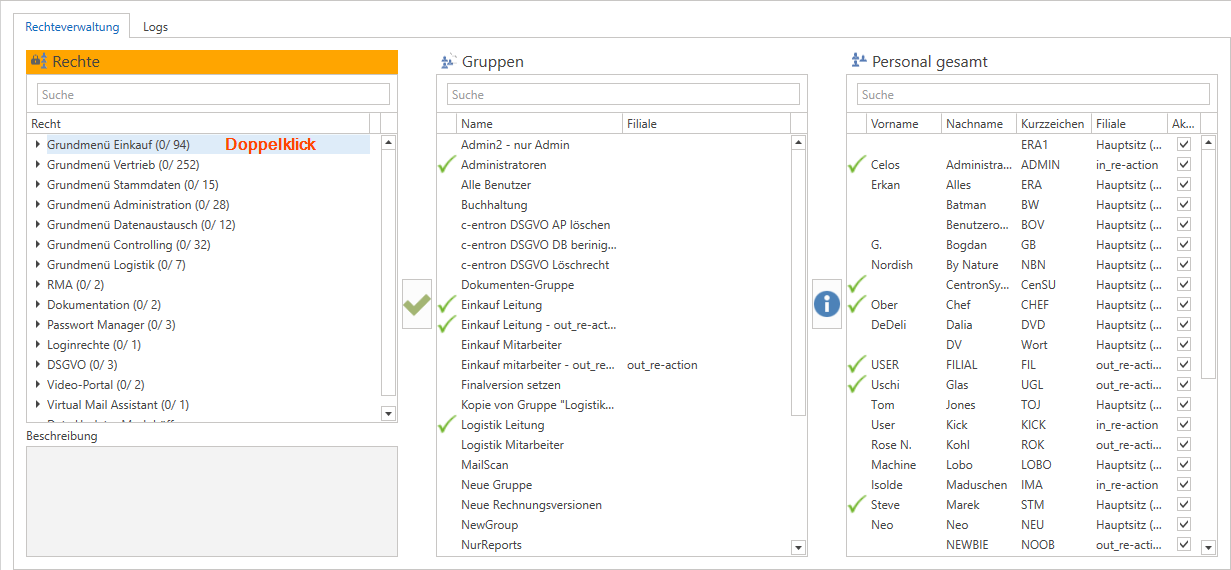
Access management is divided into three main areas: Permissions, Groups, and Users.
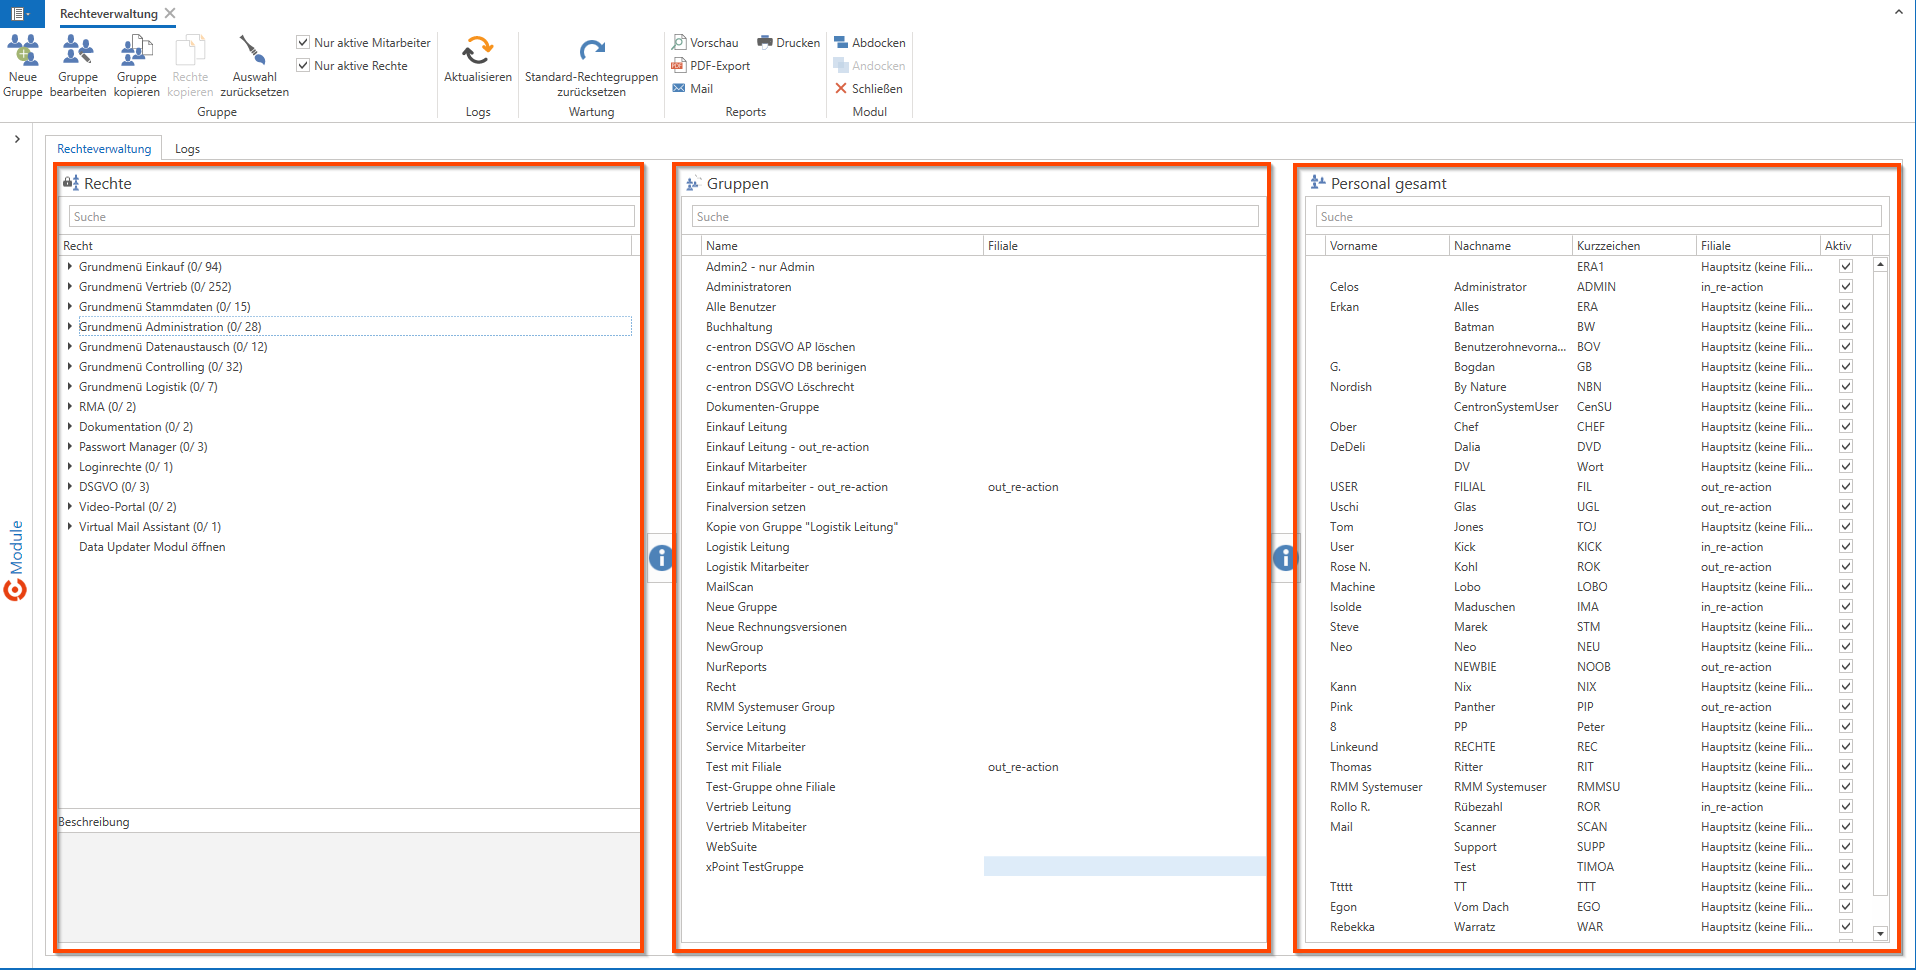
This structure allows you to organize all permissions within the system in a structured and transparent manner. Each of these areas serves a clearly defined purpose and is logically interconnected.
Note: All changes to permission settings take effect immediately—no separate save is required. If a change isn't yet visible, simply click the Refresh-Button.
Category: Rights
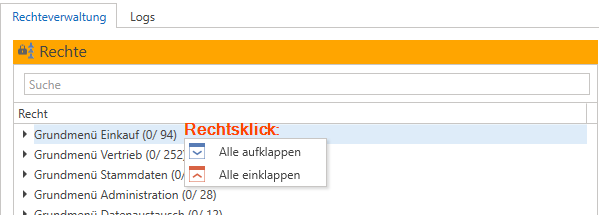
In the Permissions Overview section, you'll find a complete overview of all permissions available in the system.
The rights are clearly organized and can be accessed via a Right-click can be expanded or collapsed to get a detailed look at each section.
View and review legal information
Through a double-click When you view a single permission, you can immediately see which groups and employees currently have that permission assigned to them—this makes it easy to quickly track how permissions are distributed within the system at any time.
Assign rights to a group
Preferred law as of double-click Open.
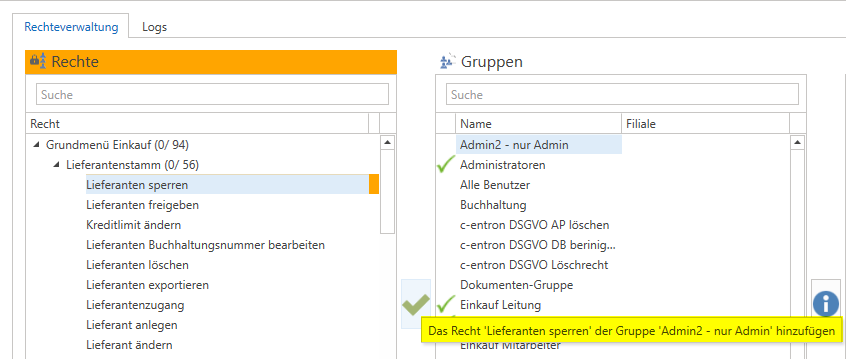
About the Icons between the "Rights" and "Groups" sections select the target audience.
Check the box → The permission is assigned to the group immediately.
Example: The "Block Supplier" permission should also be granted to the service line. To do this, click on the service line in the list and check the box.
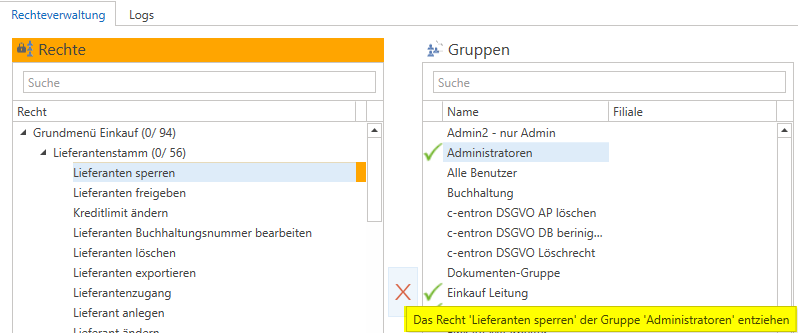
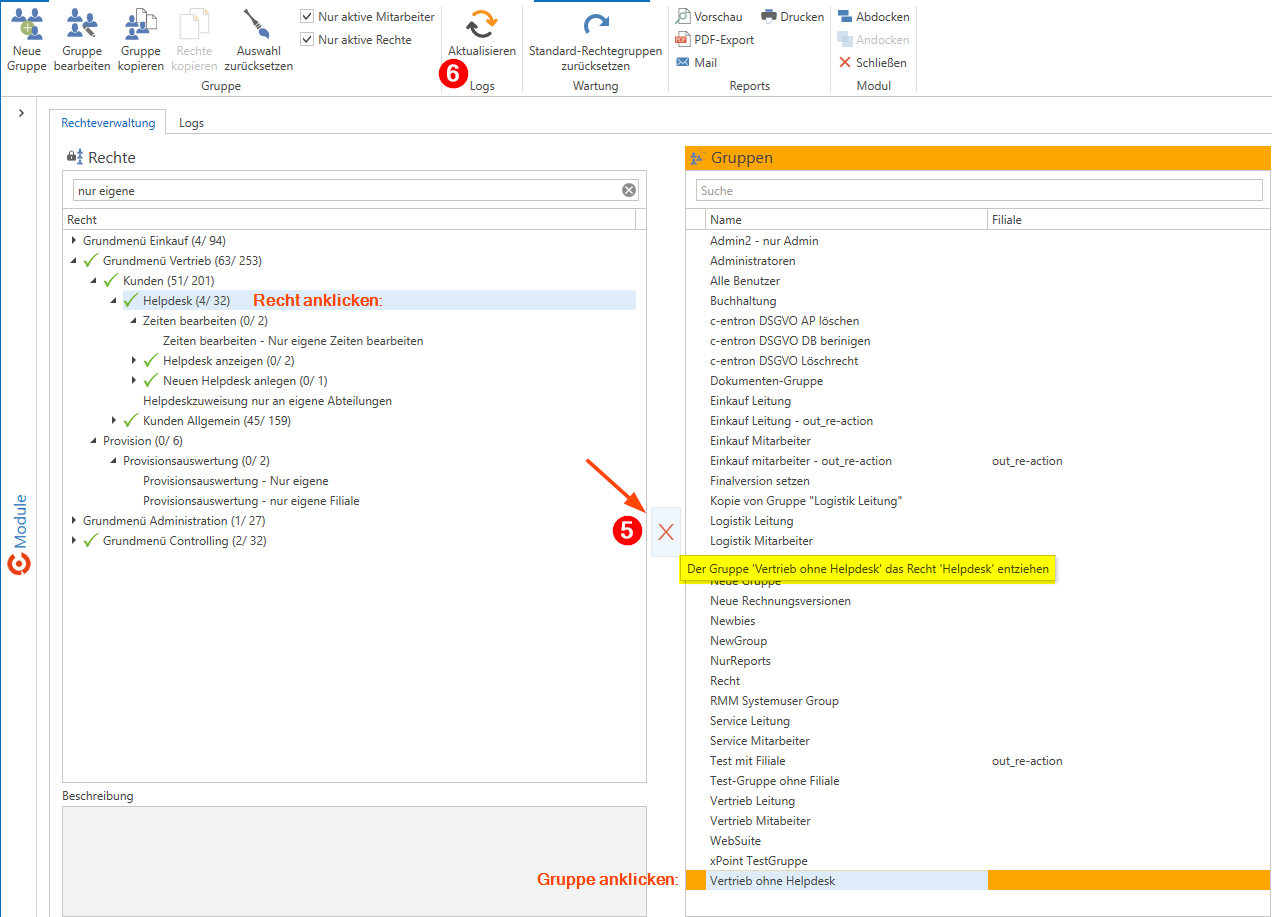
revoke a right
About the “X” For a group that already has the selected permission, the permission can be revoked immediately. The change takes effect without requiring additional confirmation.
Note: All changes to permission settings take effect immediately—no separate save is required. If a change isn't yet visible, simply click the Refresh-Button.
Exclusive rights
There are certain rights that automatically preclude other rights.
Typical examples:
View tickets – My tickets only
This right establishes the Main menu item "View Helpdesk" ahead and limits the display to your own tickets. The user sees only tickets in which they as the person in charge or the person handling the matter is deposited.View tickets – only at your branch
This right establishes the Main menu item "View Helpdesk" ahead and limits the display to tickets from your own branch.View listings – only my own
This right establishes the Main menu item "View offers" ahead and limits the display to your own listings. Only offers in which the user is listed are displayed.View offers – only at my store
This right establishes the Main menu item "View offers" ahead and limits the display to offers from your own store. Only offers that assigned to the user's branch are.
The administrator generally has almost all rights, with the exception of these restricted rights, since they typically require unrestricted access to all content.
Category: Groups
Groups make it possible to assign specific permissions to multiple employees at the same time, which significantly reduces the administrative burden.
Default groups
c-entron provides preconfigured standard groups. These are identical across all instances and already have the appropriate permissions assigned:
Sales Representative – Access to customer management and certain features of the Haptics section (e.g., change due date)
Service Line – Expanded permissions in the service area
Administrator – Virtually all permissions in the system
Note: The default groups can be used as templates. For special cases, it is recommended that you create your own groups by copying them.
Create a new group (using the "New Group" button)
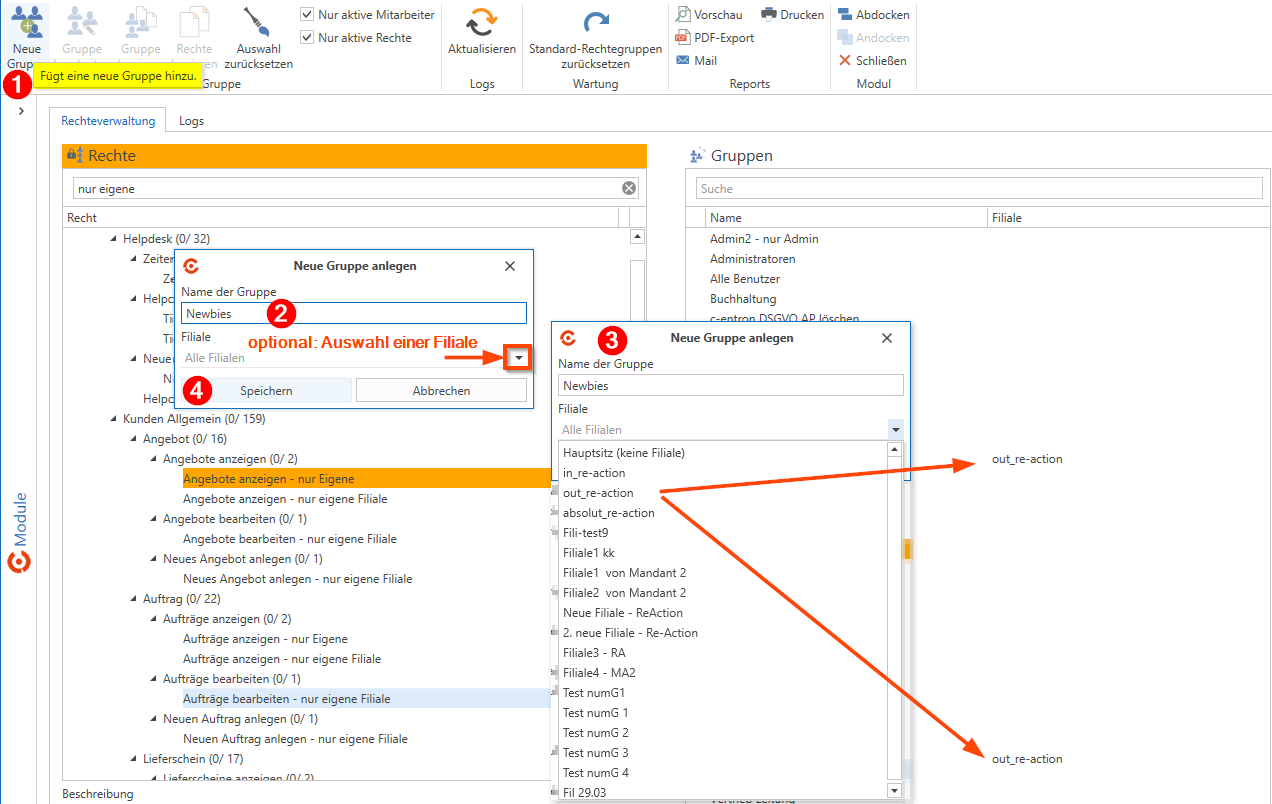
Using the button "New Group" In the toolbar (under "Group"), you can create a new empty group from scratch:
On "New Group" Click on the toolbar → the dialog box "Create a new group" opens.
In the field "Group Name" Enter a unique name (e.g., "Newbies").
Optional: In the dropdown menu "Branch" Assign a branch – this is only required if branch management is enabled; otherwise, leave it set to "All branches."
On the Save button Click in the dialog box → the new group will appear immediately in the group list.
You can then assign permissions and add employees to the new group as usual.
Create a new group (copy an existing group)
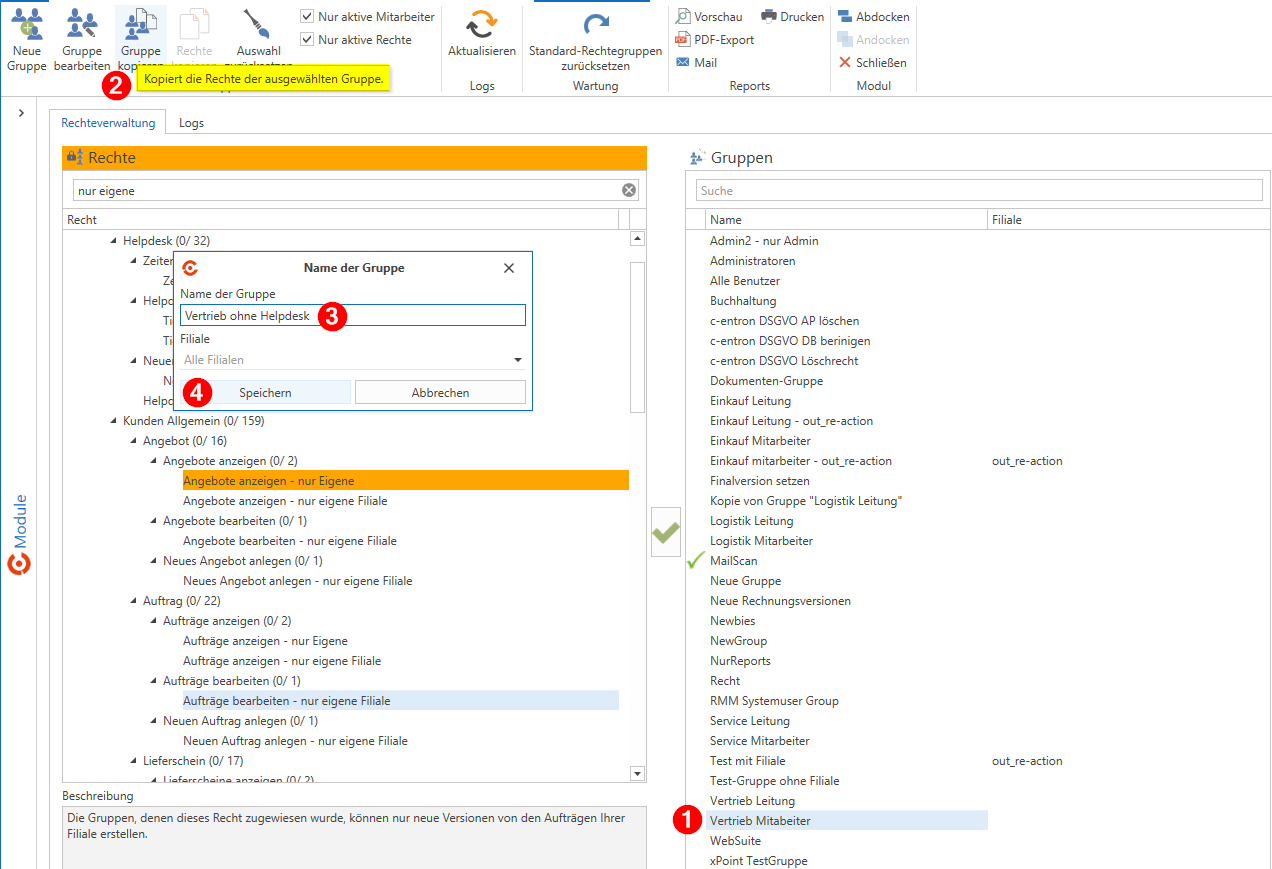
You can duplicate an existing group and customize it—without having to create everything from scratch:
Select an existing group as a template (e.g., sales staff).
Copy group – A new group with the same members is created.
Assign a new name (e.g., "Sales without a Help Desk").
On Save Click.
Revoke unwanted permissions (e.g., remove all help desk permissions).
On Refresh Click and check the result.
Tip: Copying is a good option if the new group is similar to an existing one. The "New Group" button is the better choice if you want to create a completely separate group with no default settings.
Add a member to a group
By selecting an individual and a group, and then clicking the green checkmark between the "Groups" and "Total Staff" sections, you can assign the employee to a specific group.
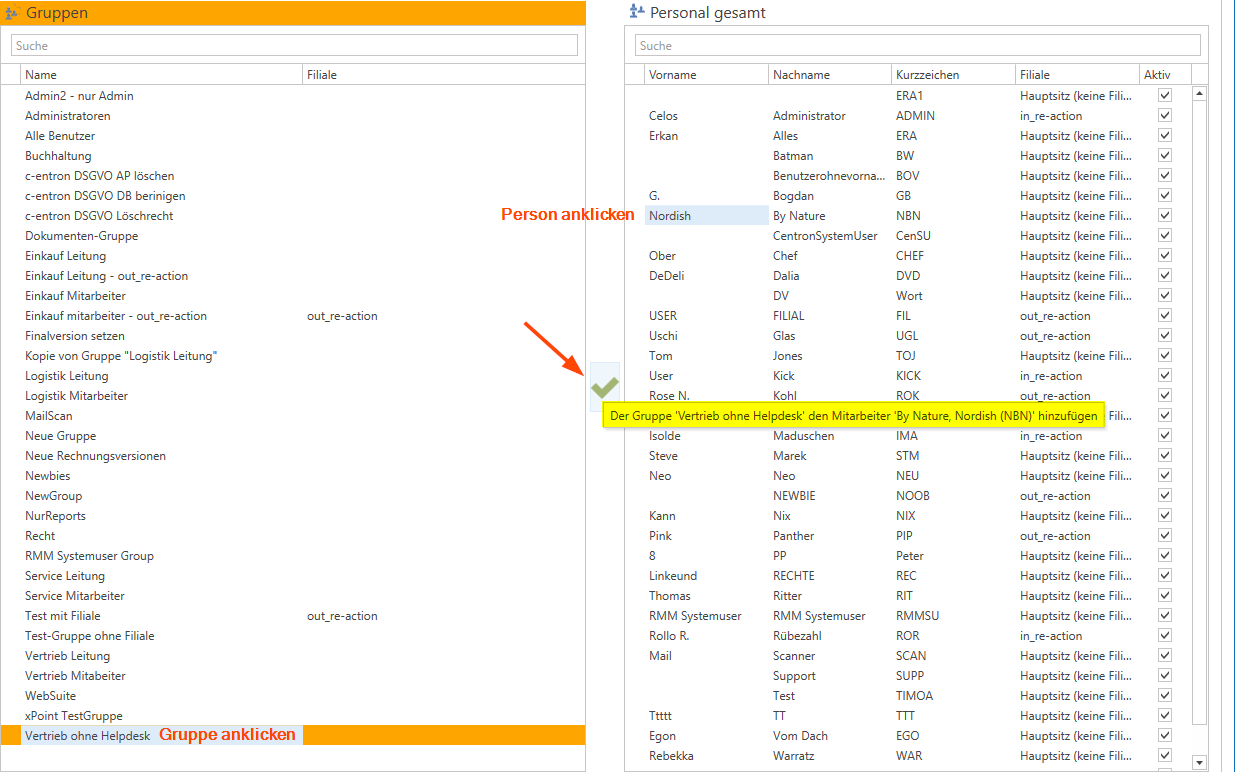
Tip: Double-clicking on a group displays the assigned employees and their assigned permissions. Assigned entries are marked with a green checkmark.
Department: Human Resources
In the Human Resources section, you manage the assignment of individual employees to groups. Each employee can be a member of one or more groups, which determines their actual permissions.
Check group membership
Through a double-click When you click on an employee, you'll see a detailed overview of their group memberships and the resulting permissions.
Copy permissions from an employee
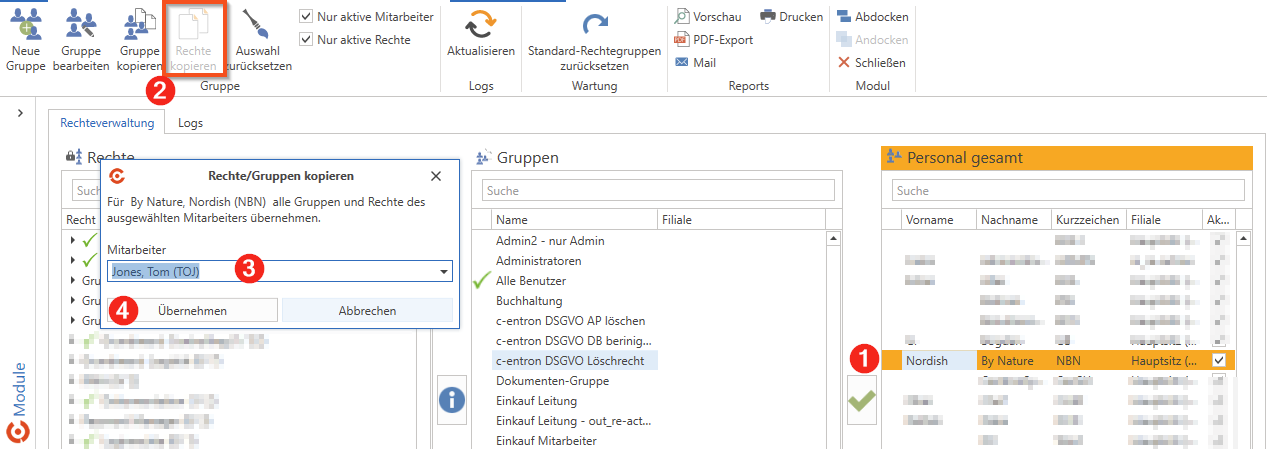
Should an employee be granted exactly the same rights as a colleague:
Select the target employee.
Function "Copy rights" call up
In the "Copy Rights/Groups" dialog box, select the source employee.
Confirm takeover – the target employee now has the same assignments.
This feature is particularly helpful when new employees are taking on similar tasks and need to be set up quickly.
Reports and Analysis
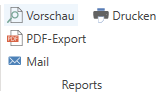
In addition, you can generate reports on permission assignments. These reports provide a comprehensive overview of all permissions granted in the system.
Preview - Displays a preview of the default report (for printing) (or you can first select the report by right-clicking)
PDF Export - Exports the default report (for email) as a PDF file (or you can first select the report by right-clicking)
Print - Prints the default report (for printing) directly (or you can first select the report by right-clicking)
Email - Sends the default report (for email) as an email attachment (or you can first select the report by right-clicking)
Note: If the desired report has not yet been added, it can be added in Report Management. For more information, see the separate article on Report Management.
Under the main folder Statistics – Overview of Rights The following reports are currently available:
User permissions
Rights by Group
Group Overview
Change Log
All changes to permissions are automatically logged. The log can be viewed directly in the permissions management section and shows:
Which law was amended?
Who made the change?
When was it changed (date and time)
Whether a right has been granted or revoked
Menu bar icons in the Rights Management section

1. Group Section:
New Group
Create a new empty group from scratchEdit group
Change the name or branch of an existing groupCopy group
Copies an existing permissions group, including its members, as a new groupCopy rights
Assigns all rights (groups) of another employee to the selected employeeReset selection
Clear the selection for Legal, Group, and EmployeesOnly active employees
If this setting is disabled, inactive employees are also displayed (as indicated by the "Active" column).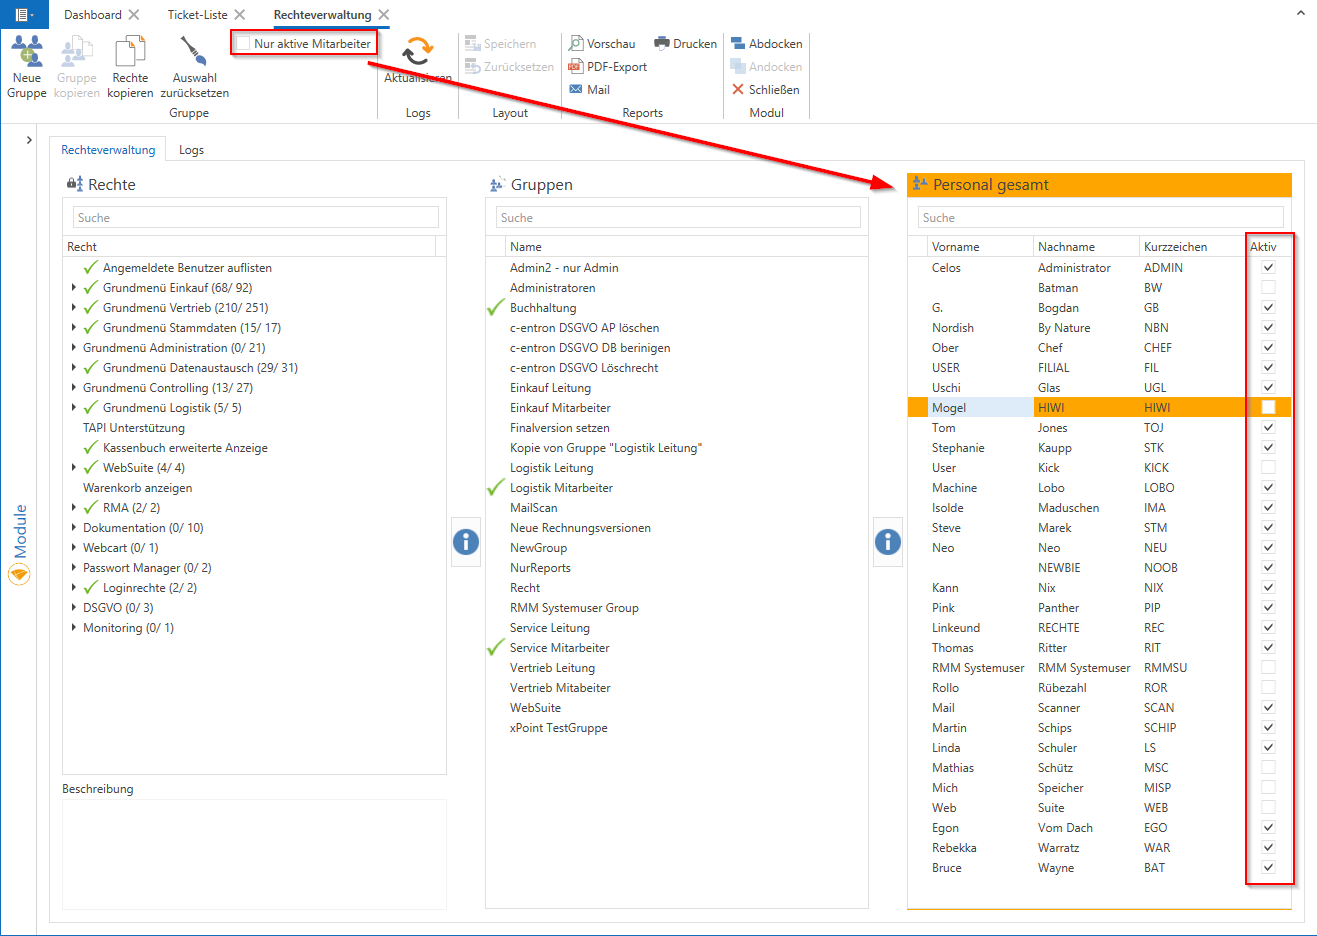
Active rights only
This setting is checked by default. Obsolete permissions that are not used in c-entron are now displayed in italics in the permissions overview.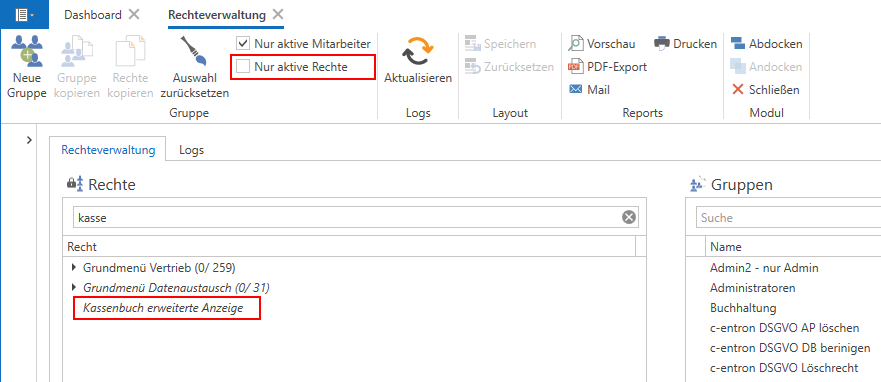
2. Logs Section
Refresh
Refresh the view manually
3. Maintenance Department
Reset default permission groups
Resets the default groups to their factory settings
4. Reports Section
Preview
Displays a preview of the default report (for printing) (or you can first select the report by right-clicking)PDF Export
Exports the default report (for email) as a PDF file (or you can first select the report by right-clicking)Print
Prints the default report (for printing) directly (or you can first select the report by right-clicking)Email
Sends the default report (for email) as an email attachment (or you can first select the report by right-clicking)
5. Module Section
X Close
Close the moduleUndocking
Opens the module in a separate window, allowing you to work with multiple windows side by sideDocking
Docks the module back into the main view and closes the separate window
More rights management icons
Green checkmark (between sections)

Assigns the selected right or person to the selected group
X (between the sections)

Removes the selected right or person from the selected group
Info icon (i) (between sections)

Note that for an action, either a right and a group or a group and an employee must be selected
Tips & Best Practices
Situation | Recommended procedure |
|---|---|
New Sales Representative | Assign the "Sales Staff" default group or Copy permissions from an existing colleague |
A completely new group with no existing entries | Create a "New Group," assign a name, and manually define permissions |
Create a new group similar to an existing one | Copy an existing group, rename it, and then adjust the permissions |
Change not visible | Click the "Refresh" button |
Please review | Open an employee's profile by double-clicking or run the corresponding report |
Reset selection | Click "Reset Selection" to start over |
Cross-store separation | Enable the "Manage rights – own branch only" permission |
With c-entron’s structured and flexible access management, you can ensure that all employees have exactly the access they need to do their jobs. At the same time, you maintain control over system permissions at all times and ensure a high level of data integrity and security within your organization.