%20(1).png)
Documentation on the Shipcloud integration in c-entron (GLS)
(As of: April 2026)
Re:
⚙️ Administration
📦 Sales
📞 Support
🖥️ IT / Technology
The one used so far GLS Interface is currently unavailable. This is due to an upcoming technical transition by GLS to a new API system. Unfortunately, it is not yet clear exactly what changes have been made or what caused the current disruption.
Since we wanted to move toward a modern and more flexible solution in the medium term anyway, we decided to, not to further investigate or repair the existing GLS connection.
Instead, we recommend that you use Shipcloud – one future-proof, centralized shipping platform, which allows you to use not only GLS but also many other shipping providers easily and efficiently through a single interface can use.
💡 Note on costs
Shipcloud is a third-party service that requires a fee.
When you register, you can Choose a 30-day free trial, where you can try out all the features with no obligation. After that, a paid plan is required.
You can find the current prices and rate plans here: https://www.shipcloud.io/preise
🔄 Important Information About the Transition
For existing customers:
If you've already used our GLS Interface If you're interested, please contact us directly at Sales or in the Back office. We can easily transfer your existing connection from our end Replace it with the new Shipcloud interface on a 1:1 basis.
For new customers:
If you're new to the Shipcloud interface, feel free to Offer at our Sales request.
🔧 Requirements
Before you begin setting up c-entron, please make sure the following requirements are met:
“Module - GLS / Shipcloud Interface” license available (c-entron)
An active "Module - GLS / Shipcloud Interface" license is required to use GLS via Shipcloud.Shipcloud account available
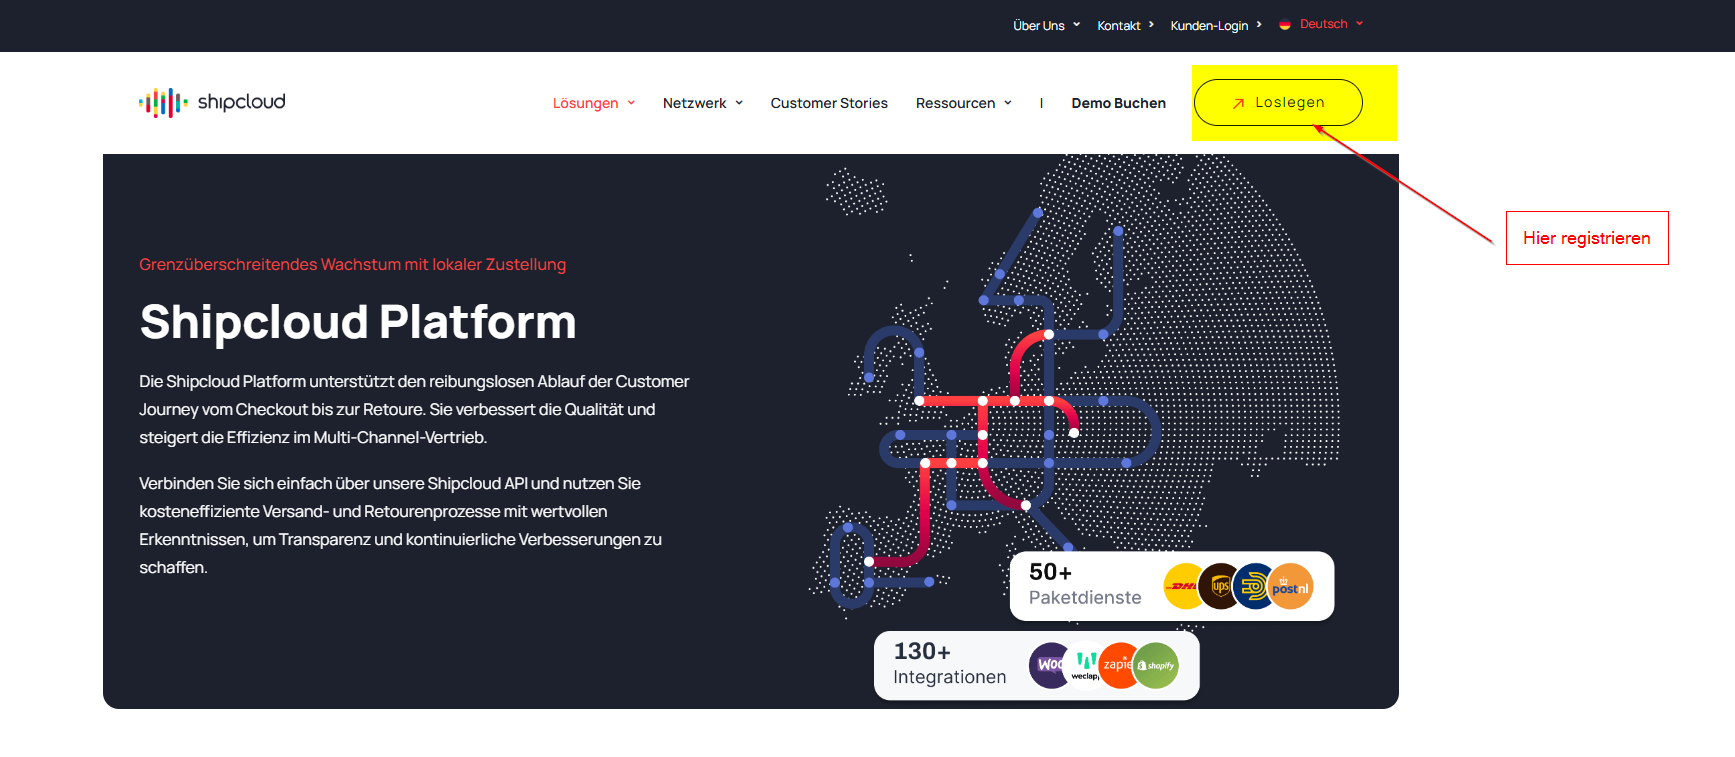
If you haven't already, please register on the website https://www.shipcloud.com by clicking the button “Let’s get started” top right.
📝 Sign up and get an API key from Shipcloud
After successfully registering and logging in, follow these steps to find your API key and complete the basic setup:
Registration
Log in to your Shipcloud account via www.shipcloud.com to.Set up the shipping process
On the dashboard, click “Set up your shipping process”.
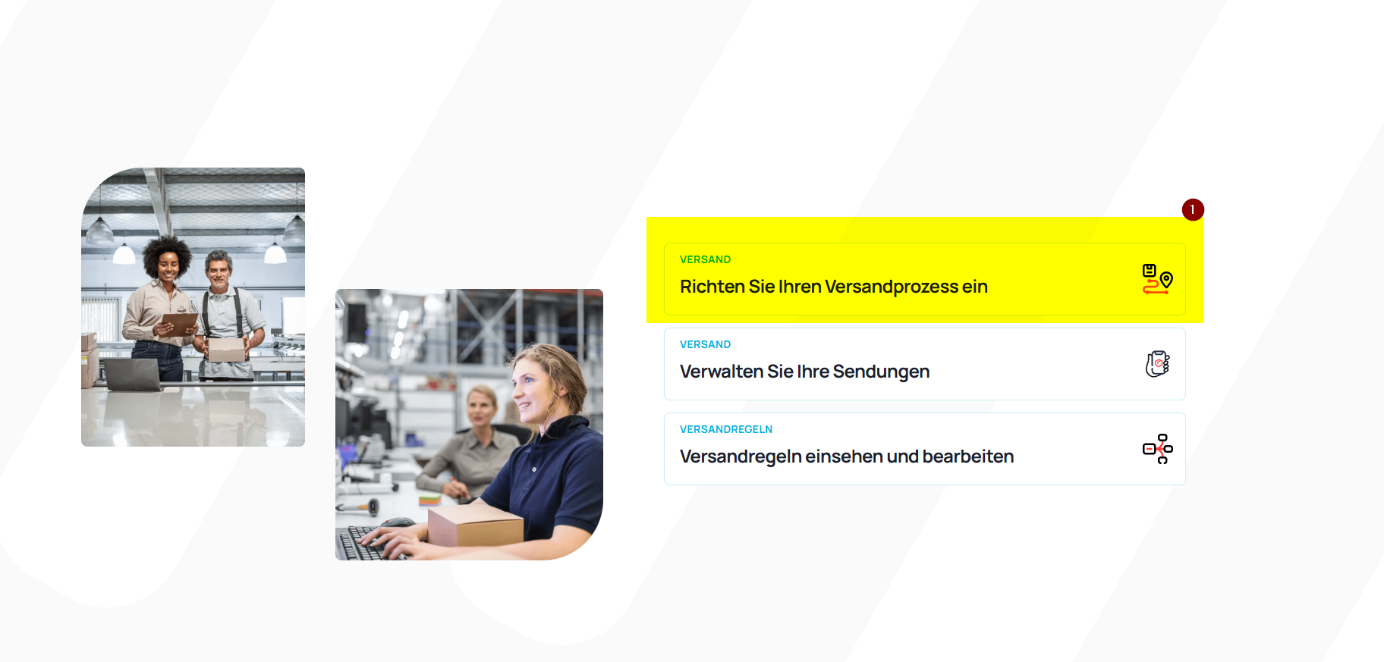
This section walks you through the most important steps to get started, such as:
Set a default sender address
Update Design and Contact Information
Configure shipment tracking
View and manage API keys
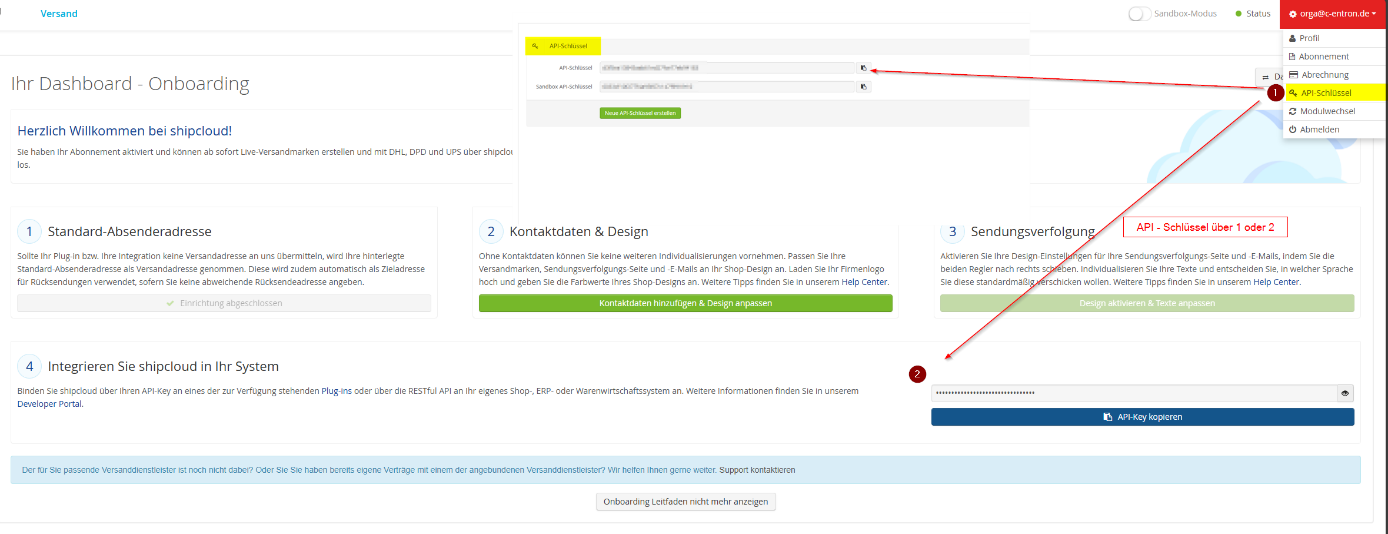
Get API Key
Alternatively (or in addition), you can view the API keys directly:
Click on your user account in the upper right corner (e.g., orga@c-entron.de)
Select the option from the dropdown menu “API key”
Copy your Production API key and, if necessary, the Sandbox API key
⚙️ Settings in c-entron
The configuration in the c-entron software is performed as follows:
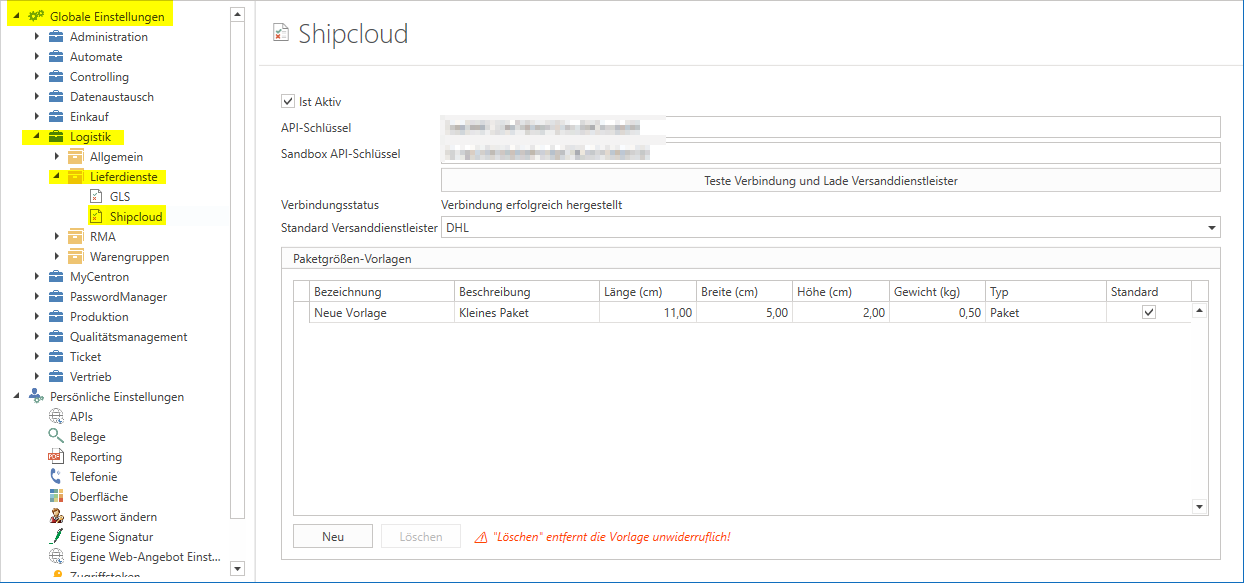
Open the module Settings.
In the left-hand pane, navigate to:
Global Settings → Logistics → Delivery Services → GLS → ShipcloudSelect the option "Is active".
Paste the text you copied earlier API key Enter the following in the fields:
API key
Sandbox API key (optional for testing)
🆕 Standard shipping provider (available starting with version 2.02509.x)
Once the shipping providers have been loaded, you can now select and save a default shipping provider. This simplifies the shipping process and saves time when creating orders.
🆕 Package Size Templates (available starting with version 2.02605.x)
With the Package Size Templates With the Shipcloud integration, you can define recurring package sizes centrally and select them quickly during the shipping process. This saves time, reduces data entry errors, and ensures consistent shipping data—especially if you frequently work with similar package dimensions.
Here's how to easily create a template:
Click on “New”.
Enter the package information in the appropriate fields:
Name
Length
Width
Height
(Optional) Enable the option “Standard”to automatically preselect the template.
Save your entries.
-> You can find detailed instructions here: Paketgrößen-Vorlagen für die effiziente Shipcloud-Anbindung im Versandprozess
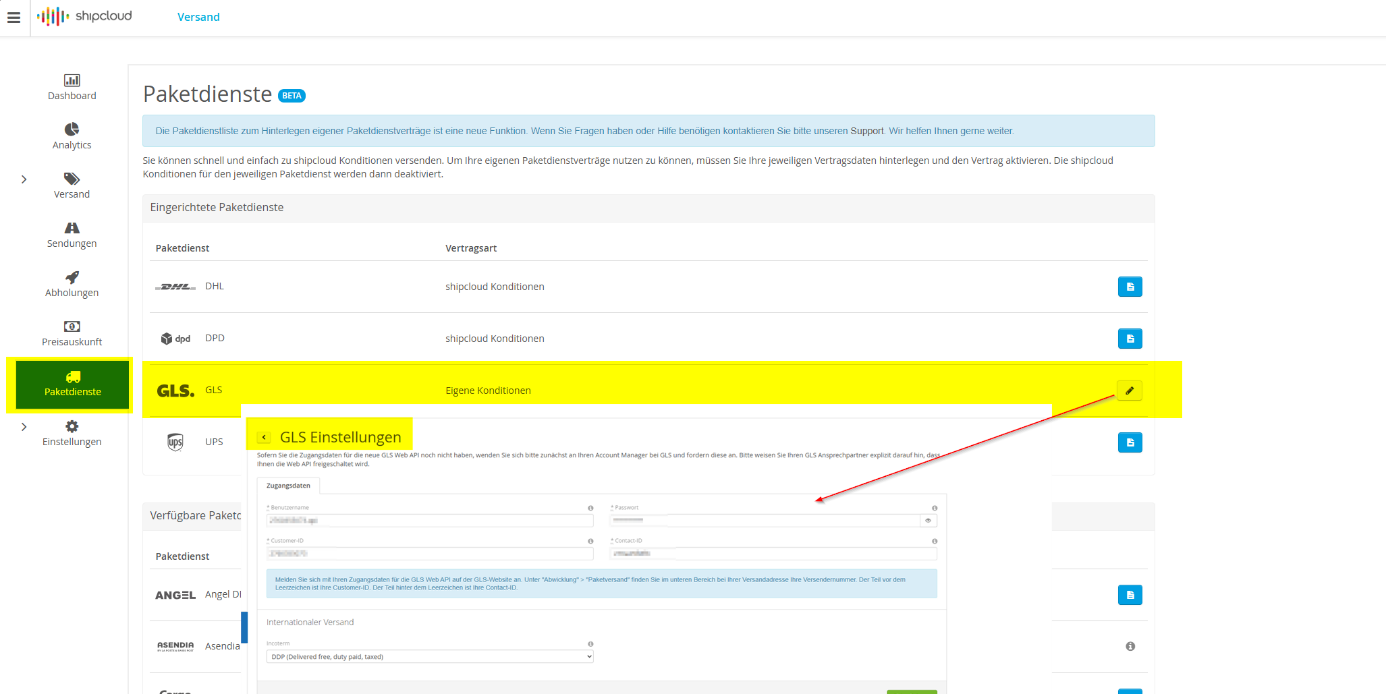
🚚 Add GLS as a shipping carrier in Shipcloud
So that you GLS To use GLS as a shipping provider via the c-entron software, you need to enter your GLS login credentials in Shipcloud. Here’s how:
Log in to the Shipcloud Dashboard.
Click on “Parcel Services”.
Search the list for GLS and right-click on the Pencil icon (edit).
Now enter your Login credentials for the GLS Web API one:
Username
Password
Customer ID
Contact ID
💡 Note: You will receive these login credentials from your GLS contact. Please make sure to explicitly request access to the GLS Web API to apply for.
Save your entries. Once the data is correct and the contract is active, GLS is also automatically available as a shipping option in c-entron.
🧾 Create a shipping label & print a label in c-entron
Once the connection to Shipcloud has been established and GLS as a service provider you can directly from a Delivery Slip Generate a shipping label and print the shipping label.
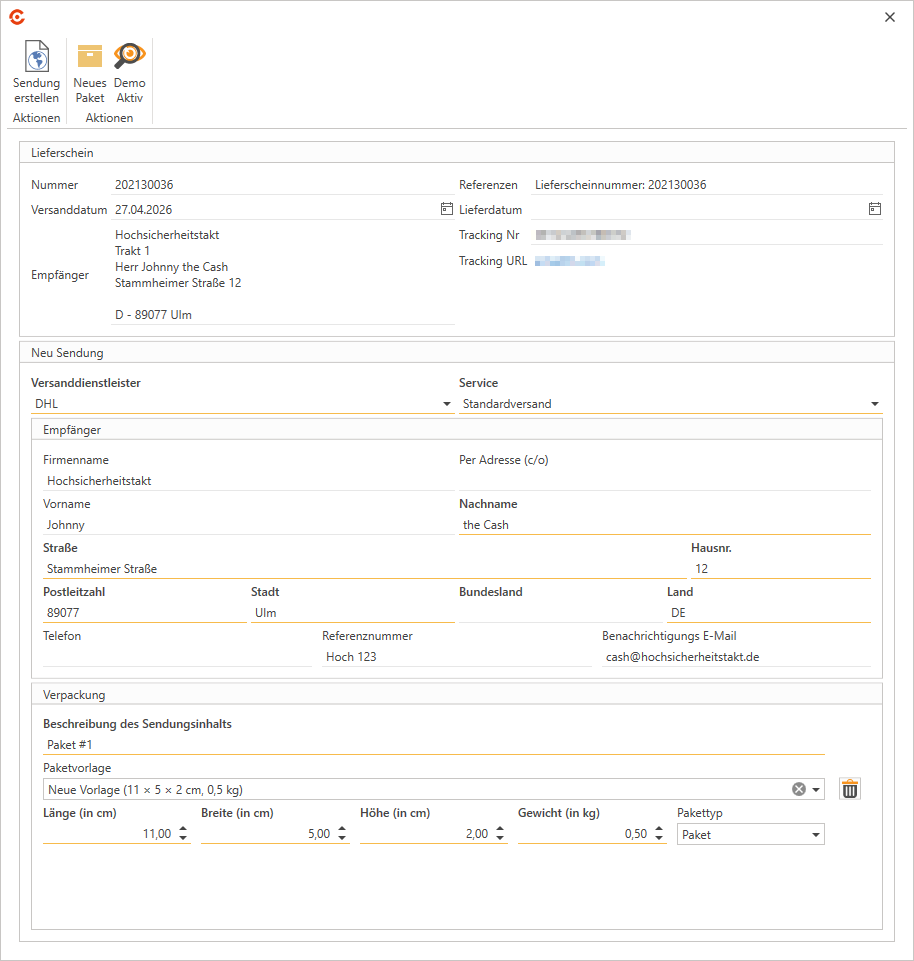
📍 Here's how the shipping process works in c-entron:
Open the desired Delivery Slip.
Click on the ribbon at the top
“More” → “Transfer to delivery service (Shipcloud/Beta)”.
The dialog box for creating a shipment opens.
Select the Shipping service provider (e.g., GLS) from the drop-down menu.
Enter the required Shipping Information one:
Service (e.g., Standard or Express)
Recipient data (taken from the document)
Packaging information (dimensions, weight, package type) (required)
🆕 New in version 2.02605.x:
For the packaging information, you can use a Package Size Template Select.To do this, select a suitable template from the drop-down menu.
(Optional) Adjust the imported values manually if necessary.
(Optional) Remove the template to enter the package dimensions manually as usual.
Description of the shipment's contents
After entering the data, click on “Create shipment”.
The shipping label is generated and is immediately ready to print.
💡 Note on Sandbox Mode
If you go to the settings and select the Sandbox API key If you use this, you can, when creating a shipment in c-entron the option “Demo Active” Select. In this mode, only a test label generated – ideal for checking the connection and label printing, without the item actually being shipped or costs are incurred.