%20(1).png)
Service Board Classic - Overview
a829eb6d-f24d-427c-9cf3-be7d86fd9f85-blob
Handout Service
2. Checklists
General
Checklists provide structured support for tasks and can be created in advance or from a ticket.
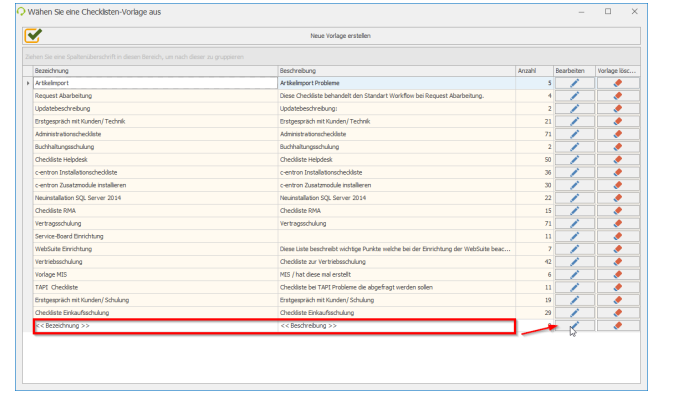
How to create a checklist
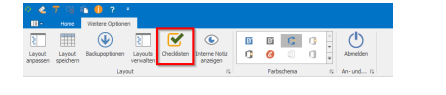
Checklists can only be created in the Service Board. Either in the main view under the tab More Options -> Checklists -> Create New Template
Or in the ticket under Checklists -> Insert checklist from template -> Create new template
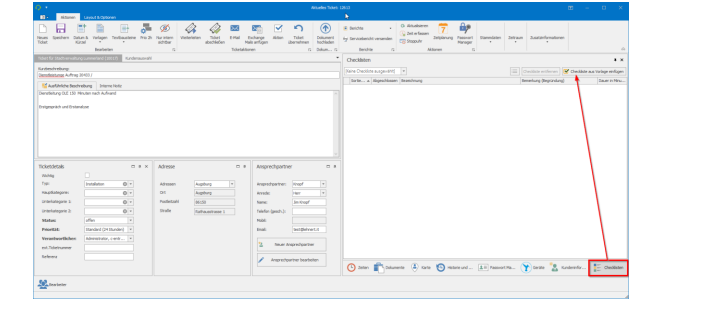
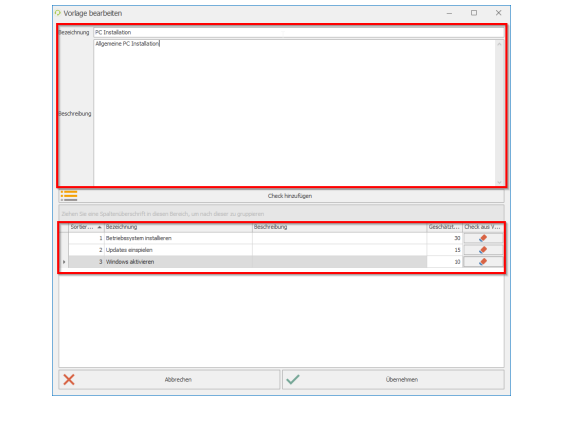
A new checklist is created via "Create new template." This can be edited using the "Edit" button.
A name and a general description can be assigned to the new template. In the next step, "checks" are added to the checklist. Here, the checks can not only be given a name, but also a sorting order and an estimated time. This time serves as a guideline for employees as to how long the check should take
Checklists in tickets and reports
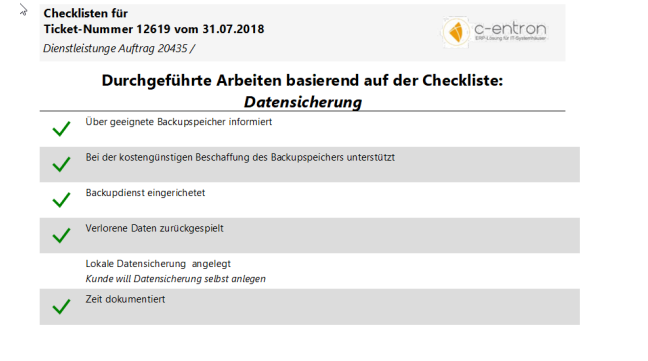
The checklists can be edited and checked off in the ticket by the employee. If a check cannot be performed, a comment can be entered for this check

The checklist is displayed by default in the service report, which you can download free of charge in c-entron.NET via Report Management -> Portal Report Download.
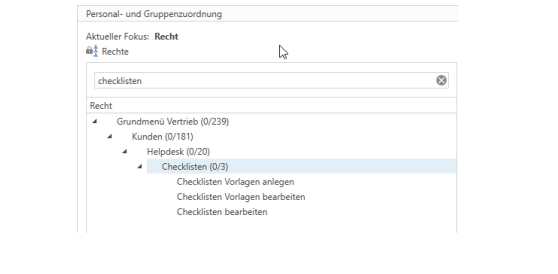
Authorization
There are separate permissions for checklists. Here you can define which employee groups can create "checklist templates" and "edit templates" and which employee groups can only "edit checklists."
3. Dispatching
General
Here we distinguish between the possibility of assignment through scheduling, resource planning, and the Dockpanel Dispatcher
Scheduling
Scheduling is the "standard" planning feature and is included in the Service Board scope. Scheduling accesses the Exchange Server via the EWS interface. In scheduling, tickets can be synchronized with employees' Outlook calendars via groups/departments or skills.
Exchangee is the leading system here!
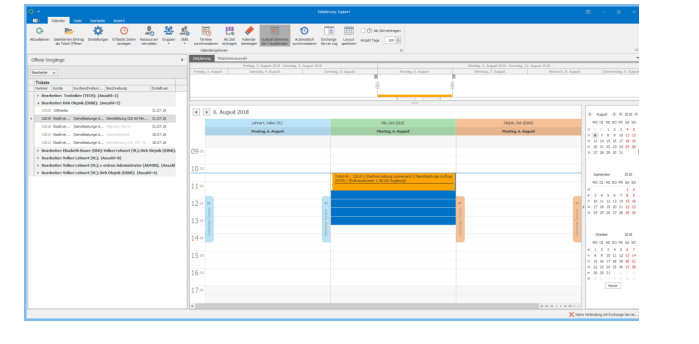
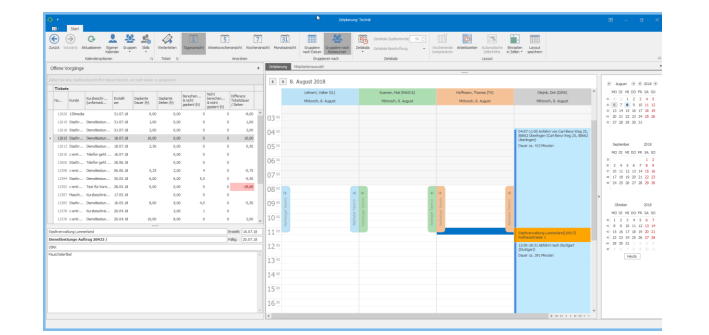
Resource planning
Resource planning is an extension of time planning and requires the c-entron Exchange Connector (additional license). In the resource planning overview, the times booked on a ticket are visible at a glance (planned duration, calculable times, non-calculable times, and the difference). Furthermore, arrival and departure times can be specified during scheduling. Arrival and departure times are entered as separate appointments. However, employees cannot simply delete appointments in the Outlook calendar for scheduling purposes; appointments can only be moved or deleted via resource planning.
Scheduling in c-entron is the leading system here!
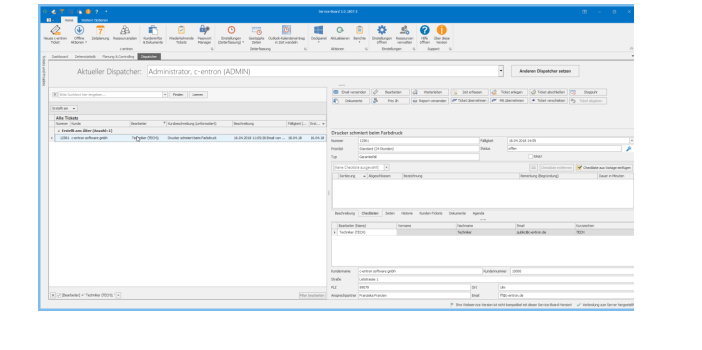
Dispatcher dock panel
The "Dispatcher" dock panel is used to distribute newly arrived tickets to support or technical staff.
The "Current Dispatcher" view shows all employees who have also integrated the dock panel which employee is currently the "Dispatcher."
As a rule, a filter is set on an agent in this dock panel, e.g., Support, Technical, MailScanner, or similar. All tickets that are newly created for the agent "Support" are visible here and can then be distributed via the Dispatcher.
4. Time recording
General
The Service Board offers you various options for time tracking. We will explain these below.
TAPI
When you answer a phone call using the TAPI interface, you will receive the following information if the phone number is stored for the customer and contact person. You can enter notes in the Notes field during the phone call and decide after the call whether you want to create a new ticket for this time or store the time of the phone call in stopped times.

Stopped times
During the stopped times, both the TAPI times can be temporarily stored and new stopwatches and new times can be created.

During this time, a description of the activity can already be entered, along with the name of the customer for whom the work was carried out. These times can then be transferred to an existing ticket or to a new ticket. Once the times have been assigned to a ticket, they are no longer visible in the stopped times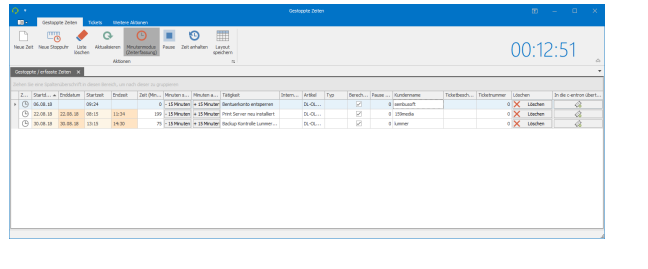
Manual entry
Times can be manually recorded and edited in the ticket at any time.
Noteif a time has been entered in a delivery note or invoice, it can no longer be edited.
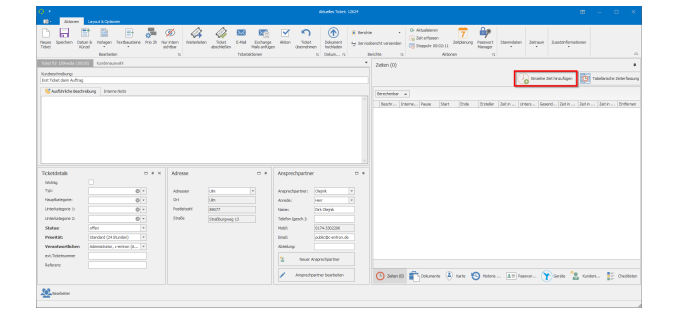
The Tabular Time Recording button takes you directly from the ticket to the overview of the recorded times.
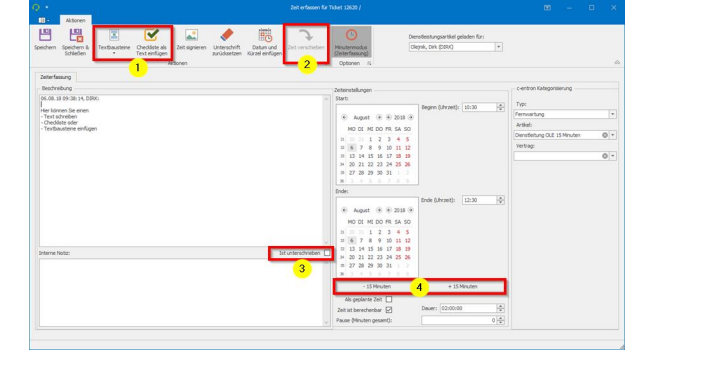
In time tracking, you can (1) insert text modules or checklists (if a checklist has been assigned to the ticket) into the time description. You can move times to another ticket (2) if they were accidentally created incorrectly. (3) If the time is signed and sent to the customer via a report/service report, this check mark is set automatically. Alternatively, you can also set the check mark manually if, for example, the customer has signed the service report afterwards and sent it to you. These buttons (4) can be customized in Settings -> Additional settings -> Time tracking.
Stopwatch
You can activate user-specific stopwatches in the personal settings of the c-entron.
The prerequisite is that the global setting "Time tracking when creating a new ticket" is activated
As soon as an employee opens a ticket, the stopwatch starts running. Once the work is complete, the employee clicks on the stopwatch. The start and end times are automatically entered in the "Time Tracking" window.
If a ticket is closed while a stopwatch is still running, the following selection appears

5. Controlling
General
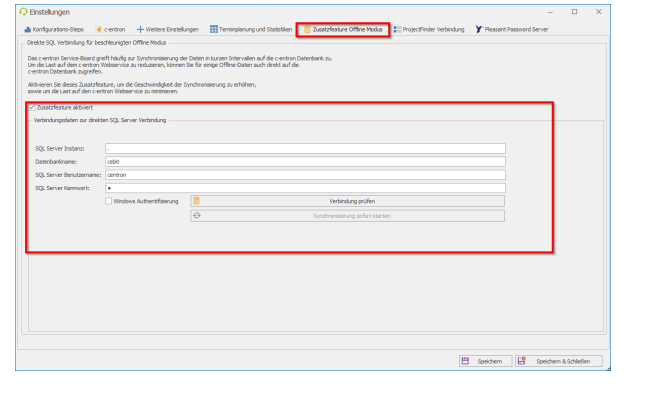
Various dock panels are available for controlling in the Service Board. When setting up additional dock panels for the first time, you must enter the connection data for the SQL Server once in the settings under "Activate additional feature offline mode."
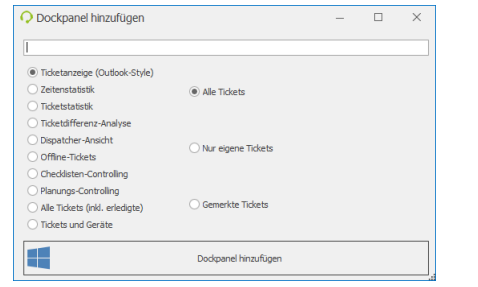
You can add new dock panels via the Dock Panel -> New tab. Here you can assign a name to the dock panels and select whether all tickets, only your own tickets, or bookmarked tickets should be displayed
In most dock panels, you will find the Print button on the right. You can use this button to print the filtered data.

Alternatively, you can also export the data to Excel, for example. To do this, simply click on Print and then click on "Export to" in the following window.

Filter
Filters can be set in all dock panels, which is particularly useful for controlling.
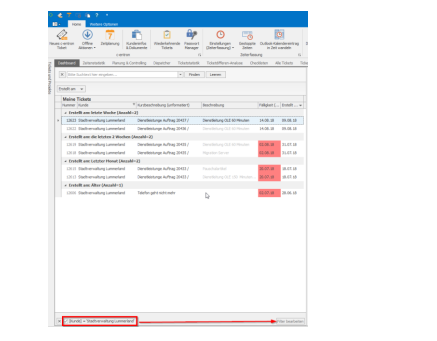
If a filter is set, this is shown at the bottom of the corresponding dock panel
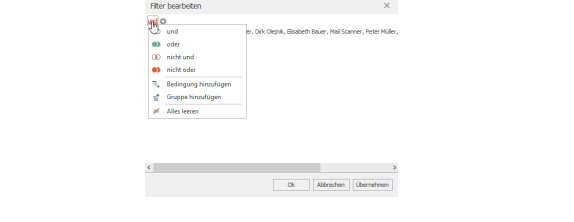
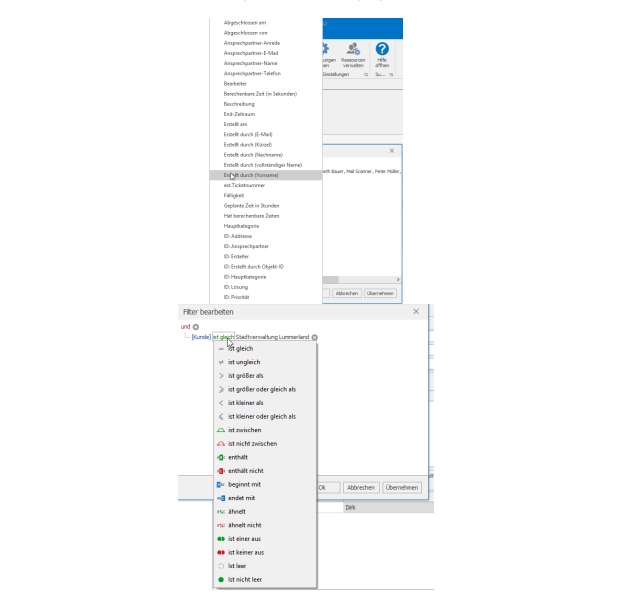
The filter can be edited via Edit filter. The following options are available: and, or, not and, not or. Conditions and groups can also be added
If you click on filter criteria 1 or 2
Time statistics
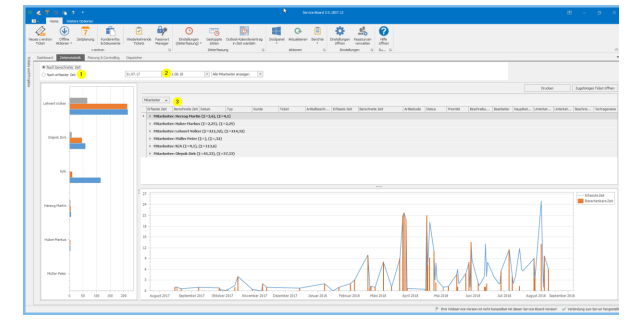
In the time statistics, you can sort between (1) "By calculated time" or "By recorded time," adjust the date range (2) to day, week, month, etc., and display the statistics for individual employees if you have the authorization to do so. By default, each employee can only see their own times. The arrangement (3) can be customized individually, and you can also filter by customer, type, etc. The time statistics are normally only visible to the logged-in user.
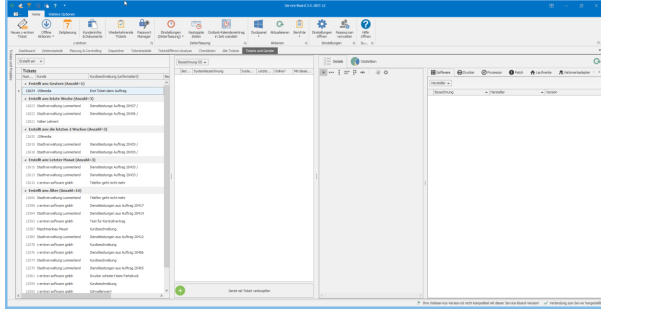
Ticket statistics
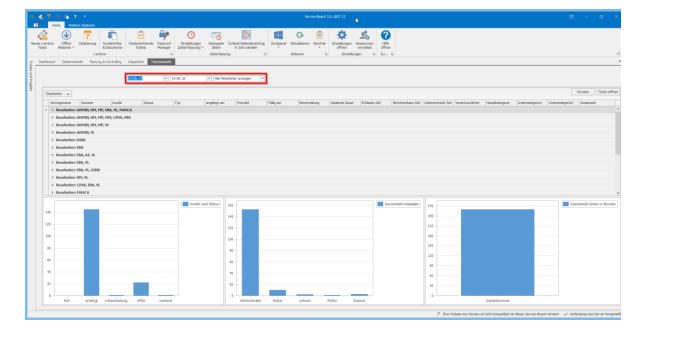
The ticket statistics provide you with an overview of the year, month, week, or day, showing which tickets are in which status, with the total number of tickets per employee and the total number of hours. The filter area (red frame) in this example, sorted by agent, can be customized as in all dock panels, meaning you can filter here according to the fields that are important to you.
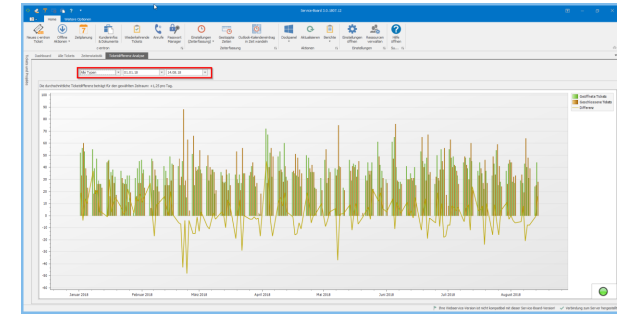
Ticket difference analysis
The Ticket Difference Analysis dock panel shows the number of open and closed tickets over a period of time x, as well as the difference between them. The difference analysis can also be filtered and displayed by help desk type.
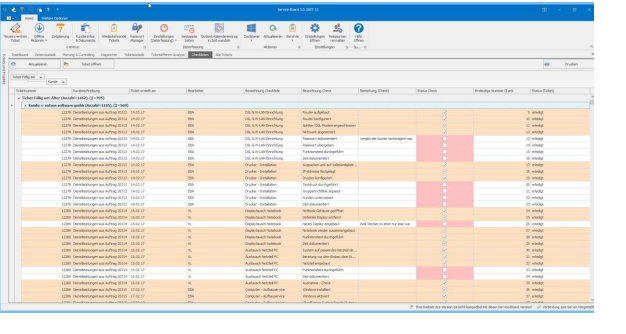
Checklist controlling
The Dockpanel Checklist Controlling provides you with an overview of the tickets in which a checklist is integrated. Here you can see at a glance which checks have already been carried out and which checks are still open. If the employee has entered a comment for a check, this comment is visible
Planning and Controlling
If tickets are created automatically by a c-entron order, the duration of the service item in the order is transferred to the planned time. For example, 2 hours of service in the order = 2 hours of planned duration in the ticket.
In the Planning and Controlling dock panel, the planned time is compared with the actual time recorded by employees. If the planning difference (delta) is positive, this is indicated by a green arrow, and if it is negative, by a red arrow. Tickets for which no planned time has been recorded are indicated by a yellow arrow.
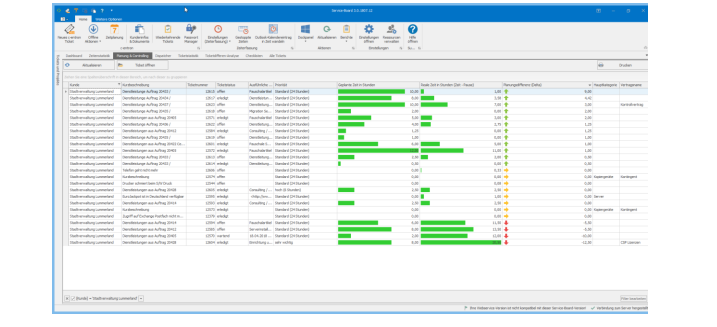
Tickets that are created "manually" can also have a planned duration added later or when the ticket is created using additional information.

All tickets (including completed ones)
By default, this dock panel displays all tickets, including completed tickets. The start and end dates can be adjusted using the date filter. Many customers also like to use this dock panel to filter by agent, customer, or type. This provides an overview of how many tickets each agent has, which customers currently have how many tickets, or which types, e.g., malfunction or installation, currently have tickets.
Tickets and devices
If you use RiverSuite for your customers, you can link the customer's inventoried devices to a ticket via the Dockpanel Tickets and Devices. This allows you to evaluate later how often there were problems with this hardware and whether it was always the same problem.
Ticket template
In the Service Board, you have the option of creating ticket templates. Ticket templates are often used for tasks such as security checks, creating new users, replacing toner, etc. Under Templates, you can create new templates, edit existing templates, or select existing templates for a ticket.
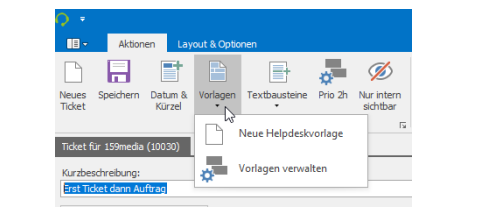
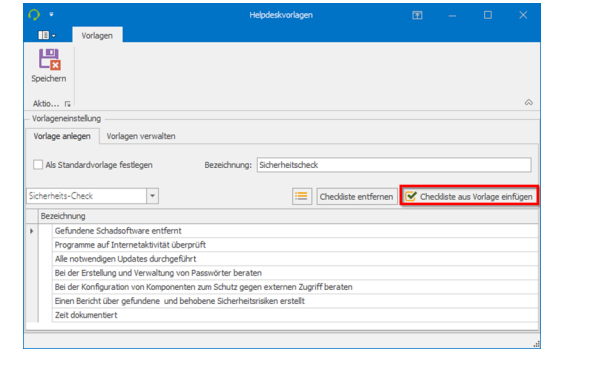
To create a new template, create the ticket with a brief description, description, and ticket details such as type and category, and save the ticket. Then go to Template -> New Helpdesk Template and give the template a name. A checklist can also be added to the template
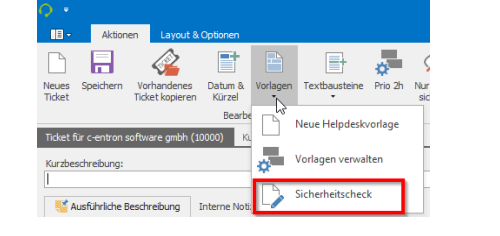
When you create a new ticket for a customer, you can select the new template, e.g., Security Check. The short description, detailed description, ticket details, and, if applicable, a checklist are then added to the ticket. So you only have to select the customer, and the rest is taken from the template
Recurring tickets
Tickets can be created automatically for recurring activities such as firmware updates, event logs, patch management, etc. To do this, click on recurring tickets in the main screen.

In the following window, you will see the tasks that have been created and are active. Below that are the tickets that were created via this task.
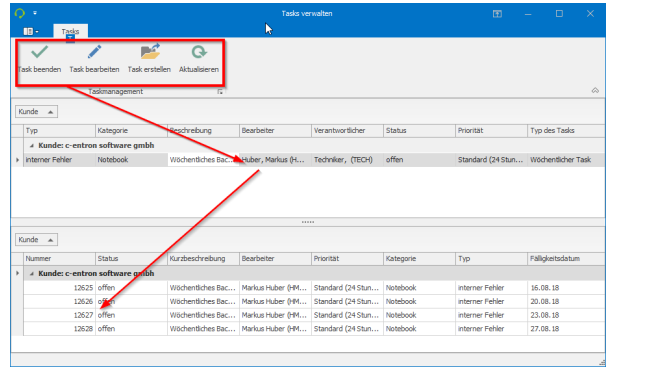
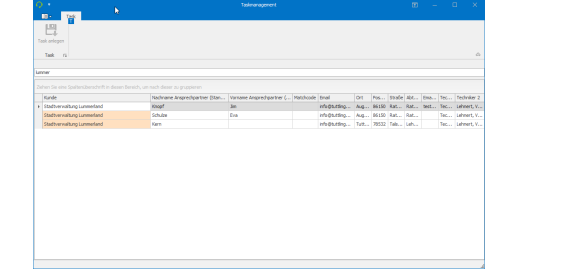
You can create a new task for a customer via Create Task
Compared to normal tickets, there are more mandatory fields (1) that must be filled in for recurring tickets. Under point (2), you can define whether the ticket should be created daily, weekly (e.g., on Thursdays), monthly, or annually. Below that, you can create an end date for this task, no end date, or end after, for example, 12 repetitions. In point 3, you can define whether and when the ticket is created in advance
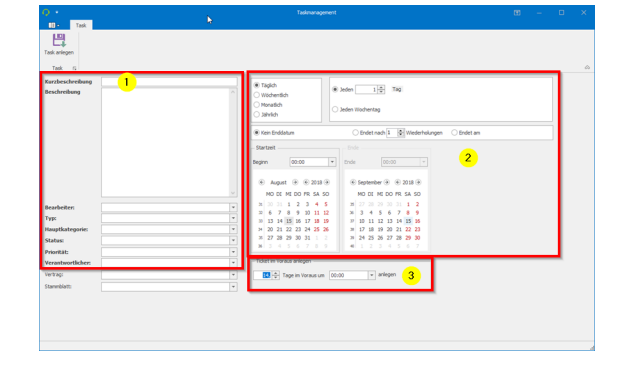
Example: A ticket is created every second Thursday. Under "Ticket in advance," 2 days at 9 a.m. is selected. The ticket would then be created for the agent every 2 weeks on Tuesday at 9 a.m.
6. Service Board - Good to know
Drag and drop
You can drag and drop an email from Outlook into the service board. If the email contains a ticket number, the email is automatically filed under Documents for that ticket.
If there is no ticket number in the email, a new ticket will be created for the email and the customer. Subject = brief description and body = detailed description.
Ticket promotions – Transferring tickets

A ticket has been forwarded to several agents. When an employee clicks on "Take over ticket," all employees are removed from the agent list and he remains the only agent.
There are two employees in the ticket's assignee list. By clicking on "Assign to me," the logged-in employee is added directly to the assignee list without forwarding the ticket.
There are several employees in the ticket assignee list. Clicking on "Submit ticket" removes the logged-in user from the assignee list. If they are the only assignee for the ticket, the function is no longer available. Every ticket requires at least one assignee in the assignee list
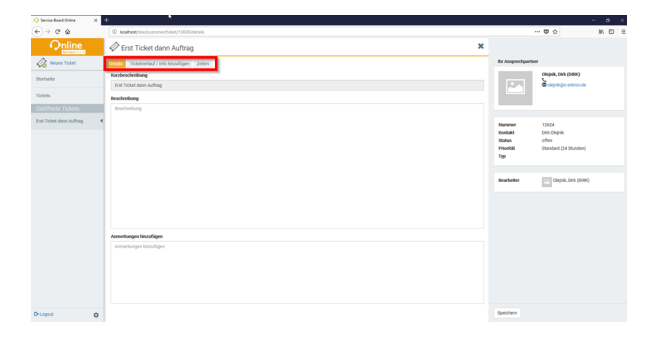
7. Service Board Online
General
Employees and customers who have a web account can log in to the Service Board Online and create, edit, and close tickets.
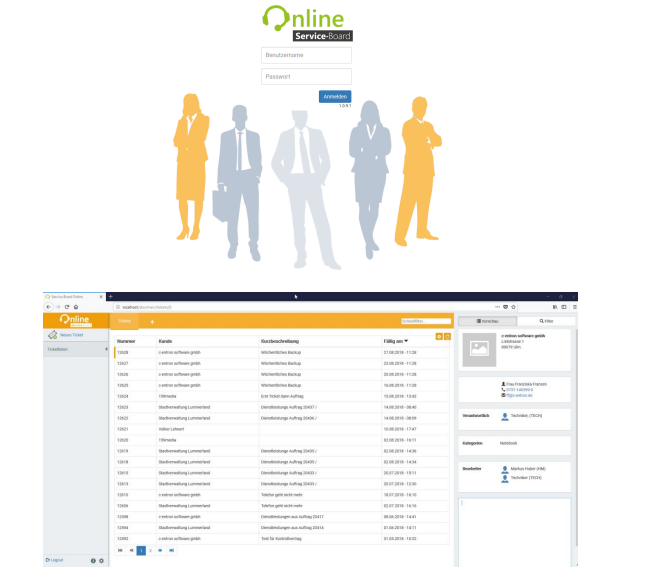
Ticket The ticket provides employees with the same range of functions for ticket processing.
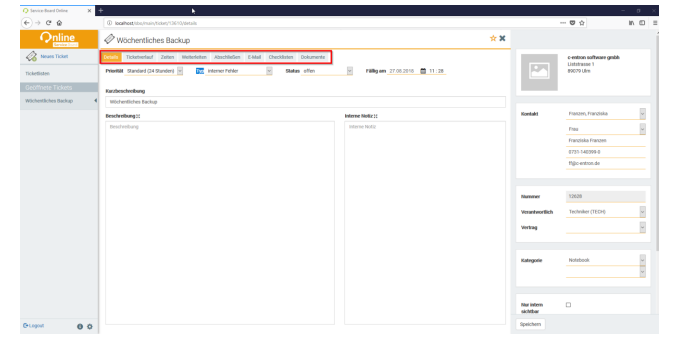
For customer access, the range of functions depends on the permissions that have been assigned.
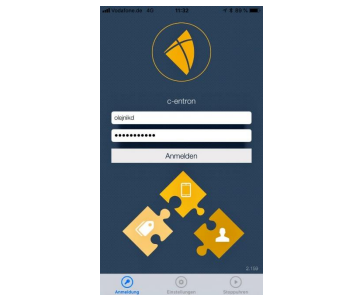
8. iSuite
General
The iSuite app is available for iOS and Android devices.
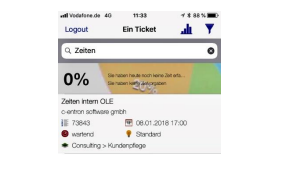
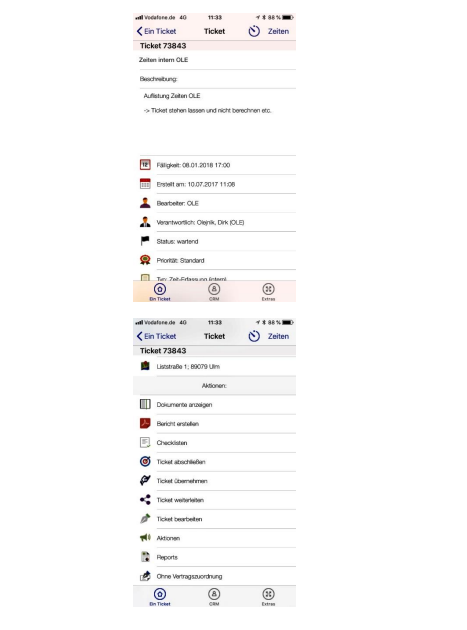
Ticket
In the ticket overview, employees receive an overview of the tickets in which they are listed as the processor. The search can be customized using the filter at the top right, and the statistics next to it provide employees with an overview of billable and recorded times for the last 3 days
Tickets can be fully processed, forwarded, and closed in iSuite. Time recording, report generation, and document display are also available.
You can search for a customer using the CRM button at the bottom center.
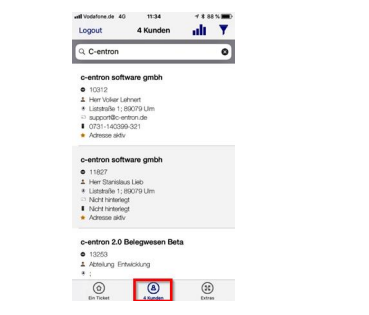
In the customer section, you can view (depending on your permissions) master data, contact persons, reports, sales, etc., and you can also create a new ticket for this customer.

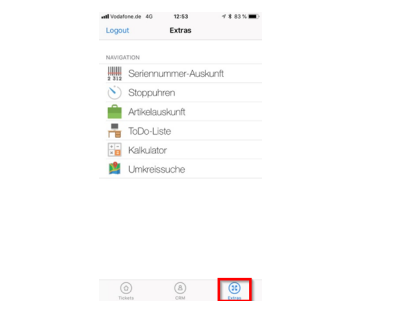
Extras
The Extras tab provides you with additional useful functions, such as a stopwatch or radius search. You can use the stopwatch to record the time spent with a customer when you don't have Wi-Fi or mobile network coverage.
9. Outlook plug-in
General
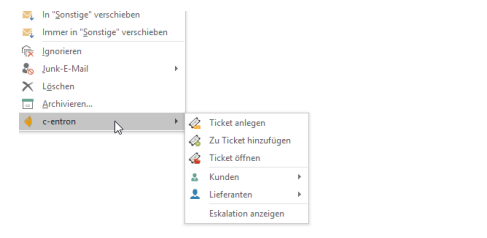
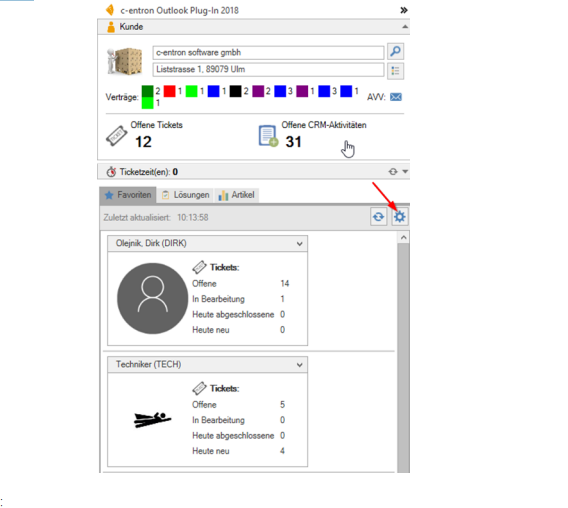
With the Outlook plug-in, you can easily create tickets from emails or attach emails to existing tickets. The ticket can also be opened directly in the plug-in if the email contains a ticket number. The "Tickets" button gives you an overview of customer tickets; the customer is identified by the email address that is highlighted

You have the same options if you select an email and right-click on c-entron.
Favorites
The c-entron bar allows you to manage your favorites. If you drag and drop an email onto an employee, a new ticket is created from this email and forwarded to the employee you dragged the email onto.
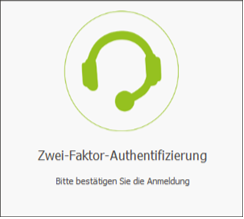
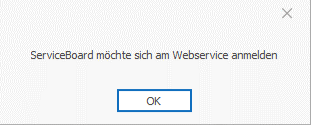
Two-factor authentication (2FA) settings in the Service Board
(available from release version 3.0.2109.x)
The following options for supporting 2FA have been added to the service board under Settings – "c-entron" tab below the [Synchronize data] button:

Show note
When you log in, a message will appear asking you to confirm your login via 2FA.
Wait at start
This option may be useful if Service Board starts automatically with Windows.
A dialog box will then appear, which you must confirm before Service Board attempts to log in to the web service.
Custom dictionary for spell checking
(available from release v3.0.2205.116)
A custom dictionary can be imported for spell checking.
Where can I find dictionaries for Service Board?
Service Board can import Hunspell dictionaries.
These can be found on the Internet in .oxt files. For example, here: https://extensions.openoffice.org/project/dict-de_CH_frami
The .oxt file can simply be renamed to .zip to unzip it.
From the archive, you need the .dic file and the .aff file.
These can be imported under "Additional settings" - "Spell check."
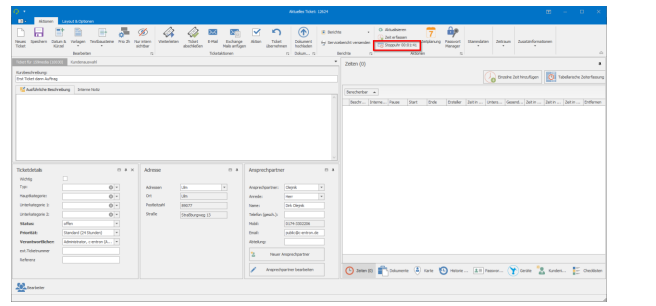
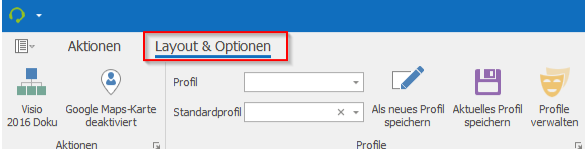
Manage layout profiles via "Layout & Options"
Easier management and provision of layout profiles by using the web service.
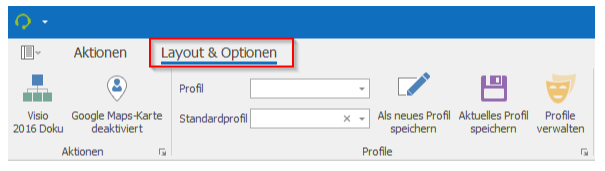
·Profile
Both your own profiles and global profiles of other users are available.
·Standard profile
This profile is used when opening the ticket window for the first time.
Save as new profile
Creates the current layout of the ticket window in a new profile.
Save current profile
Overwrites the selected profile with the current layout of the ticket window.
Manage profiles
Opens a window for managing ticket window profiles
Manage profiles
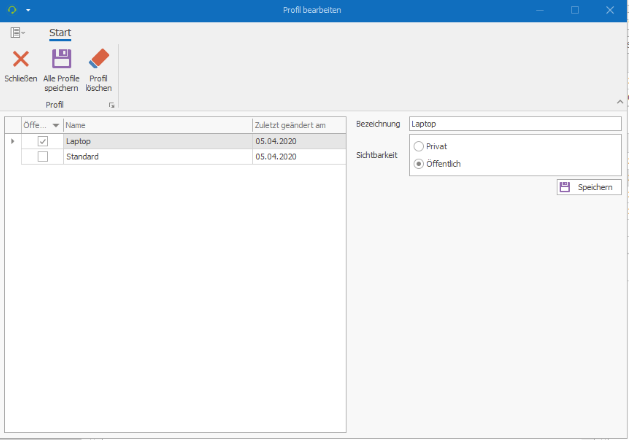
Designation
The profile can be renamed here
Visibility
Private profiles can only be used by the creator. Public profiles can also be used by other users but cannot be changed
Special notes:
The old system can still be used temporarily by activating it in the settings. However, old profiles cannot be transferred to the new system due to structural changes.
Application/case study:
1.Right-click on an element and then select "Customize layout."
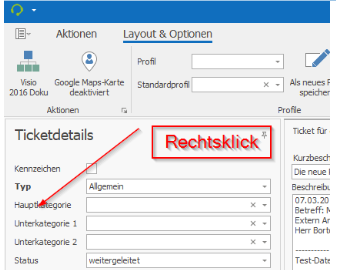
Since there are different context menus, it is best to right-click on a description text.
1.Arrange elements using drag and drop

To drag an element into the tab register, you must drag it to the center, for example. Please note the help symbols that appear when dragging.
1.
Click on "Save as new profile" under Layout & Options. Then choose a name. You can also make the profile public later under Manage Profiles.