%20(1).png)
VMA white paper
Note: "Virtual Mail Assistant" is abbreviated as VMA in the following text passages. Setup:
First, download the latest VMA.zip and the latest c-entron Agent Installer from the download area.
with the VMA Extension and the latest WebService, either directly as an installer or alternatively via the c-entron Update Manager.
NOTE: The VMA application and the VMA extension in the c-entron Agent must always be updated in parallel.
First, update the c-entron WebService to the latest version. Then update your c-entron Agent.
Now start the "c-entron Agent Configurator" in the main directory of the c-entron Agent. Click on [Open configuration] for the "VMA Service" extension. The WebService URL and a valid c-entron user with password must now be entered in the configuration.
NOTE: We recommend using a separate "VMA user" for this purpose and creating this user with the appropriate rights. Please also note that if Windows authentication is enabled, this user will also be created in your ActiveDirectory. In this context, you must also take into account your internal password policy regarding password expiration and adjust it accordingly in the respective modules when passwords expire cyclically.
The user stored here is entered as the ticket creator. They require the following c-entron rights:
Basic sales menu
customers
Complete request (optional for specific requirements)
Create new help desk
Show help desk
Edit help desk
Customers General
documents
Manage documents
Add documents
Virtual Mail Assistant
The interval specifies the pause in minutes between the processing of VMA workflows.
NOTE: We recommend a value greater than 5 minutes. A value less than 5 minutes can lead to overlapping workflow processing and multiple processing of emails when there is a high volume of mail. The minimum value here is one minute.
Then unzip the VMA.zip directory and install VirtualMailAssistant.
If the web service is accessible, you can start the application using "VMA.exe."
The first registration:
The WebService URL must now be entered in the start screen (without the extensions .../REST, .../SOAP, etc.).
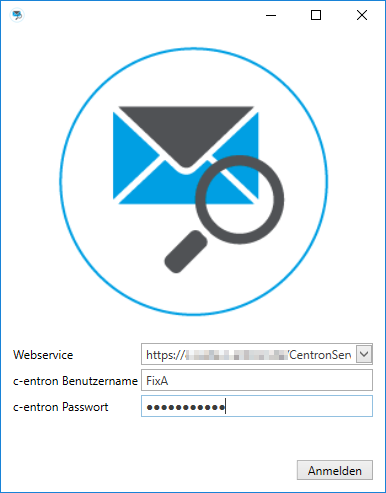
and username and password of a c-entron user with the appropriate permissions.
NOTE: The user used here to log in to the application is also used for the "Simulate" function. The workflow may therefore differ if the permissions differ from those stored for the user in c-entron Agent -> VMA Extension.
Upon successful login to the WebService, the file loginsettings.xml is created locally on the client under C:\Users\{username}\AppData\Roaming\c-entron software gmbh\VMA. This file contains all locally entered WebService URLs and also stores the last used WebService URL and the c-entron username.
If a "404 Not Found" error is displayed when attempting to log in, then the web service is not yet fully accessible at the time of login, there is an error in the web service URL, or the port on which the web service is configured is blocked (firewall settings).
If the message "The username or password is incorrect" appears, this is either due to an input error during login or because the web service you are trying to access is running on a database that does not contain the username in combination with the password.

After logging in, you must first create a [New Profile] under [Profile].
Name: You can enter a desired name for the profile here. Active: To use the profile, it must be set to "Active."
SSL: In some environments, a corresponding protocol must be selected here. This is usually done via "Automatic detection."
Mail URL: The IMAP mail URL is specified here.
Mail port: The IMAP mail port is specified here.
Email username: Enter the username for the email account to be monitored here. Email password: Enter the password for the email account to be monitored here.
[Test mail connection]: This allows you to check directly whether the IMAP mailbox is accessible. The timeout for the connection test is 120 seconds.
By clicking [Save], the profile is now stored in the database connected via WebService.
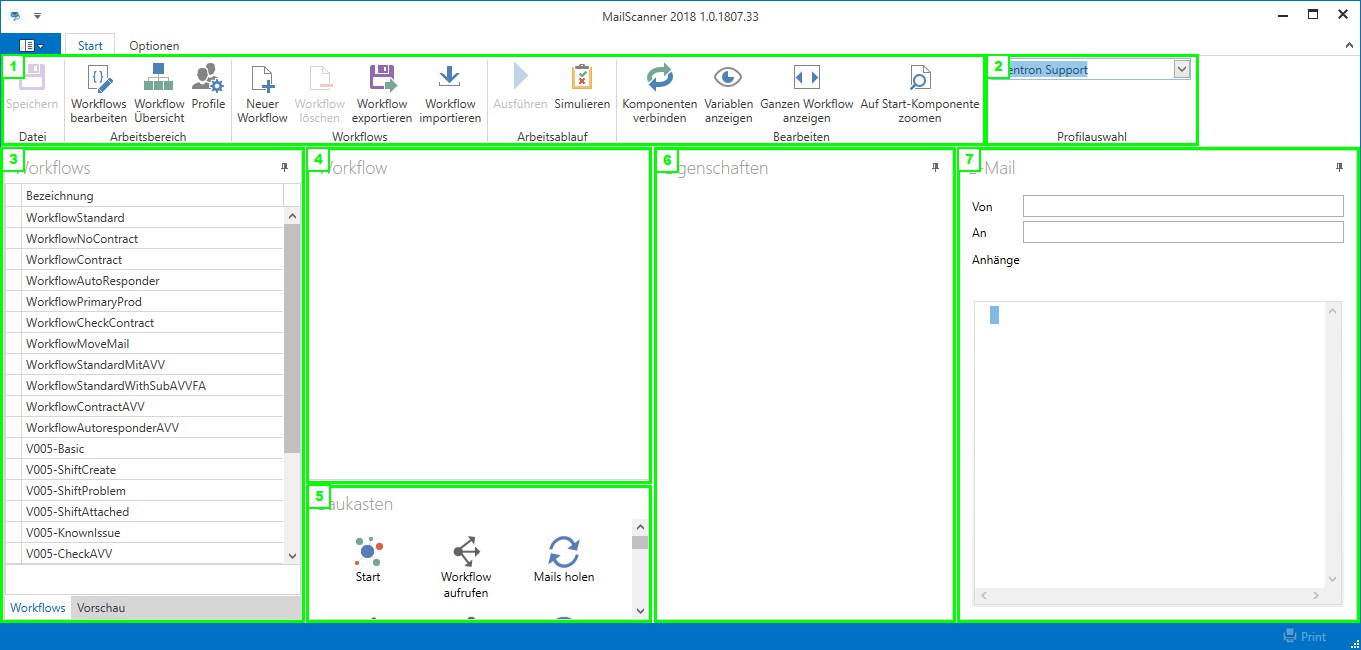
The surface:
The menu bar: Here you will find various functions that we will discuss in more detail later.
Profile selection: The profile whose mail settings are accessed
Workflows: All existing workflows are listed here.
Workflow: This is the editing interface for workflows.
Construction kit: This contains all the building blocks for the workflow processing interface.
Properties: The properties of the module selected in the workflow are listed here.
Mail: Preview of a selected mail for simulating workflows

The menu areas
File:
Save: Pretty self-explanatory, saves the settings and workflows you have set.
Work area:
Edit workflows: Switches to the workflow selection and editing area. Workflow overview: Shows all existing workflows and any links set between them.
Profiles: Profiles can be used to manage existing profiles and create new ones.
Workflows:
New workflow: Creates a new workflow
Delete workflow: After an additional confirmation prompt, irrevocably deletes the selected workflow from the database.
Export workflow: Generates an export file of the selected workflow:
NOTE: When exporting, destination directories, selected fields in "Change ticket," and/or
"Create ticket," etc. are not exported because, despite having the same name, they may differ at the database level.
Import workflow: This allows export files generated via VMA2018 to be imported into the database.
NOTE: Please note the information under "Export workflow"; not all fields can be imported.
Workflow:
Execute: Manually executes the currently selected workflow and, if applicable, any associated workflows. The permissions of the logged-in user are taken into account.
NOTE: Depending on the configuration, emails can also be sent to customers here.
Simulate: This simulates the progress of selected emails from a defined email directory in the selected workflow. The permissions of the logged-in user are taken into account. More on this topic later.
Edit:
Connect components: Enables or disables the connection between the respective components with a left click. Alternatively, components can also be connected at any time with [Alt]+left click.
NOTE: The default connection is "always" and can be set to "always," "successful," or
"...unsuccessful" should be set.
Display variables: Opens an extra window listing all available variables (please note the addition at the bottom of this document).
Show entire workflow: Reduces the display in the "Workflow" area so that the entire workflow is visible.
is depicted.
Zoom to start component: Aligns the workflow display so that the start block is positioned in the upper left corner.

Profile selection
Here, you can switch between different profiles in the interface, for example, to manage multiple mailboxes.
Create a new workflow
You can now create a workflow via [New Workflow]. This can be done at any time in its "Properties."
be renamed.
A grid now appears in the workflow, where you can drag and drop the desired modules from the
"Construction kit" added.
NOTE: Every workflow begins with the "Start" block. Unlike the "old" VMA, no
"End" building block no longer needed
The building blocks are connected to each other either with [Alt]+left click or with the menu function "Connect components" (toggle on/off) and then with a left click.
This is what a finished workflow could look like:
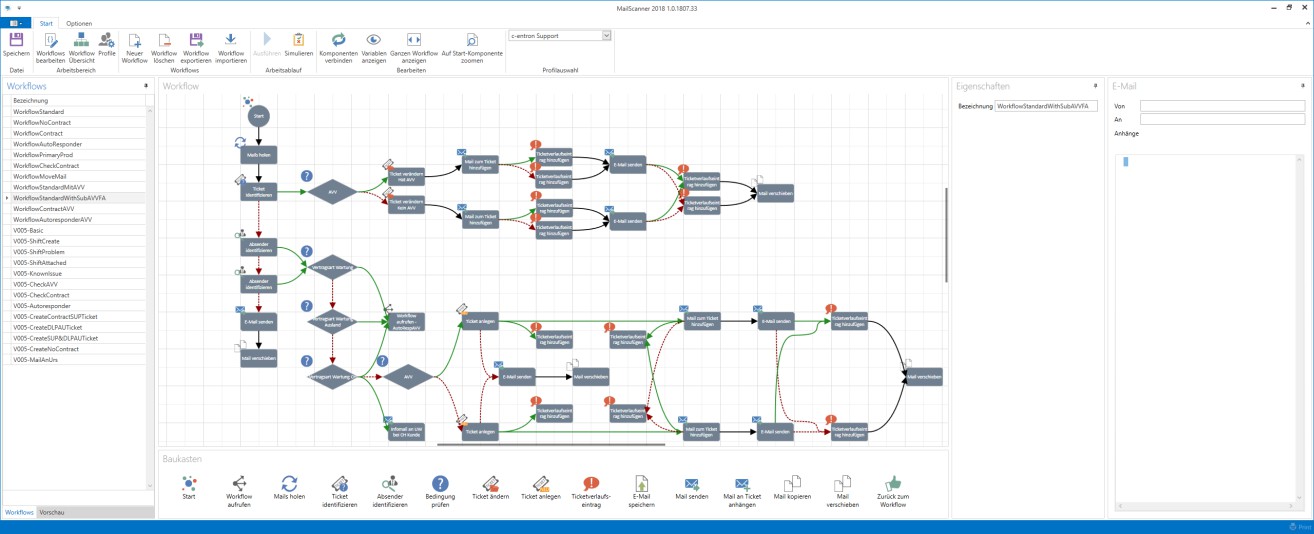
The function of the workflow shown would be as follows:
The emails are collected and the ticket is identified based on the subject line and/or the body of the email. A check is made to see whether the customer has an AV contract and the existing ticket is modified accordingly, e.g., status of the ticket, a history entry is set, the email is attached to the ticket, another history entry is set, the processor(s) are notified by email, and the original email is moved to a subdirectory, e.g., "Ticket attached."
If identification is unsuccessful, the sender is identified using a possible customer number in the email or based on the email address.
If the "sender identification" is successful, existing contracts are checked. If one of the condition checks is successful, the email is processed further with a corresponding sub-workflow and a new ticket is created. The email is stored with the ticket, the contact person stored in the ticket is notified that the request has been received, and the email is then moved to a subdirectory, e.g., "Ticket created." "Ticket created." If the condition check for the contract types is not successful, a check is made to see whether the customer has an AV contract and, if so, a ticket is created with a reference "No maintenance contract."
If the "sender identification" is unsuccessful, a stored email address receives a notification that there is an "unknown email" and the email is moved to a subdirectory, e.g., "Ticket unknown."
The compounds and their properties:
Black arrow => Type: Always This step is always executed.
green arrow => Type: ...successful This step is executed if the check/function
was "successful/found"
red arrow => Type: ...unsuccessful This step is executed if the check/function "not
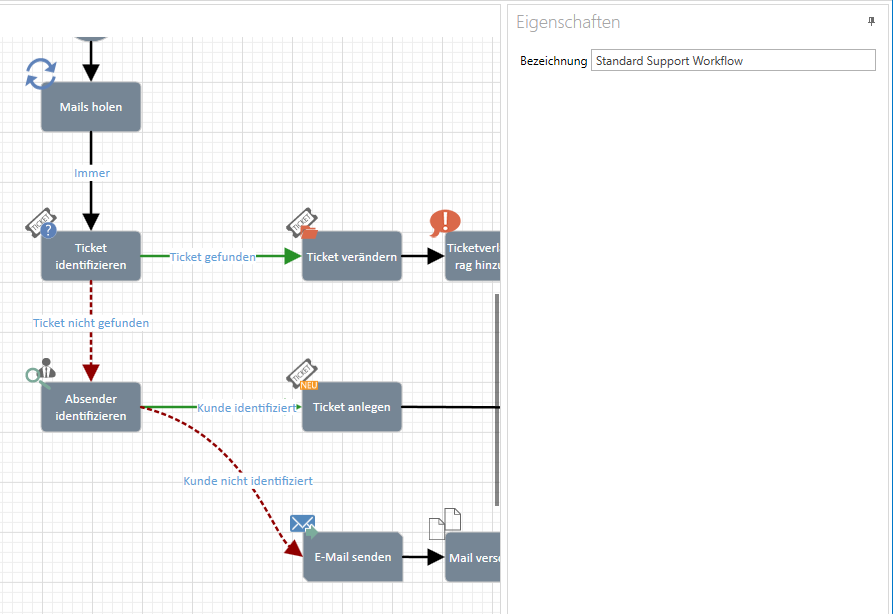
was "successful/found"
The individual building blocks and their properties
All building blocks can be individually labeled/designated using the "designation" field.
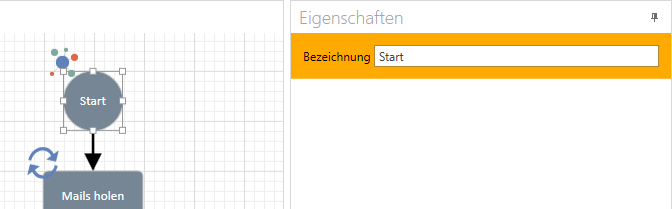
Start: The Start block marks the beginning of the workflow, even if workflows are interconnected/linked. It does not offer any additional properties.
Call workflow: This module allows you to link workflows together. In the
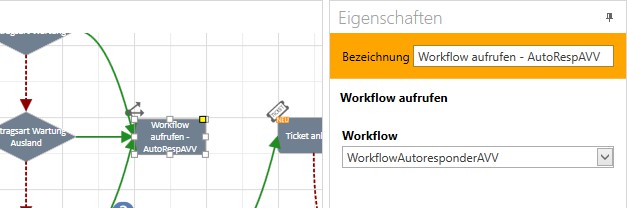
Properties of the building block, the "Target Workflow" must be selected in order to call it up.
This allows several "small workflows" to be nested within each other.
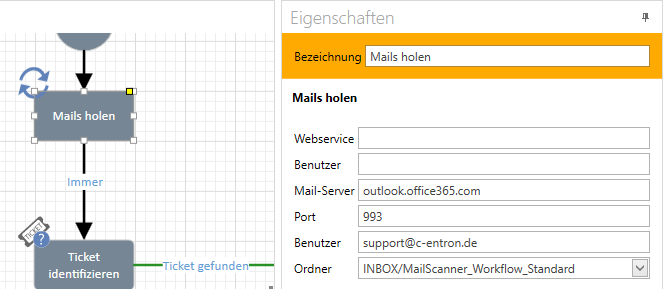
Retrieve emails: This module retrieves emails from the profile's mailbox. Here, you can or must define the directory from which the VMA should process the emails.
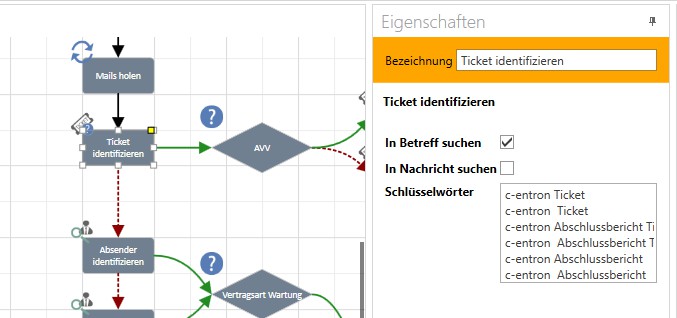
Identify ticket: In this module, the keywords are defined that will be used to search the email in the subject line and/or in the email body. In this module, the following 10 places are then searched for keywords by numbers, which must then match the ticket number.
NOTE: Multiple keywords can be specified; these will be treated separately.
Identify sender: If the "Search by customer number" option is active, the system first searches for the specified keywords in the subject line and body of the email. If one of the keywords is found, the following 10 digits are checked against an existing customer number. If successful, the default address and default contact person for the customer number are transferred. If no keyword is found or no valid customer number is found after a keyword, or if the option
"Search by customer number" inactive, a unique match for the contact person's email address is searched for. If this check is successful, the contact person found and the corresponding address are transferred.
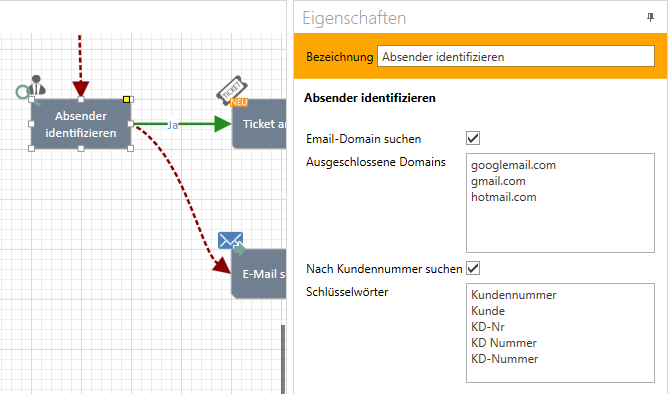
If the "Search email domain" option is enabled, the email domain is searched for in the event of an ambiguous match (domains stored under "Excluded domains" are not included in the search) and, if successful, the standard contact person for the standard address would be returned as the result.
CASE STUDY: Customer c-entron Software has only one contact person with the email address support@c-entron.de.
If you receive an email from support@c-entron.de Identifying the sender is clearly successful; the contact person is forwarded to Support.
If you receive an email from vertrieb@c-entron.de If there is no clear result, the domain @c-entron.de is searched for, which is then returned as the result. support@c-entron.de is returned as the result, meaning that the standard contact person for support is passed on.

Check condition: This block offers various conditions for checking.
CASE STUDY: After the "Identify customer" module, if the result is successful, a check should be made to see whether the customer has a specific contract type (in the example above, "quota contract"). If the check is successful, the contract type is passed on and can, for example, be assigned as the contract type in the following "Create ticket" module, or, if the result is unsuccessful, be used in the following ticket with a different priority or even different processors.
Modify ticket: Offers the option to modify certain fields in an existing ticket. Fields that are modified are adjusted accordingly in the ticket; unfilled fields are not modified.

CASE STUDY: Ticket is closed, customer responds to ticket closure, ticket is successfully identified => The status of the ticket is set to "open," all other fields remain unchanged.
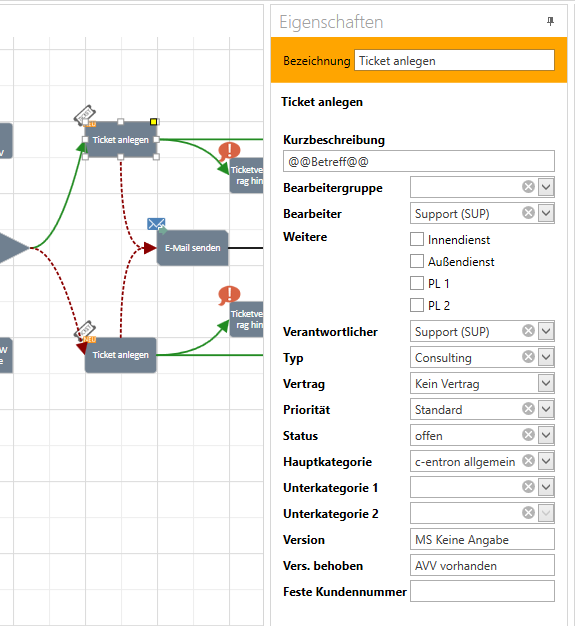
Create ticket: Creates a new ticket based on the template.
Short description: Specifies the short description of the new ticket.
NOTE: The body of the original email is always used as the detailed description of the ticket.
Processing group: Here you can define a group/department whose members are entered as ticket processors.
Processor: Here, a single c-entron user can be selected to be entered as the processor of the ticket.
Additional: In addition to "Processor group" and "Processor," you can also enter the customer's
Well-maintained IDM, ADM, Technician1 & Technician2 can be defined as processors Responsible person: Here, a single c-entron user can be selected to act as the responsible person.
is entered on the ticket
Type: The ticket type is preset here.
Contract: If a corresponding condition check is performed beforehand, a contract can also be assigned to the ticket. If this is an SLA (Service Level Agreement), the selected priority is ignored and the ticket is assigned the priority of the contract.
Priority: This defines the priority of the ticket (for exceptions, see "Contract"), and the priority in turn defines the due date of the ticket.
Status: The status of the ticket is defined here. Main category: Specifies the main category of the ticket. Subcategory 1&2: Specifies the subcategory of the ticket. Additional text 1&2: Specifies the additional text for the ticket.
Fixed customer number: Allows you to create a ticket for a predefined customer.
Add ticket history entry: This allows a history entry to be added to the ticket.
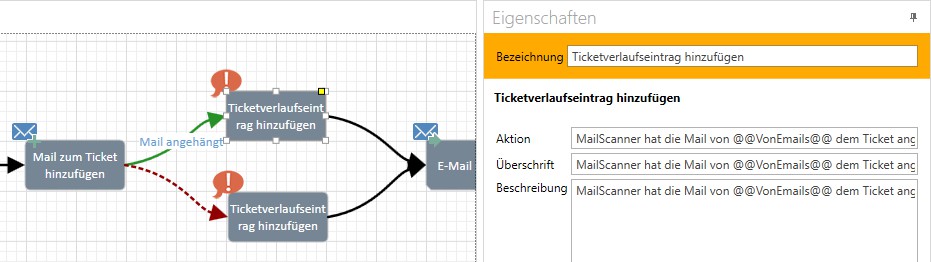
CASE STUDY: For traceability purposes, a history entry should be created if the email was successfully attached to a ticket, or another entry if the email could not be attached. Accordingly, the workflow could also take a completely different course, for example.
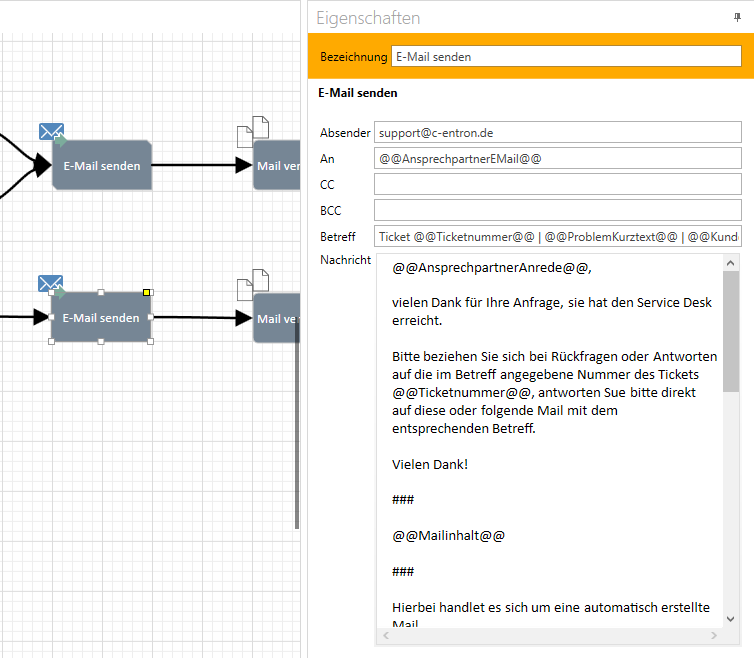
Send email: Attempts to send a corresponding email via the web service. The sent email is automatically attached to the ticket.
CASE STUDY: The customer sends an email and, after successful sender identification, a corresponding ticket is created and the customer/contact person at the customer receives a corresponding email according to the template. The sent email is automatically attached to the ticket.
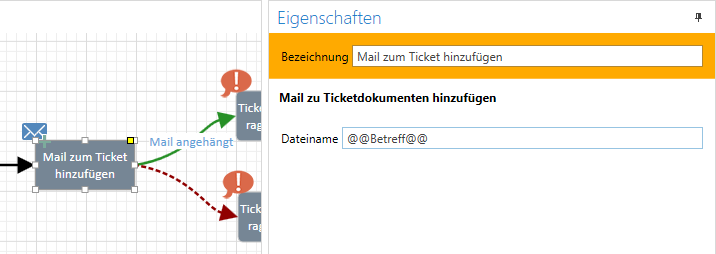
Attach email to ticket: Offers the option to attach the edited email to the ticket. Optionally, the file name of the email can also be customized here, e.g., to indicate that this was done by the VMA and not manually.
Copy email: A copy of the original email is generated with a new subject line.

and stored in the desired "target folder"
A possible application here would be separate mail archiving or another workflow that then processes the copied mail elsewhere.
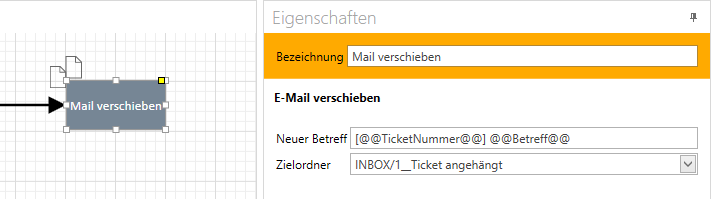
Move email: In most cases, this marks the end of the workflow that has been called up. The email is moved to the desired destination folder with an optional new subject line.
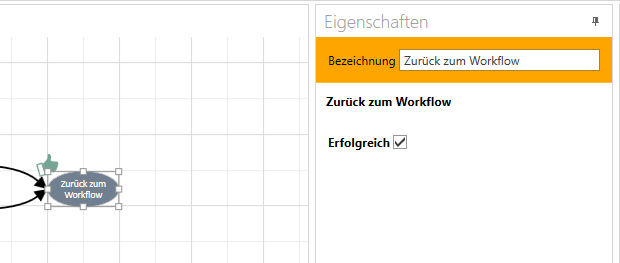
Back to the workflow: This module offers the option of returning from sub-workflows back to the calling workflow.
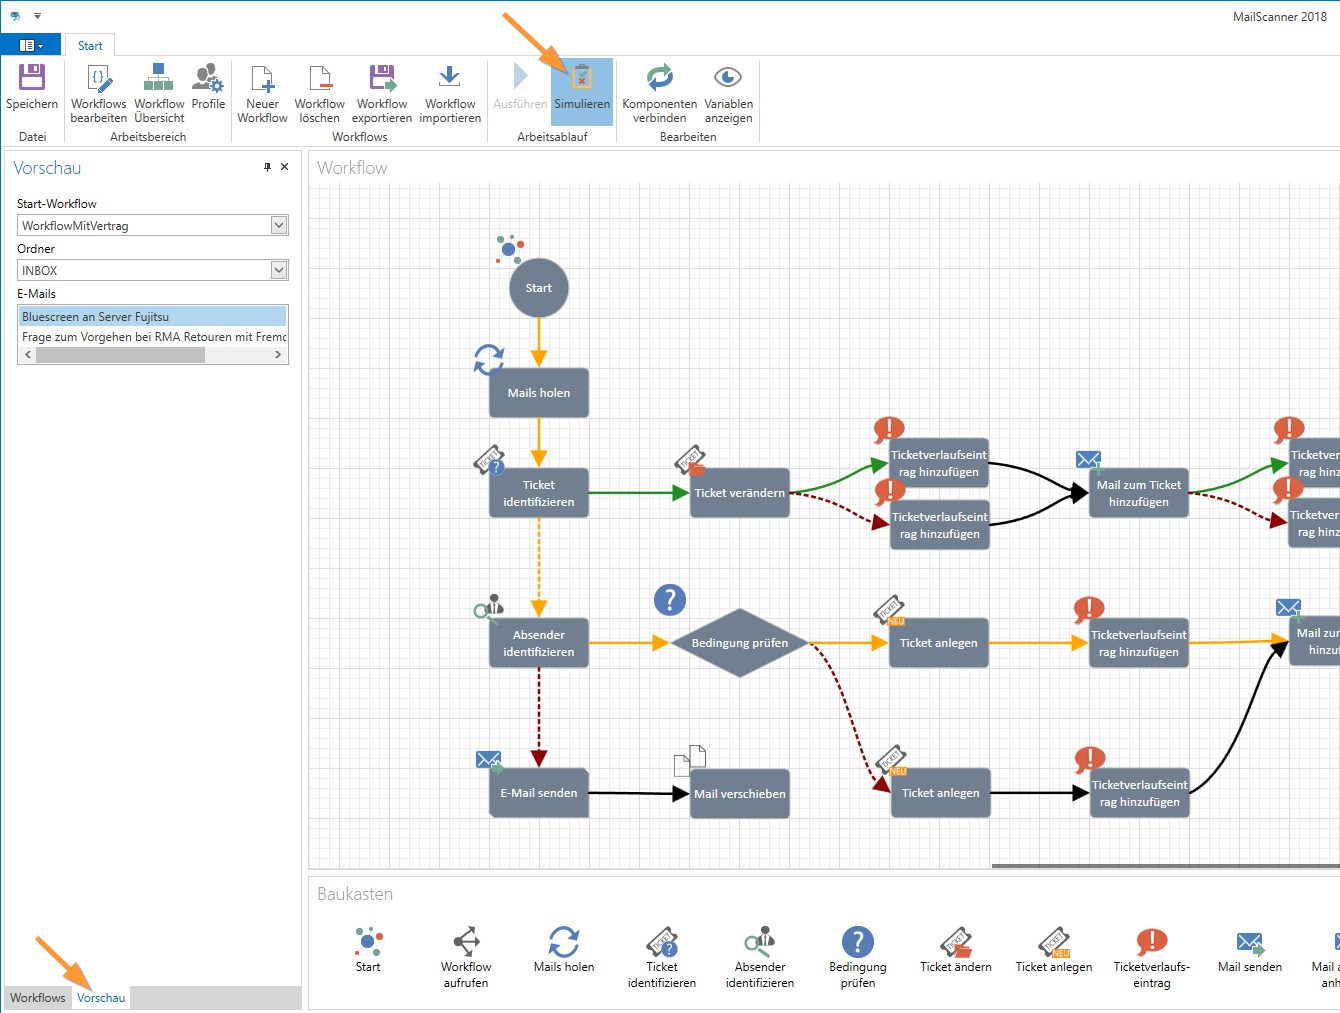
The "Preview" function
The "Preview" tab (bottom left) allows you to select a "Start Workflow" and a "Folder" in your mailbox, from which the "Emails" contained in that folder are then loaded. If you then use the function
When "Simulate" is activated, the expected progress of the selected mail can be displayed in the workflow (orange connection arrows).
e.g., "Sender identification" and subsequent "condition check" both successful:
Or "Sender Identification" successful, subsequent "Check Condition" does not apply:
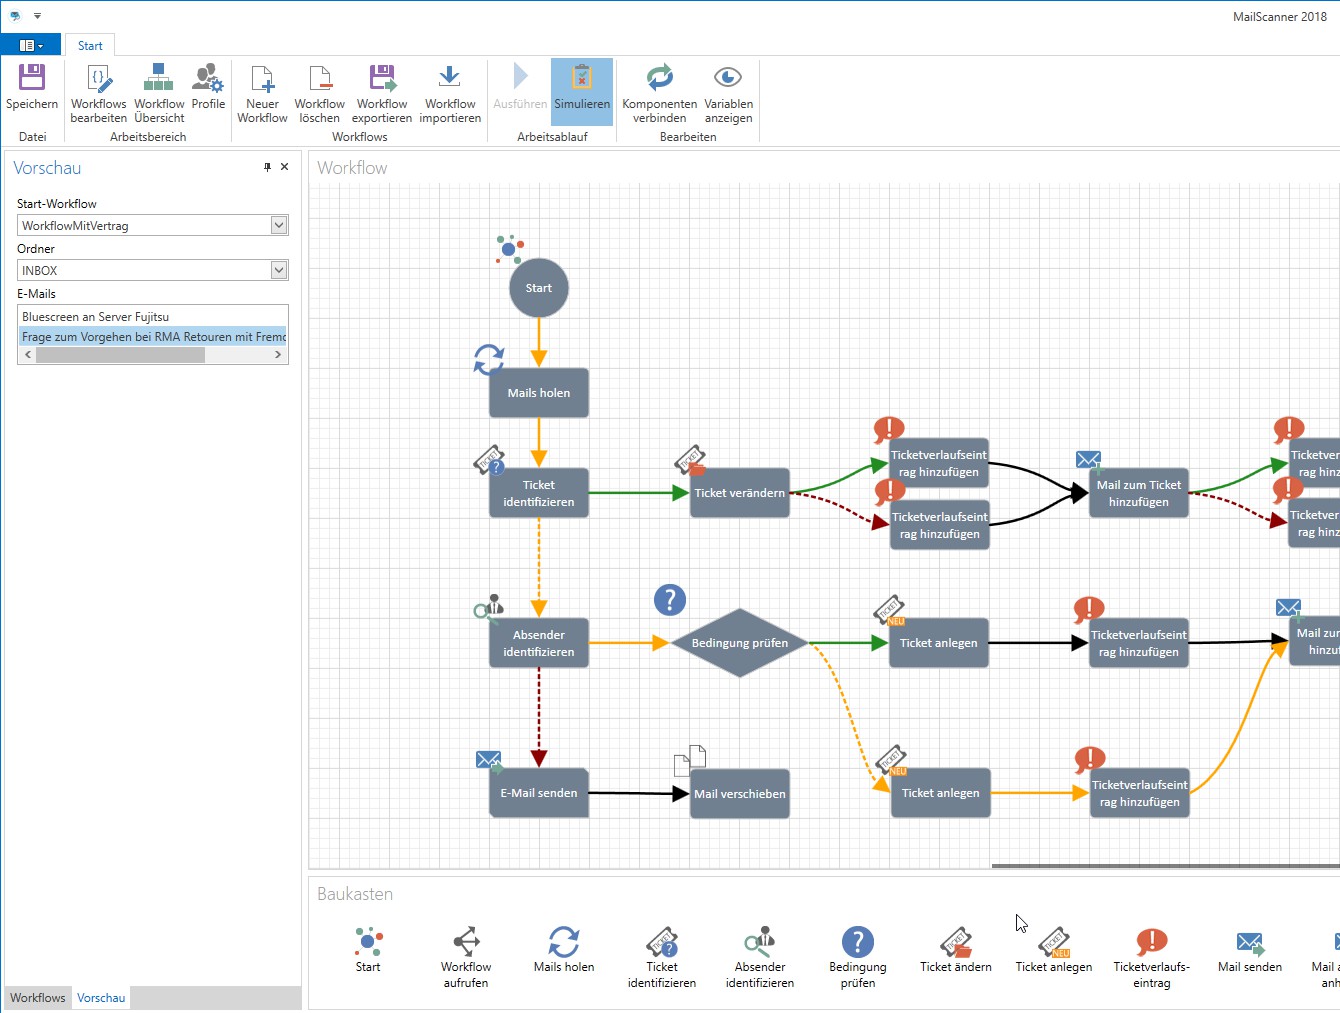
NOTE: After changing the folder, the "emails" for the simulation will be updated to the new directory/folder. Depending on the number of emails located there, this process may take several minutes.
Assign workflows to a profile
Using the "Profiles" menu item in the menu bar, you can drag and drop the desired workflow onto the desired profile:
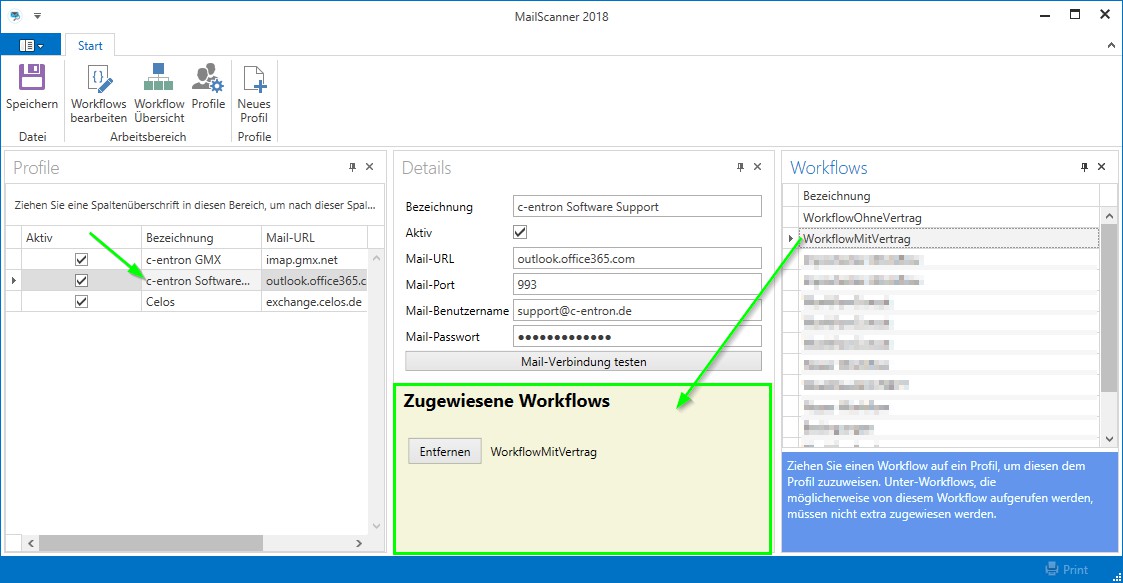
These "assigned workflows" are then processed cyclically via the VMA extension in the c-entron Agent.
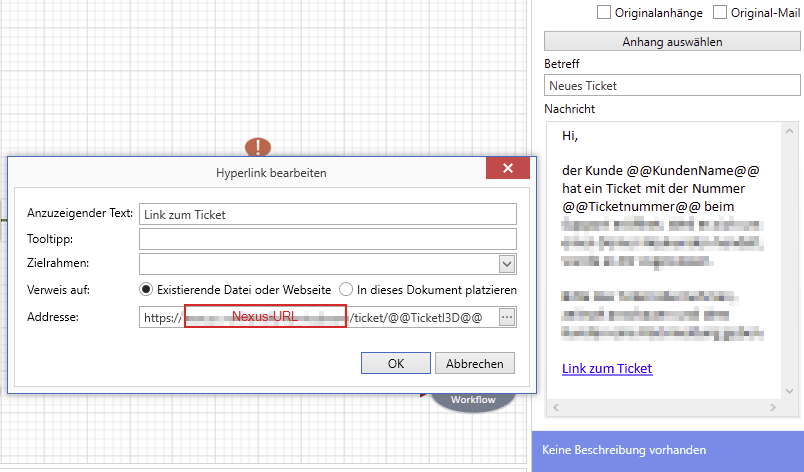
Addition to the available variables
There is a variable called "@@TicketI3D@@" that is not displayed in the list of available variables. This can be used, for example, to link the ticket in ServiceBoard(Next) in emails to the agent. The link should be structured as follows: "URL of ServiceBoard"/ticket/@@TicketI3D@@